
Oh Snap! The Ultimate Product Photography Guide
by Cydney Hatch


Did you know that people remember 80% of what they see, and just 20% of what they read? The power of an image is hard to ignore, and if you’re not including great images of your products on your ecommerce website, you could be missing out on some serious sales.
The truth is, the better your stuff looks, the more you will sell. So why aren’t you taking photography more seriously?

You can learn the skills you need to promote your business well—whether you’re snapping shots with a smartphone in your kitchen or managing a photo shoot with all the fancy stuff! In this article, you’ll learn everything you need to create quality product photography and before you know it…OH SNAP! You will be a pro! Let’s take a look!
Why Product Photography Is Important
The perceived value of your products and the trustworthiness of your brand is often judged on the quality of your visual content. That means having high-quality, beautiful product photography can go a long way towards driving sales for your business.
Think about the last time you were shopping online and came across a bad product photo.
Maybe the image was dark or out of focus. Maybe you couldn’t figure out how large the product actually was or you weren’t sure what color it would actually be. Maybe there was so much going on the photo that you didn’t know what item was actually for sale.

Odds are, you didn’t buy that item.
Unlike shopping in a boutique or a department store, when you browse online, you can’t pick up the product. You can’t touch it, hold it in your hands or feel the texture with your fingers. All you have is the photographs to base your buying decisions on.
As a shopper this can be scary, so it’s your job to put them at ease with great photos and descriptions.
However, not everyone can afford a professional photography studio, models and equipment—especially when they’re just starting out. DIY product photography provides a great alternative and—as long as you know the proper tools and techniques—taking compelling product photos is well within your grasp.
Types of Product Photos
Before we talk about specific kinds of product photos, let’s talk about the basic functions of product photography.
As stated above, in order to make a purchase, customers want to be confident in what they are buying. Product photography that illustrates all facets of your product helps shoppers make confident, well-informed purchases. Here are a few of the things a great product photo can accomplish:
- It is eye catching and makes them want to buy or click on your product
- It is clear and communicates important information about the product
- It has purpose, emotional connection and stylization that represents your brand
- It helps them visualize what it would be like to own and/or use the product in their personal lives.
Different photo styles can convey a variety of different information about your product. By mixing and matching from the below photo types in your ecommerce storefronts, you’ll give shoppers a well-rounded understanding of your product…which means more sales!
1. Studio
Studio shots are the “meat” of your ecommerce product photography. These are shots of your product on a plain background with plenty of light to highlight and give your customers an easy glimpse of your product.
Studio shots are a bright, clean and simple way to show potential customers what you’re selling. The clearness, lighting and simplicity are really what will draw in your customers, especially when they’re looking at thumbnails.
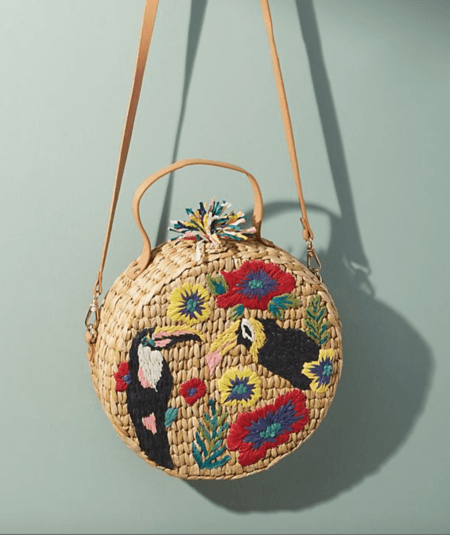
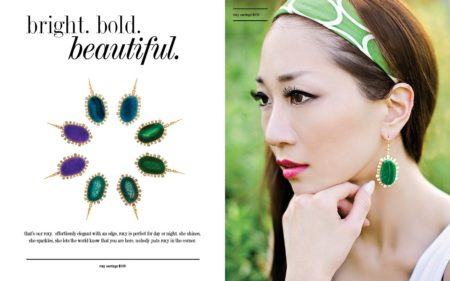
White or solid backgrounds help bring out textures, depth and details of products. However, your background does not always have to be grey and white, the key is simplicity. Anthropologie consistently dabbles with color and simple backgrounds to showcase their clothing and products.
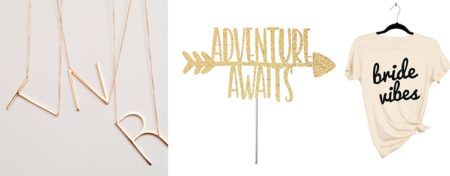
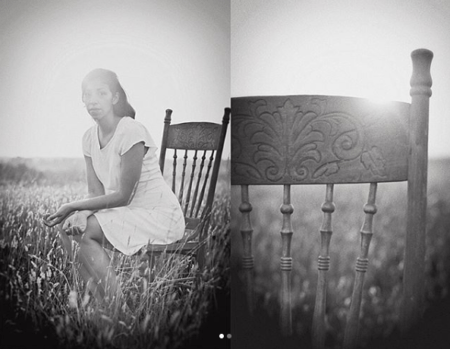
Compare the photo above (taken with studio lighting) to the photos below. In the images below, the idea is nice, but the products get lost against the background. The green earrings are hard to see against the green leaves and the bright background pulls your eyes away from product.
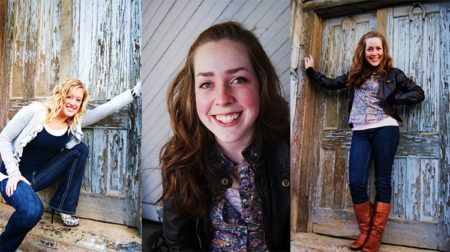
Similarly, the cupcake shirt gets lost in the texture of the hay, grass and the pumpkin. On top of that, the way the shirt is folded, it’s hard to tell what the product is. Is it a towel? A washcloth? A shirt?

Like these bad examples, it’s usually good to have a few simple studio photos that show your product beautifully by itself so customers can “see” it. Clear photos help set a realistic expectation of what a customer will be receiving in the mail. Photos like this will greatly reduce your returns and exchanges as you were clear upfront with your customers.
Next, if you want to dabble with fun backgrounds and styling, let’s learn about Lifestyle photos.
2. Lifestyle
Lifestyle shots are the photos that help inspire your customers to purchase and make them feel like they “need” to have the product in their own personal lives. I call these the “Steve Irwin” of product photography because you are showcasing your products in their natural habitat—the way they are intended to be used/look.
This inspiration style of photo is why social platforms like Pinterest do so well. You are setting up products in a visually appealing way to help sway shoppers to make a purchase from your store. With Lifestyle photos, it is important to be thoughtful with your styling—which we will talk about in a later section.
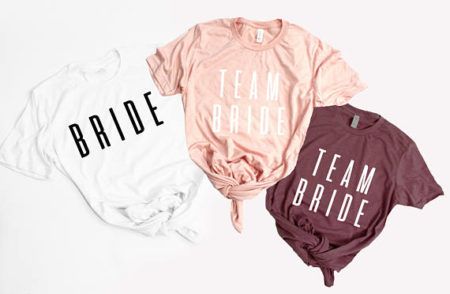
Below are some examples of strong Lifestyle photos businesses could pair with the other product photography images.
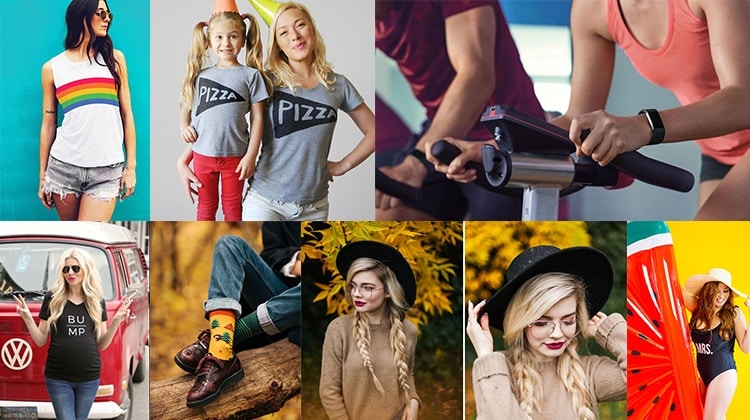
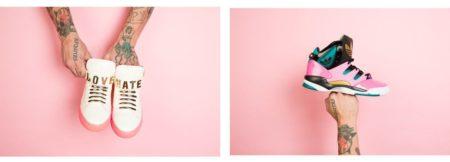
So as we look at these examples, it’s easy to imagine what it would be like to wear the apparel, fitness watches or accessories on a future vacation, during the upcoming season or to a specific date.
The matching pizza shirts could inspire a mother to get a shirt for her and her daughter to wear to an upcoming party. An expecting mother would have little trouble imagining herself in this baby bump shirt. It’s easy for any future bride to picture herself wearing this “Mrs.” swimsuit on her sunkissed honeymoon!
If styling is tough for you, you can always take a more simple approach to Lifestyle product photography. The simple definition can be that you have a product worn or used by a model. This at least helps customers see how the products are worn, how they fit, how they scale to a human body, etc. Depending on what you’re selling, simple can actually be better!
 Lifestyle photos help potential customers visualize the product in their own life. Once they picture themselves wearing or using your product, it gets a lot harder to say “no” to buying it.
If you want to go the extra mile in selling your products with lifestyle photos, try pairing items to encourage additional purchases.
Here’s a quick example:
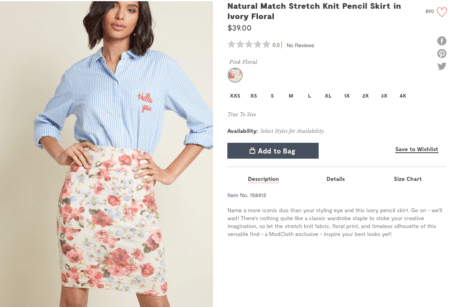

This approach helps someone who isn’t the best at putting outfits together to see how your dress, bag, and earrings go together beautifully. That way, instead of buying the products separately, they might buy all the products in your image so that they can get the same”look” seen in your photo.
Unfortunately, Modcloth above does not have their items featured together on the same page for easy group purchasing, but you can design your ecommerce website to have a feature showcasing also worn items in your lifestyle product photography!
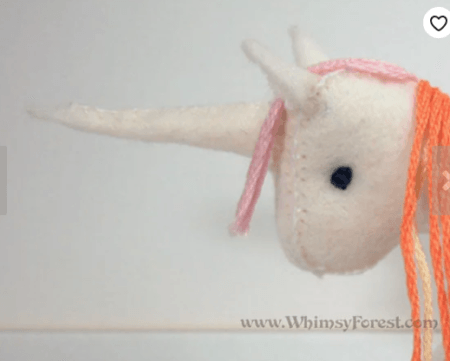
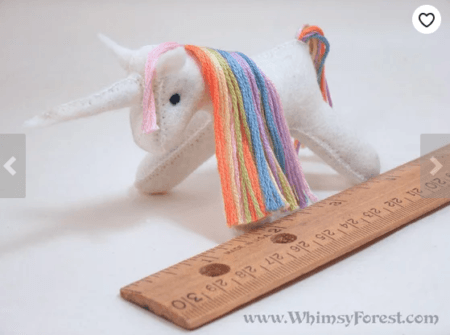
3. Scale & Details
This will be one of the more helpful product photography types you will include on your ecommerce site. A scale photo of your product is one that visually communicates the size of your products.

Since customers cannot pick up and physically see your items like they would in a brick and mortar shop, photos like this reassure your shoppers that the product will be what they expected. This again helps with returns and exchanges, which can help save you money!
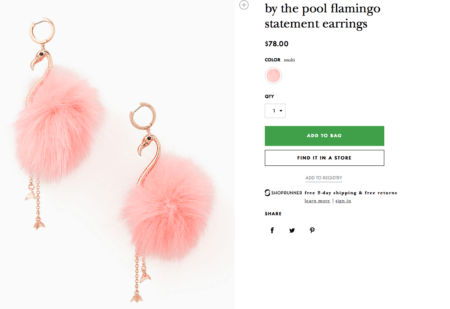
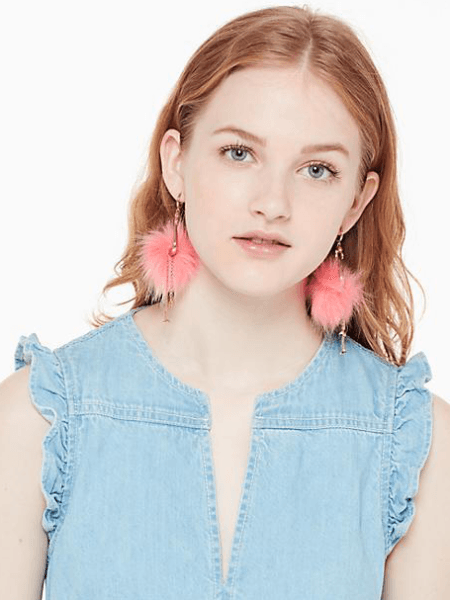
For example, above, Kate Spade has these quirky flamingo earrings. Looking at the studio photo they are puffy pink balls of fluff that could potentially take over your face. Looking at a studio photo alone will not help a customer visualize the size and “wear” of the product, Kate shares a scale photo to give potential customers a sense for what these earrings actually look like on a person.
Showing scale in your product photography helps put your customers at ease. Does the vase hold one flower or a whole bouquet? Does that gemstone set in that ring totally overpower the hand? If a customer has to question the sizing, shape or wear of a product, they’re a lot less likely to buy.
Now, not every product needs a photo showing every aspect and dimension. A detail shot is a close-up photo that highlights your product’s features.
So for example, this EtnoDesign ottoman pouf shows great lifestyle product photography, scale and detailing.
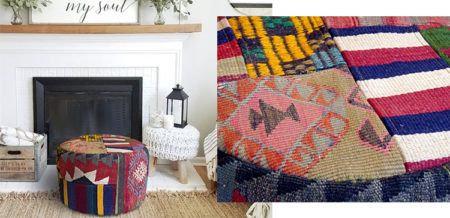
This company placed the pouf in a home setting that simultaneously provides viewers with a Lifestyle feel and shows meaningful scale by setting the pouf near a fireplace, small chairs and a couch.
EtnoDesign further assures the shopper of quality by showing an up close product photo of the fabric. In this photo, a customer can quickly tell the pouf is covered by a woven, high quality knit—not just pattern printed. This can help them rationalize and understand the listing price because it is a higher quality product. This is why sharing details and scale is so important!
4. Group
Group shots are pretty straight forward. All you have to do is group a few products together.
Group shots are especially good for documenting products sold in multiples, such as sets of custom shirts, cookware, sets of bowls or silverware, etc. You can also use group product photography to show the variation of different colors, finishes or materials you offer for purchase.
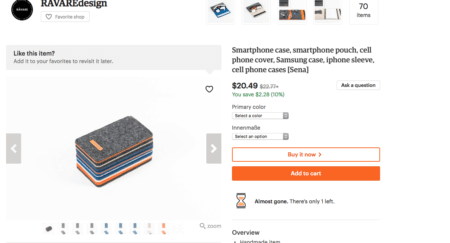
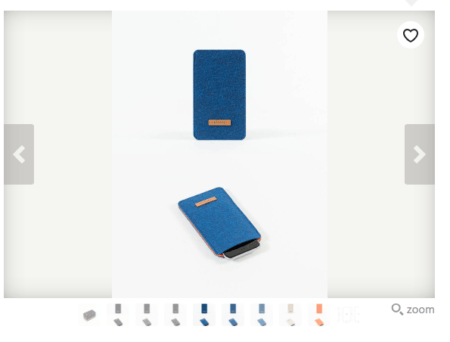
In the photo above, RAVAREdesign shows all of their iPhone cases stacked and then has individual studio photos of each color variation in different angles. Like this, you too can create grouping photos that share a lot of information in just one photo!
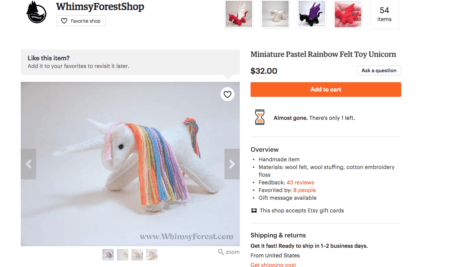
BONUS: Authenticity & Quality Assurance
People crave “behind the scenes” and “process” product photography and content. We live in a world where people question a lot, so creating a sense of authenticity through your product photography is always a good idea.
An authenticity shot can really emphasize the level of workmanship that went into a particular item and share the quality the company takes in creating items. These types of shots are also handy for promoting your business on social media.
An example of this is Jesiii who paints handmade home decor.
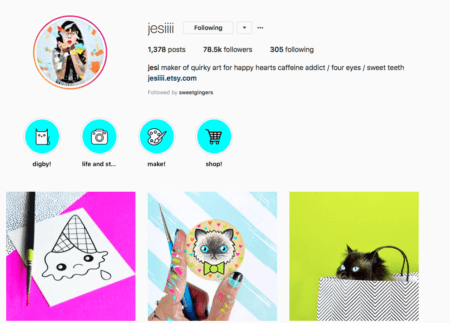
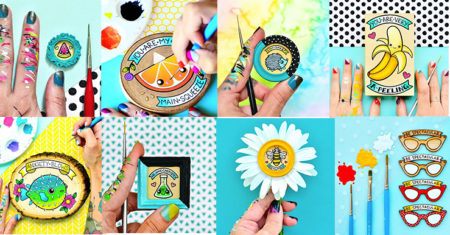
She does a great job on her site and social media pages of sharing quality, stylized and unique product photography that really reach out to her audience. All of her photos give you a sense for her “handmade” quality using paintbrushes, her paint ridden hands and her attention to detail.
If I was a customer looking for adorable, handpainted wall art, I would definitely trust her expertise as her photos put me at ease!
A different example of using product photography to generate a sense of “authenticity” is Project Made With Love’s bracelet photos. Project Made With Love shares emotionally authentic photos of their products in addition to their scale and studio pictures.
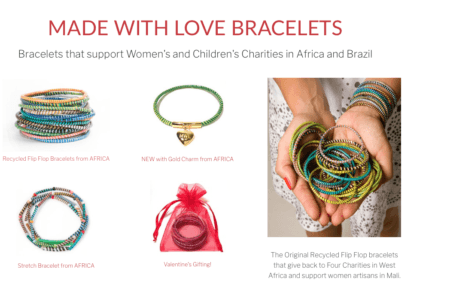

Sharing the communities involved with these bracelets helps inspire customers to want to buy and support those people. By seeing where the products are coming from, customers might have a stronger desire to purchase from you rather than getting a cheap bangle from China…people want to know where their products are coming from!
You too can create a sense of authenticity with your customers by sharing process shots, behind-the-scenes images and supplementing these photos with other content pieces on your site.
Overall, combining several photo types is one of the best ways to use product photography to win over potential customers. Quality product photography drives sales, so you need to make sure you take advantage of as many opportunities as you have to show your products off!
Choosing Your Camera and Equipment
Now that you understand product photography types, let’s talk about how to take’ em and dig into camera details and tips!
Not sure what equipment to use to get the best shot? That is okay! In this section, we will go through all the basic things you should know about cameras as well as other accessories that can help elevate your product photos.
Even if you can’t afford a high-end camera, you can still create beautiful, high quality and consistent product photography that will significantly add to your ecommerce business. Let’s take a look at the types of cameras you will see and the many cool thing-a-ma-bobs you can add to your camera gear!
Digital Cameras
There are a few options you will see at a tech store: Compact, Mirrorless, and DSLR. All of them have their pros and cons but ultimately I have come to find it all comes down to user preference, usability, quality control, creativity and price point.
Compact
Compact cameras or better known “point and shoot” cameras come in a lot of different options ranging from fully automatic to limited manual.
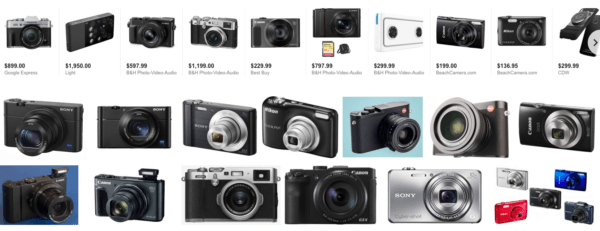
Compact cameras are more afforable than higher-end cameras like DSLRs and mirrorless cameras so these are a great option for ecommerce business owners who have a tighter budget.
Portable and simple to use, compact cameras have more automatic modes and built-in settings (called “presets”) than smartphone cameras. There will be minor learning curves because many presets take the camera calculations out of your hands, but compact cameras are a good way for beginners to get comfortable with a camera and practice before investing in a more expensive camera.
A compact camera with at least 10 megapixels and a macro setting is a great way to capture quality, detailed images with basic depth. These photos can then be downloaded into basic photo editors or the camera bridge program that comes with the camera.
The only downfall to a compact camera is that you are seriously limitation in your manual settings and photo manipulation options. Even though camera abilities are limited by your aperture (blurry background photo manipulation we will talk about later in this article), you can still do some decent product photography with a compact camera.
The flash on compact cameras is honestly the only true AWFUL feature of compacts because they are so close to the lens. This can severely affect your image quality. When the flash is right by the lens, it shoots light forward parallel to the lens, which makes white light wash out appear in your photos.
Fortunately, as seen in this photo by Big Street Guns, diffusing the flash light source can really soften the flash light appearing on your products.
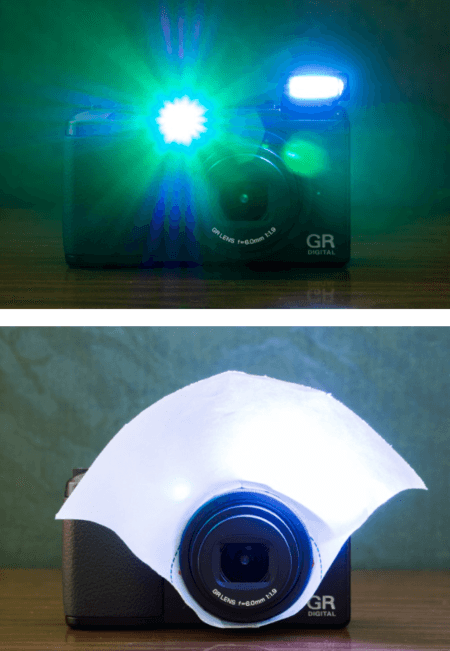
Diffusing your flash cuts down on harsh light and product photography wash out. There are many ways you can soften your compact camera flash as seen in these photos and this video tutorial below:
Remember, it’s easier to fix under exposure in a photo editing application than it is to fix over exposure—you can rarely fix over exposure—so err on the side of under exposing things. Trust me!
Compact Cameras I Suggest:
- Panasonic TZ100 / SZ100
- Canon PowerShot G7 X Mark II
- Fujifilm X100F
- Panasonic LX100
- Sony RX10 III
- Leica Q
Although compact cameras have a lot of presets, automatic actions and come at a great price point, they do have a lot of limitations that really limit your product photography capabilities, so let’s take a look at the next step up: mirrorless cameras.
Mirrorless
Like compact cameras, mirrorless cameras do not use mirrors to capture an image and actually allow light to travel and directly hit the image sensor. The image then appears on to a rear screen or electronic viewfinder (EVF).
Since these cameras do not have not require a prism or mirror to function, this camera is compact and light to hold! The reason why this camera is the step up from compact cameras is they have more manual capabilities than a compact camera with lens options (similar to a DSLR).
For a beginner, these cameras are slightly less complex to navigate than a DSLR, so if you are looking for the good “in between option”, mirrorless cameras might be for you!
Mirrorless Cameras I Suggest:
- Fujifilm X-A5
- Panasonic Lumix DMC-GX85
- Sony – Alpha a5100
- Canon – EOS M100
- Fuji-X-M1
- Olympus E-PL7
- Panasonic GF7
- Samsung NX3000
Now, let’s move on to the best option which is the king of photography, DSLRs.
DSLR
Digital single lens reflex (DSLR) cameras have interchangeable lenses and max manual setting capabilities. I mean, some of the film winners of the Sundance film festival were shot with these cameras! It is quite impressive!
To take a photo with a DSLR camera, light passes through the lens to a mirror that reflects the image into the viewfinder so you can preview the shot. When you press the button to take a photo, the mirror flips up, the shutter opens, and light hits the sensor, capturing the image.
Cool, huh?
DSLRs come with a significant learning curve, especially if you change your settings from automatic to manual. You will need to take time to learn the science and mathematics of photography.
The manual controls and options for camera lenses and accessories are huge, making it easy to use these cameras in many different situations, including in low light. With larger image sensors that take in more light and allow for higher pixel densities, these cameras generally produce sharper, higher-quality images than compact or mirrorless cameras.
You buy a DSLR body and then you add the different lenses which will also bring new capabilities to your camera body. Lenses are the true investment.
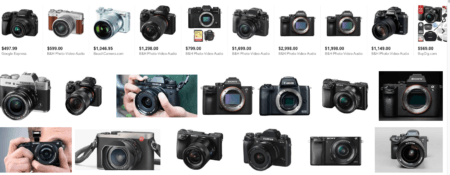
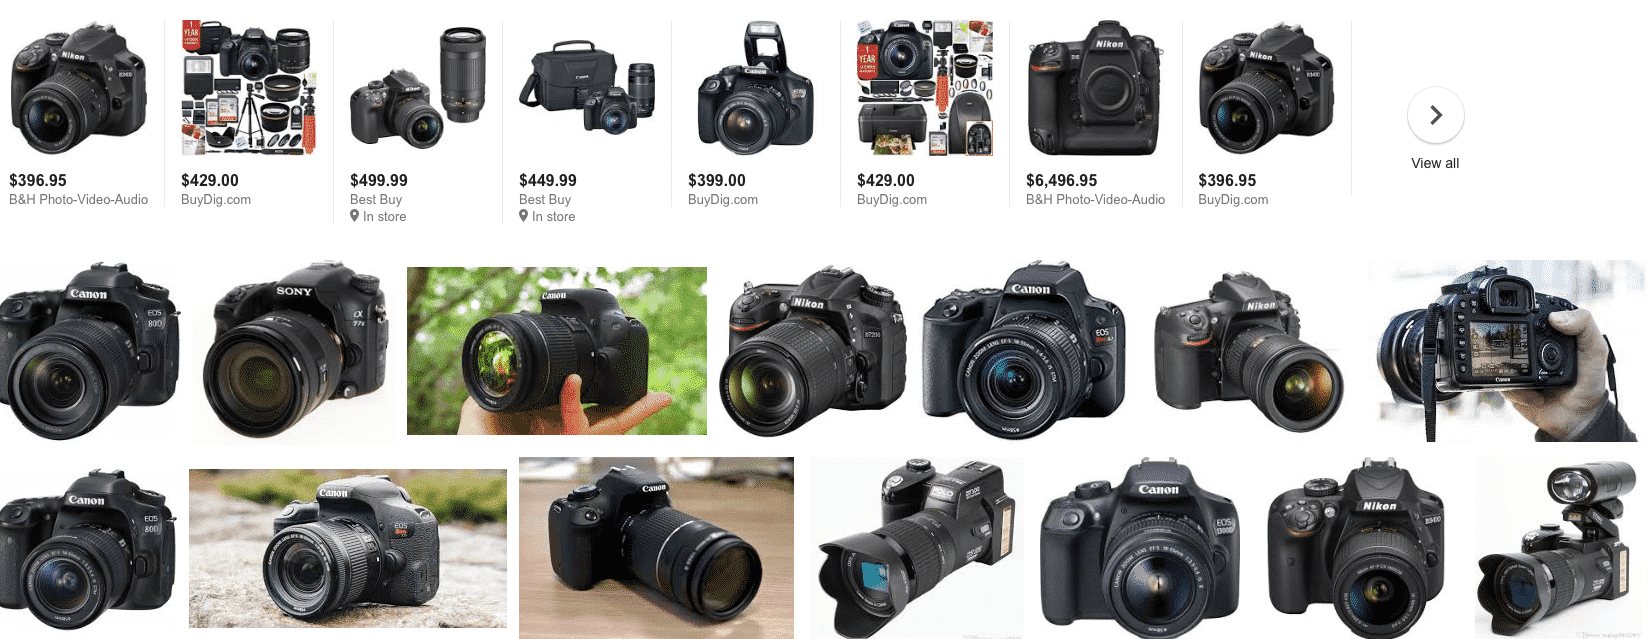
The downside to DSLR is just that, lenses and building your camera “family” is expensive. DSLRs can get pretty pricey and you will need to commit to a DSLR maker as its truly an investment and the accessories are not interchangeable from one to the other. The two main DSLR makers I suggest looking into are Canon and Nikon as they are the dynamic duo”kings” of the DSLR camera world.
Now comes the BIG and GREATEST debate of DSLR camera: Which one do I choose?
Many people ask me which DSLR model they should invest in and honestly, my first piece of advice is to focus on your personal preferences! Go to the store and pick up both models, Canon and Nikon, and see which one feels better and is more user-friendly.
Both are a fantastic option, but one of the biggest determining factors is what you feel comfortable with. Don’t look at specs to begin with, just pick up a few cameras. Each brand has its strengths and weaknesses, but they are both fantastic options. Just know that once you pick one or the other it’s an investment moving forward.
Also, keep in mind if you’re buying your first DSLR, it may make sense to buy it as a kit, which generally includes the camera body along with an 18-55mm lens. Often referred to as a ‘kit’ lens, this covers a pretty broad zoom range, perfect for almost every photo setting you will find yourself in!
From there, you can build your lens “family” to get the effects and capabilities that you want.
Canon
- Canon EOS Rebel T7i / Canon EOS 800D
- Canon EOS Rebel T6i / Canon EOS 750D
- Canon EOS Rebel SL2 / Canon EOS 200D
- Canon EOS Rebel T5i / Canon EOS 700D
- Canon EOS 5D Mark IV
- Canon EOS 6D Mark II
- Canon EOS 80D
Nikon
- Nikon D3300
- Nikon D5600
- Nikon D3400
- Nikon D500
- Nikon D7500
- Nikon D850
- Nikon D5
If you want something a bit different, look at Sony cameras or Olympus, particularly the Olympus OM-D E-M10 Mark III.
Can You Shoot with an iPhone?
People ask my opinion on iPhone photography and all I can say is, it has come a long way! iPhones have a lot of quality photography components that can make your product photography pretty dang amazing.
I mean look at this photo comparison of a Nikon & IPhone shooting this dress shoe:
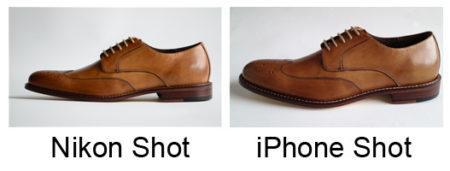 If the two photos weren’t labeled, you probably would have thought they came from the same place, eh? So, if you are on a tight budget, on the go or wondering if iPhone product photography is here to stay, let’s take a look at some of these points and tips for successful iPhone photography.
To start, Holly Castro created an awesome tutorial on some of the things I will discuss below:
As seen in her video, a lot of the same principles of studio photography you use with real cameras will apply. Make sure you are focusing on proper lighting, backgrounds and a lot of the same principles and your iphone camera will do the rest.
Some of the features you will want to dabble with include:
iPhone 8 and iPhone 8 Plus Camera Specs
- The iPhone 8 has a single 12-megapixel camera with an f/1.8 aperture.
- The iPhone 8 Plus has dual 12-megapixel cameras. The wide angle will have an aperture of f/1.8, while the telephoto will have f/2.8.
- The iPhone 8 and iPhone 8 Plus both have optical image stabilization, or OIS, which helps reduce motion blur due to camera shake.
- The iPhone 8 Plus has a feature called “Portrait Lighting,” which is designed to digitally simulate various lighting conditions for portraiture work. It also allows for strong aperture to be used in portrait mode which will give depth to your photos.
- The iPhone 8 and iPhone 8 Plus can both shoot 4K video at up to 60 FPS, and slow-motion video at up to 1080p and 240 FPS.
iPhone X Camera Specs
- The iPhone X has nearly the same camera specs as the iPhone 8 Plus, with a dual 12-megapixel setup, f/1.8 and f/2.4 apertures. Note the iPhone X’s telephoto lens opens a bit wider than that of the iPhone 8 Plus.
- The iPhone X has dual optical image stabilization, resulting in even less motion blur.
- The iPhone X enables Portrait Mode with selfies, allowing for a blur effect that improves self-portraits.
- The iPhone X’s 5.8-inch “Super Retina” OLED display should serve as a bigger and more vibrant viewfinder and frame for your photos and videos.
Your iPhone camera modes will typically be:
- Grid: This allows the rule of thirds to come to life as a grid system appears on your iphone camera live screen to help you position items creatively.
- Live Exposure: This allows you to read your camera’s auto exposure settings as the camera adjusts it. It is good to take note of your exposure settings just in case you need to change them later.
- HDR Quality: It is very important that you set your image quality to High so that your smartphone can help you create the best images possible.
- Lighting: If you have a newer iPhone, there are tons of lighting options to choose from in portrait mode including: natural light, studio light, contour light, stage and stage light mono.
How to Creatively Use Your iPhone
If you still arent sold on using your iPhone for your product photography there are fun stories like Street artist and photographer Philippe Echaroux who used his Iphone, a flashlight, plastic straw and a Big Mac Box to create luxury lighting for his photo project.
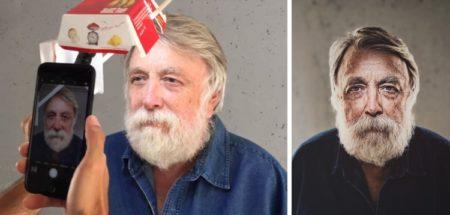
The results were incredible. So, since this kickstarts the discussion, here are a few ways you can hack at making quality product photography using your Iphone.
Use Panoramic Creatively
A lot of the time people only use panoramic from side to side but you can also use it going vertically. Start with the arrow pointing downward and snap a shot vertically with all the elements you want not getting cut off!
Use Burst
If you want to take a series of photos in quick succession, just hold down on the shutter and it’ll rapidly take one photo after another until you let go
Use Focus
To make sure your pics are actually properly sharp and focused, just tap whatever part of the screen is your main subject. Also handy if you want to take some up-close pics close to the lens with a blurry background.
Use the Grid System
Go to Settings and scroll down to Photos & Camera and turn on ‘Grid’. That way, you can line up your shot properly. We’ll get into the specifics of how to make the most of this grid in a bit.
Creative Texture and Lighting
Lighting created with the iPhone light can be really interesting. The video below used sequins, disco balls and other textures to add an effect to their iPhone photos.
Accessories and Editing Tools
Like cameras, the iPhone also comes with multiple lens, accessory and editing software options!
Believe it or not, you can use external lenses with your smartphone and having them on hand is a good idea to make it through tough lighting and focusing situations. Macro lenses are particularly important when it comes to iPhone product photography, Apple’s camera settings have very low zoom capabilities.
Here are a few great lenses that can be used on smartphones:
- $20-$100 Photojojo iPhone & Android lenses
- $70 Olloclip iPhone 4-in-1 Lens
- $10-$80 Moment iPhone & Android lenses
If you are looking for other accessories like editing software or external lights take a look at these items:
- $2 iPhone Camera+
- Free Adobe Photoshop Express
- $9 Photoshop Touch
- GLOWME 2.0 LED Ring Light
- Joby GorillaPod 1K Kit
- Square Jellyfish Metal Spring Tripod Mount
Obviously, you’ll get the best results from using a DSLR camera, but whether you go with an iPhone, a compact camera, a mirrorless camera or a DSLR, there are ways to get decent results. All you need is the right accessories and techniques!
Camera Accessories
There are a lot of fun accessories you can make at home or purchase for your camera! Let’s take a look at some of the camera accessories you can use for successful product photography.
Lenses
Lenses will be the main thing you will want to invest in once you purchase a mirrorless or DSLR camera. Honestly, the lens is the camera’s most important component because the lens determines the quality of the image.
Camera lenses can help you get a crisp, close-up shot of your product. There are a few basic lenses you should know:
- Standard: A standard lens is one with a mid-range focal length, typically around 50mm. They have an angle of view which is roughly the same as the angle that the human eye can comfortably view.
- Macro: A macro lens is one designed especially for close-up photography.
- Telephoto: A telephoto lens has a long focal length and provides a high level of magnification, allowing you to photograph subjects at a moderate to far distance. They tend to be bigger and heavier than other types of lens, so depending on which one you get, it might be a lifting exercise while you use it!
- Wide Angle: A wide angle lens is one with a short focal length. They provide an angle of view beyond that of a standard lens, allowing them to capture more of the scene in a single shot. An extreme example of this would be fisheye lenses.
BONUS: Often, if you see a lens you see a bunch of random numbers and letters on the top rim of the lens. To the new photographer, this might be some photo mumbo jumbo but here’s what they mean and what they are good for:
| 8mm – 24mm | Ultra wide angle (fisheye) | Wide panoramas and skyscapes, artistic |
| 24mm – 35mm | Wide-angle | Interiors, architecture, landscapes |
| 35mm – 85mm (50mm common) | Standard | General purpose |
| 85mm – 135mm | Short telephoto | Portraits, candid |
| 135mm – 300mm | Medium telephoto | Close sports, action |
| 300mm+ | Super telephoto | Far sports, wildlife, nature, astronomy |
I would also suggest renting certain lenses so you can test out which ones you would like to invest in. Lenses are expensive but they are the key to getting the photography results you want—especially when it comes to depth of field and lighting abilities—so they are worth it.
Test out, try out and you will know which ones are best for your product photography needs.
Tripods & Monopods
Do you struggle with keeping a steady hand? There are breathing techniques for that as you take a photo, but to make your life easier, purchase a tripod or monopod!
Tripods and monopods ensure capturing a steady shot and they are usable for all camera types! Tripods have three extendable legs that can be adjusted for your needs. Monopods are basically a stabilization stick that you attach to your camera bottom. I enjoy monopods as they allow more movement from the photographer but tripods give more stability for the camera.
Moose Winanas makes a great video explaining tripods and which one you should take a look at!
Tripods and monopods make studio product photography a breeze as all you need to do is set up the products and then click without worrying about blurry images or movement on your part as the photographer.
BONUS ACCESSORY: Photography Harness
I love love, love my camera harness. Whether you have one camera or two, wearing a harness makes photography much easier and takes the pressure off your shoulders and neck. Harnesses come in single or double based off of your needs.
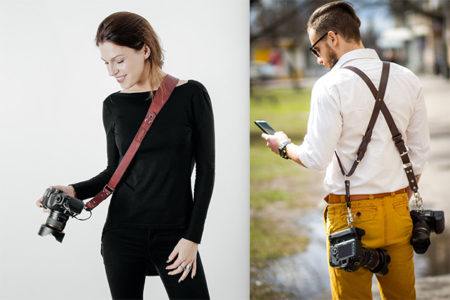 When I shot weddings, in the beginner years, I was constantly switching my camera bodies out of my camera bag. Wearing a harness let me wear both cameras, on my body, so I could easily hold and switch uses. Like me, this will be a game changer for you photographing your lifestyle or studio product photography!
Getting to Know Your Camera: Camera Basics
First of all, I always tell people, no amount of reading tips or tricks will make you a better photographer, but practice and experimenting will. I never had professional training with photography but I went out and taught myself the basics and built my skills from year to year as I practiced, worked and improved my skills through reading, asking questions and getting out there!
If you feel discouraged because your photos do not look like the beautiful catalog photos of your competition, chin up, buttercup!
To prove that, below is an example of how much you can improve with practice!
This was my first fashion shoot in college where I bought my first DSLR Sony camera, starting from a not so great place. Compare that to my recent shoots photographing for boutiques, fashion companies, social influencers and other small businesses now:
BEFORE
NOW

Like me, you too can develop your product photography skills!
Understanding how your camera works will help you get the best shot of your product. While you may not use all these settings and modes if you’re using a point-and-shoot camera or a smartphone, understanding the basic principals of photography will help you take better photos. Let’s take a look!
The Photo Exposure Triangle
Don’t worry, this isn’t a geometry lesson. I hate math as much as you do! Ha!
The photo exposure triangle is a simple way to explain the exposure calculations of a photograph: aperture, shutter speed, and ISO. All of these need to be in proper balance to achieve the look you would like. These exposure elements not only affect exposure, but also control the overall look of the image. You will need to master these three things well to truly understand how to make a quality product photo.
1. Aperture
The aperture is the opening of your camera where the light reaches your camera’s image sensor. The bigger or wider the aperture, the more light comes into your camera.
Aperture is measured by F/#, better known as F stops. Numerically, the smaller the F/#, the larger the opening you are creating for light to come in is. But, the larger the aperture, the smaller depth of field you will see.
Here are some helpful illustrations and photo examples for you to see:
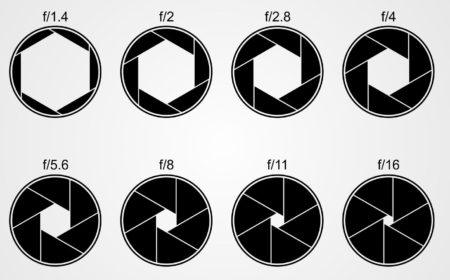
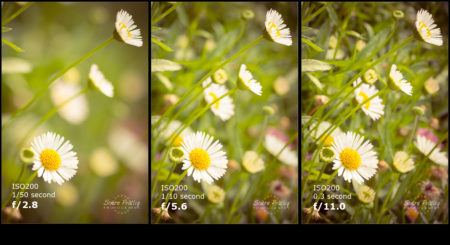
As you see in the flower photo, the smaller the number of F stop the more light and blur—aka depth of field—you will have in your photo.
BONUS TIP: I find when photographing people, you do not want the aperture higher or lower than the number of people in the photo. You will quickly find that the “blurriness” will affect the focus on the people, so make sure that the number is in balance.
Shutter Speed
Shutter deals with time. Shutter speed is measured in fractions of a second and it describes the speed/length of time the shutter of your camera is open while you take a picture. When you shoot, it’s usually the click noise your camera makes when you click the camera taking button.
Short or fast shutter speed (like 1/1000 of a second) allow less time for light to pass through your lens, whereas longer shutter speed (like 1/250 of a second) creates a longer exposure, hich may be useful in low light situations.
Be aware that using a longer shutter speed, while it allows more light into your camera, it also lets terrible blurring happen! Since your camera is staying open longer, it needs more stability from you to secure the light well. So, when expecting low light situations that require longer shutter speeds, make sure you are stabilizing yourself well or use a tripod.
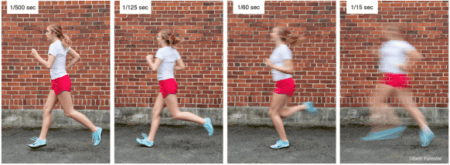
The cool thing about shutter speed is that it really manipulates your photo to have more sharpness, blur or make it as manipulated as you intend! In this photo, you see that a slower shutter speed blurs objects in motion and faster shutter speeds allow for crisp snapshots.
Shutter speed is popular with nature photographers manipulating waterfalls and other moving objects in nature. This is not something you really need to worry about with studio product photography, but you might need to understand this when it comes to shooting models in Lifestyle shots.
ISO
ISO determines the light sensitivity of your camera. A low ISO means your camera is less sensitive to light, requiring more light for a decent exposure. A high ISO makes your camera more sensitive to light. ISO also affects the level of “grain” you will have in your photos which means it has more or less texture.

ISOs for digital cameras typically range from 200 to 1600. When shooting outdoors in the full sun, use a low ISO. When shooting indoors with less light set your ISO higher to capture more light.
Camera Modes
Depending on the tpye of camera you have, there will be camera modes to learn. Below are some of the basic camera modes you will encounter and as you get more advanced camera modes will control exposure.
Manual mode is a beast, so if you are a beginner, I suggest you start with automated and build up to more manual modes as you become more confident with your camera. Refer to your camera manual to determine how modes are labeled if needs be.
- Fully automated or automatic: Your camera makes all the decisions, determining the best exposure. This is also a mode where you might see your instant flash pop up to make up for darkness based off of this mode’s calculations.
- Program: Your camera selects the shutter and aperture, but allows you to set the ISO, white balance, and choose whether you want to use the flash.
- Shutter priority: Allows you to select the shutter speed while your camera calculates the rest.
- Aperture priority: Allows you to set the aperture while your camera calculates the rest.
- Manual: Gives you full control to adjust to your particular subject and lighting conditions. This is more advanced and will really require you to practice and experience it to fully understand.
- Macro mode: This mode creates a detailed blurred background and in-focus foreground objects. This mode is ideal for photographing small objects and doing detail product photography shots.
- Portrait: Uses a mid-range aperture to highlight a close object in front of a blurry background.
- Landscape: Uses a small aperture to yield a deep depth of field. This mode captures far and close objects well.
- Action/kids: Your camera’s highest ISO and fastest shutter speed captures movement.
- Night-time: A slow shutter speed and high ISO allows more light in.
- Burst: Allows you to capture several shots in quick succession with one click of a button.
- White balance: This setting determines the color balance or temperature in your photos making photos seem more warm with orange/yellow tones or cool with blue/green tones.
There are tons of online articles that you can refer to if trying to understand any of these modes more. Take the time to explore, study and understand these modes because these are the ingredients to a photo’s look!
Understanding Lighting and Backgrounds
On top of understanding your camera modes and basics, you will need to understand the use of lighting and backgrounds, especially when it comes to product photography!
Lighting tools
Good lighting brings your products to life and shows your products in the best light…no pun intended! Lighting is powerful, so take the time to experiment and learn.
Luke Ayers shares a great way to understanding lighting basics and setting up a cheap product photography studio:
Like him, you can learn the best ways to photograph your products on any budget. We will talk more about those tips below, but lets first learn some of the basics, particularly the lighting accessories you will bump into:
Bounce and Reflectors: You can use a bounce card or a reflector to reflect light onto your product. Easy DIY bounce cards can be made from white poster board or a piece of index paper. Weirdly enough, wearing white clothes can also reflect light to your subject.
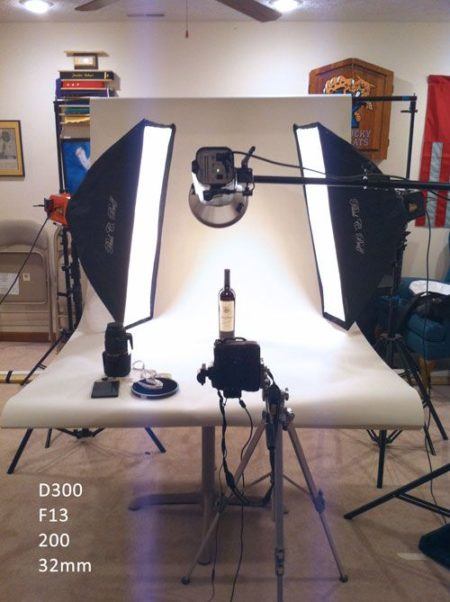
Softbox: Particularly helpful for lighting larger items and humans, a set of three softbox lights (artificial lights that are diffused by a sheer fabric box) can illuminate your products from the sides and above, which reduces harsh shadows.
Light Box and Tents: For smaller items, a light box (with solid walls) or light tent (with fabric walls) can streamline your process with a consistent backdrop and light source. You can easily create DIY lightboxes and tents at home with fabric and cardboard boxes—compliments of YouTube.
External Light Flash: The small built-in flashes on digital cameras cause harsh shadows and hot spots. An external flash or Speedlight paired with a DSLR or mirrorless camera can help solve this. These attachable light flashes can be bent in different directions to bounce light off of walls and other places which helps to better diffuse camera flash.
Flash Diffusers: A flash diffuser disperses light from the flash, making it less harsh and removing deep shadows. These can be plastic caps, cyclones or could possible be small softbox attachments to the top of your camera. Some of them can also be colored to cancel out indoor light coloring from artificial lighting.
There are also different types of lights you will need to understand as well: fill, main, background and—when necessary—backlight.
Main light is the main light source, typically off-axis from the camera, which is pointed directly at the product (or person). The fill light is a secondary, often lower-intensity light (light placed farther away) on the opposite side of the camera from the key light. Back light is a light placed behind (or behind and above) the subject, to better define the subject from the background.
A photographer might even add a background light, pointed at the backdrop, to draw (shape) light or texture on the background in order to make the subject stand out better, if the background is a part of the desired results.
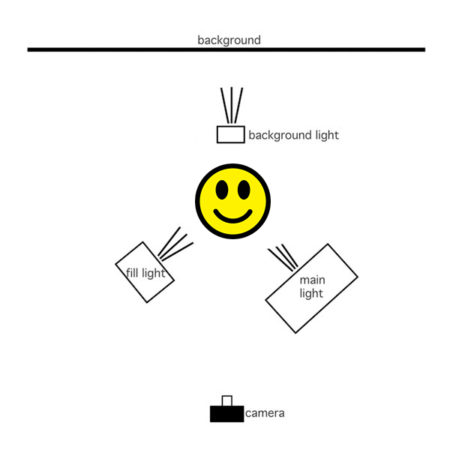
Light placement is a critical decision a photographer makes after setting up the scene/background.
This is the area of product photography where you have to do hours of trial and error before you can truly master it. So, for those just starting, have patience as you figure out what lighting works best for your product photography needs. If you need some more direction, there are tons of YouTube tutorials that will teach you on all different skill and budget levels!
Don’t have lighting equipment? Sunlight makes for beautiful photos, with a few tricks:
Diffuse the light: To avoid harsh shadows, use indirect sunlight. If you’re shooting outdoors, wait for a cloudy day. Harsh sunlight can create unwanted shadows (if you are shooting lifestyle photos outside, the best time to shoot is when the sun is coming up and going down as the sun is softer and not as harsh).
When taking photographs indoors using natural light, try positioning your products a few feet from a window, and aim for a time of day when there is a lot of light. If you need to diffuse harsh light, take a white bedsheet to the window and use that to create a softer light.
My only request is, please do not mix natural light and artificial light! The color tones of the lighting will get too messed up. Promise me!
Seamless backdrops
Backgrounds really take you to the next level when it comes to product photography. Lifestyle allows you to be creative with your backgrounds, but studio shots really require simplicity.
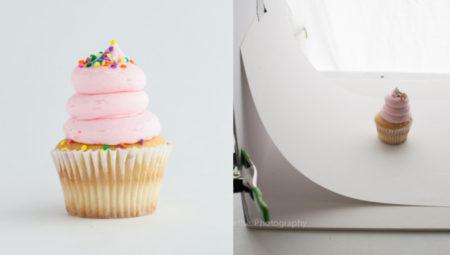
My biggest suggestion is purchasing or creating a “sweep” which is a backdrop that is usually a long sheet of paper or wrinkle-free fabric that flows from the wall down to the floor, in a crease-free curve. Fstoppers show what a sweep is clearly in this photo of a cupcake below:
Because there are no wrinkles, wall cracks or textures, the seamless background creates a continuous background that helps products pop. Again, you do not want anything taking away from your products, so using a sweep really makes a difference in quality photography. Fstoppers shows the difference again here:
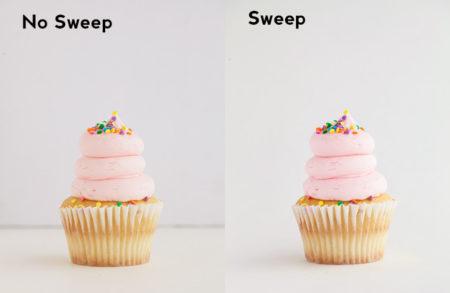 Although the wall crack isn’t the biggest problem in the world, using a sweep really took the left photo up a notch by getting rid of any distractions that might take your eyes off the product and in this case, the cupcake.
Paper does not require a lot of extra accessories but if you go the cloth route you might need clamps or clips to stretch and tighten fabric as needed.
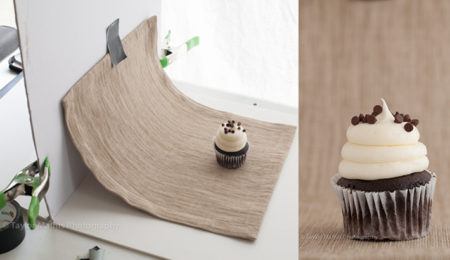
White is not the only background you can use! Sweeps and backgrounds come in many colors, patterns and texture, but again, you want backgrounds to compliment the products not distract from the products. As you see with this chocolate cupcake, the slight textured brown sweep compliments it quite nicely.
Play around with textures, backgrounds and color! Do not be afraid to do something different, but always remember, less is more.
How to Style and Shoot Your Products
Alrighty…do I still have you attention? Thanks for staying tuned in!
We have covered a lot of camera and photography logistics, but I now want to share with you tips on styling and shooting your products successfully. For many, this is the main struggle: How do I make my products look appealing, hip and cool?
If this is you, do not worry and keep reading. These tips will help you plan and execute a successful product photography shoot as well as helpig you develop a creative mindset you can keep with you moving forward!
Things To Consider Before a Photography Shoot
Whether you’re an experienced photographer looking to streamline your process or a beginner just getting started, the tips here will help you get more from your photos. Follow these best practices to plan a successful shoot.
- Shot List: Before you begin, think about what you want to highlight about your products and the best way you can do that. Refer back to the photography shots we talked about and make a list of the shots you’d like to capture in your shoot. This will help you plan the order of your shots and determine which specific equipment you will need for your shoot. No one likes to constantly be switching lenses back and forth, so save yourself some time and plan ahead.
- Inspiration: Do you research and think about style/purpose! Look in Pinterest, your competition’s sites and see what photos are getting a lot of likes! They are doing something right, so look for the elements the photo has and replicate it—just do it better! Inspiration is never a bad thing and I frequently browse the internet to see what others have done to spruce up my creative juices! Look for items your inspiration pairs with like-products and style as needed.
- Options! Options! Options! Photo shoots are time consuming and labor intensive, but you can save time and create consistency by photographing multiple items at once. Also, make sure you take lots of photos of objects so you have more photos to work with. Early on, I learned this the hard way after going back to my desk to edit and finding the new photos I took didn’t turn out all that great. Give yourself flexibility.
- Check Your Shots: Do not assume it all just looks good. Test out your exposures and look at the photo you just recently took. By doing this, you are saving yourself time needing to go back if photos were underexposed or overexposed. Checking never hurt anyone and it can save you a lot of headaches. Do not assume you have it all right!
Tips for Styling and Shooting
Below are some tips and tricks to consider for styling and shooting your product photography!
Frame Your Shot: Rule of Thirds
Composing your shot on camera reduces the need for editing after the fact. Make sure you aren’t rushing and think about the object placement…a quick snapshot isn’t going to cut it. Determine how you want to position the image. Do you want to shoot your product vertically or horizontally? How close or wide of a shot are you aiming for? Again, as stated above, use variety!
You can use the “rule of thirds” for guidance: Imagine you divided your frame into nine parts by drawing two invisible lines in both directions.
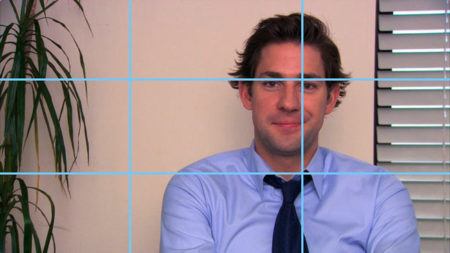
Research shows that the eye is naturally drawn to the intersections of these invisible lines, so you can help direct shoppers’ attention to your product by placing it in these areas. Position your product so it is centered at one of the points where the lines intersect.
Also know that it’s okay to break these rules and experiment with interesting angles as well. However, keep in mind that you do not want to go too abstract or distract from your products. You are showcasing a product, not creating modern art.
Utilize the Golden Hour: Outdoor Shoots
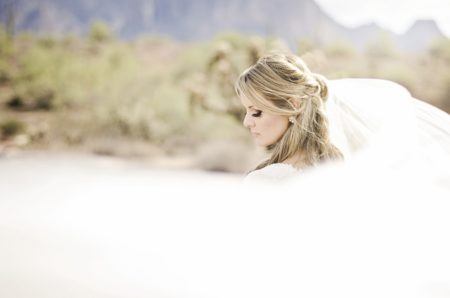
When the waning afternoon light is golden and the scene looks too magical to be real, taking a photo is practically a requirement. But, little did you know this is actually a photography term called “the golden hour”? This time of the day, along with when the sun comes up is the perfect time to photograph lifestyle photos because it gets rid of harsh sunlight and shadows that can affect your photos.
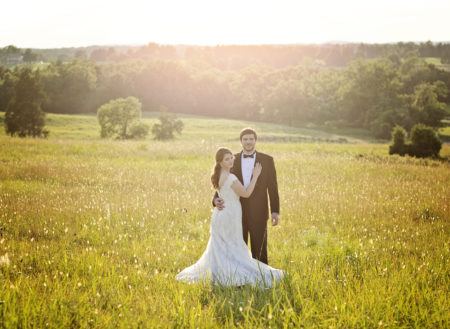
These hours are also an opportune time to explore with sunspots and sun-flares. As you can see in this Bride and Groom I shot above, they have beautiful lighting on their faces and bodies and there is just a rich sunlight glow filling up the frame. It is consistent, shadow free and just pleasant.
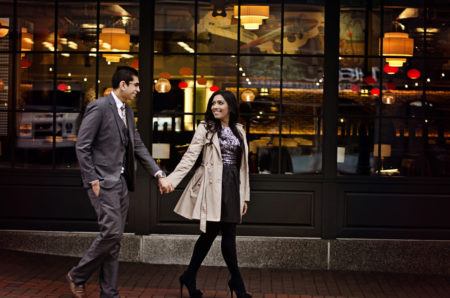
Compare that to these photos taken of my fiance and I in London during the harsh sunlight of the day.

You see dramatic shadowing and bright yellow light hue that really take away from the subjects: us. If we shot these when the sun was going up or down, we could have easily avoided these mistakes. Unfortunately, travel plans and optimum photography lighting don’t always line up.
Now, you might see the difference in composition and say, hey! You guys are under trees and the bride and groom were not. However, regardless of location, where the sun is in the sky truly matters when it comes to outdoor photography! Be patient and plan your shoots around the golden hours of the day to avoid harsh sunlight.
Understand Your Item and Plan for Context
Planning is the key to a successful Lifestyle product photo. Knowing the product, how it will be used, who will use it and where it will be used will help you create a meaningful photo that will show a product in a person’s life.
Ask these questions when brainstorming:
- Where will the product be used?
- Who will use the item?
- What other items belong with this product?
- What is the mood I want the customer to feel when seeing and using this product? How can I show that visually?
Along the same lines, I always told my wedding clients that they should plan their engagement outfits for purpose and function: if you are going to display these photos at your wedding, do the colors match your wedding colors? Think about purpose and how the photos will be displayed. I promise if you do, they will run more smoothly with your intended goals!
Use Your City
A good wall can be an easy and effective backdrop, especially for fashion products. But, when choosing a wall to take your photo in front of, consider what your model is wearing. What colors are in the outfit? Is it urban? Girly? Colorful? Match your wall to your sartorial mood and look for ways to compliment the products with colors, style and textures.
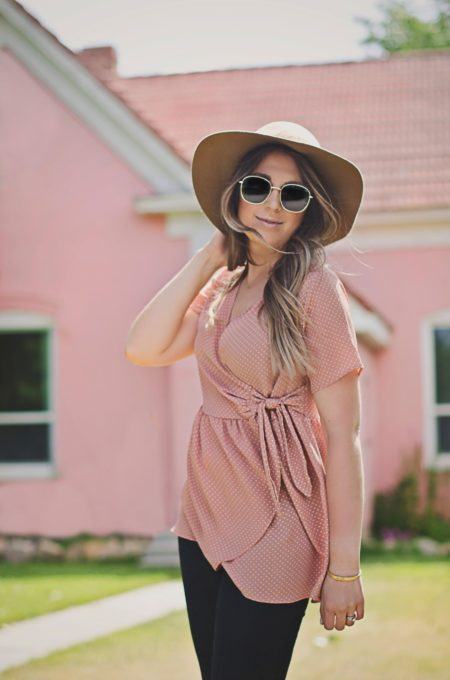
For example, in the photo above, I was given a pink shirt to photograph for Cottonwoodthreads boutique (just started shooting with them to help with branding).
Since she wanted girly, modern and lifestyle like photos, I found a pink home in my neighborhood and used aperture to diffuse the harsh lines of the home to compliment the pink shirt. This is a true example of not needing a lot of fancy or extravagant places to get a quality, stylized photo.
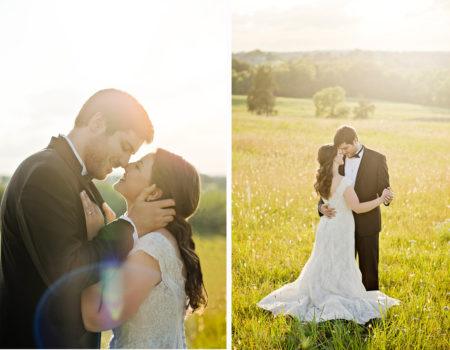
Have Models Move Around
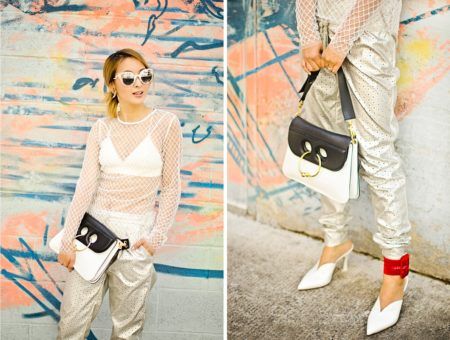
Compelling product photos, especially for fashion and fitness products, require movement.
If you’re like me and you struggle to look natural in photos, try moving around slowly instead of standing still. Mix up your models eye gaze from side to side, looking at you, looking down…mix it up.
As you can see in this photo, my two models have a nice flowing movement that is soft and natural. Walking looking at you, the photographer, is stagnant, so movement allows natural feeling and authenticity. Most models move into and out of poses when on a shoot, and the movement makes them look more like they’ve been captured candidly. Try walking back and forth on the spot, or moving into a particular pose.
Avoid Brand & Logos
Unless you are in a partnership that requires you to display a businesses logo, branding. etc, keep them out of your photography. Try to avoid anything with big logos, characters or brands.
If you so, people might be confused and it takes away from your product marketing. We want to look at your products not the big Mickey Mouse face blanket you have the products laying on.
Capture Details
Like we discussed earlier, you will need to have a varied display of photos. Remember to include details.
The best photographers create a photo set so that the photos fit into a branding visual story. This might include close ups of some of the details of the outfit, as well as some photos of the outfit on them in different poses. For those selling objects, it can be stitches or other product details like shown below:
Having a set that fits together like this creates a more professional feel to your ecommerce listing and helps maintain variety and interest in the photos you post.
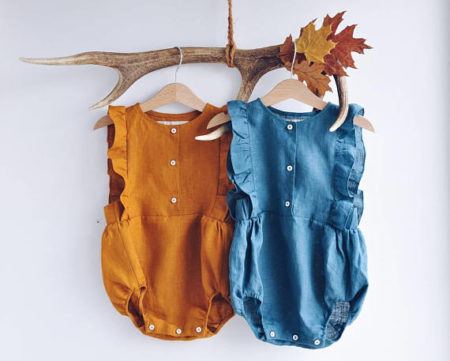
Use Backgrounds & Props
Rather than use a solid color backdrop and empty set to sell a product with a specific use, try setting up a scene that places the product in its intended setting. Different environments and props can go a long way in helping potential customers imagine the product for their own use. Do not go overboard with products but simple touches can really take your product photography from 0 to 100!
OMOLOKO Baby rRmpers did a cute stylized studio shot of two of their fall baby rompers using a deer antler and some leaves. They also careful used quality hangers that keep the quality up. The details do matter when it comes to styling, so make sure you are thinking every piece involved through.
SoLAdeli used a more simple approach, putting simple rosemary leave near their rosemary oil bottles. Again, not a ton of styling involved, but practical and a nice touch!

This is also a time where you can implement product pairing and get customers interested in buying more of your products in one place. Your business has many customizable iterations of the same product, so don’t just talk about it—show them all. Rather than simply saying you offer different styles or size, emphasize the scope of your full offering by capturing them all in your product photography.
Freeze Frame Photography
The motion captured in a freeze frame shot can show a product in its most important moment of use for customers. If you’re looking to demonstrate that your product was designed with a specific use in mind, this a perfect idea for your product’s photo. Make sure you master shutter speed to get the effect you want!
Macro Shots
Keep in mind that most macro shots will probably need to be ones that are used in conjunction with normal product photos.
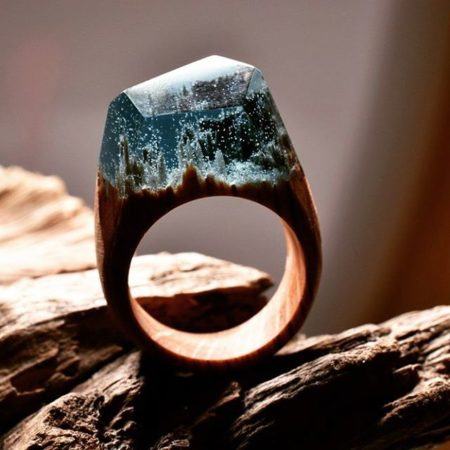
However, they can be a great asset to a series of photos for, say, a feature page in a catalog, or an eye-catching poster ad. See how beautiful the above ring shot is from Min35.0? Just be sure that your lighting is phenomenal so that the tiniest details show up.
Place Products Above a Reflective Surface
A reflection adds quite a bit of depth to an otherwise boring photo. And don’t get stuck just using a mirror. Use lighting to enhance the reflection and edit later to further bring out the reflection.
Add Personality
Humanize products in your product photography or create a story that surrounds it. Give it character. Think about what it is that makes your unique product better or simply different than a competitor’s. These following photos certainly add personality or emotional connection to the products:

Use your photos to portray certain aspects of the product.
Create Looks
Combine products into stylized looks. You can control the color match-ups and show how items go together. This is great for advertising, allowing you to show multiple products at once, while creating colorful eye-catching, fun designs that are useful on two fronts. Also, as a wholesaler, it shows how products can look together in store, which can help you promote multiple sales.
Create Movement, Not Flatness
Get clever when you are styling products—especially garments. Even if you are shooting them flat you can still infuse them with life. For example, Papu, a childrenswear company, gave a flat clothing outfit interesting movement. By doing this they create a fun style and spirit of the brand without even using humans! Just because something is flat, simple of small does not mean you just shoot it directly as is… creatively pose items!

Create Catalog Looks and Use Influencers
Sometime the best way to showcase your products is not even in your storefront product listing, it can be in your blogs and banners. Create catalog looks with new lines, seasons, or categories and create high quality, stylized shots to inspire customers to just look at your products further. These can tend to be more “fine art”, high fashion or creative shots that can really help customers visualize your products in their trips, their creative minds or everyday life.
An example of this would be Modcloth’s stylized shoots:
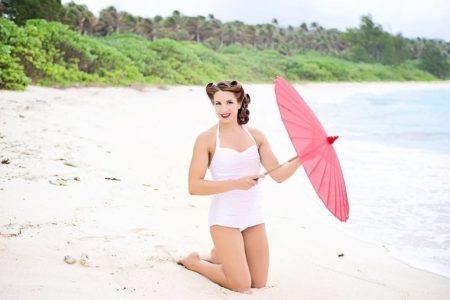

I don’t think I will ever look like a retro beauty queen like the beach photo above, but I can rock that bathing suit on my honeymoon with some vintage sunglasses to partially get the look. I also do not think I will ever in my life be casually laying on books, but this makes me want to look more for back to school inspired outfits for the fall or quirky outfits for teachers.
Using influencers to stylize your products is also a powerful way to attract your shoppers visually. Gabifresh did an amazing editorial style shoot with ASOS curve and it drew me in to see more!
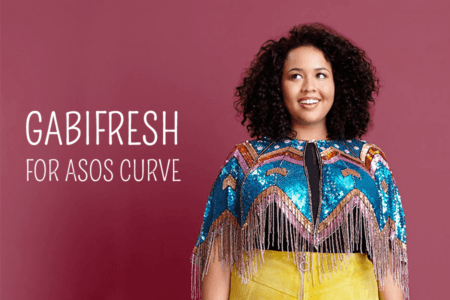
Like these two examples, editorial shots—that might even feature a influencer or two—can showcase your items paired, groups and stylized so you can add serious interests to readers.
Photo Editing 101
Retouching your images after the shoot is vital to achieving a polished look for your ecommerce store.
For those starting out, getting the lighting and exposure right takes a bit of trial and error. Thankfully, photo editing can help fix your in camera mistakes! Retouching covers anything from background removal to color correction, mannequin removal to editing the model’s features.
Even the best photographers need a little editing help. Making a few simple touch-ups to your photos can make your images look polished and professional. As you edit your photos, be careful not go overedit. Using filters and other photo manipulations can distort the appearance of your product and create a misleading image, which could lead to unhappy customers. You do not want that!
While photo editing won’t turn bad photography into masterpieces, it can improve good photography.
Below we will talk about editing tools you should look out for and what things you should edit out of your product photography.
Editing Tools
There is photo editing software online, but I prefer to use Photoshop and Lightroom to edit my product photography. They give you all the power to manipulate and create complete product photography photos you desire. The world is your oyster and you get to be the creative genius. I will say, though, both of these programs will take a lot of tutorials, trial and error and a huge learning curve to completely master.
You can also look into Affinity Photo, GIMP and Pixelmator.
If you dont want to purchase the Adobe suite account, free tools are easy to come by. For the desktop, try free web-based editors like Aviary, Pixlr, and PicMonkey. Some inexpensive mobile apps include Photo Editor by Aviary and Afterlight.
Things to Edit and Look Out For
Once you’ve picked your software and familiarized yourself with it, it’s time to start editing!
Lighting
If you’re working with an image that seems to be too dim, there are a variety of ways to lighten things up. With the picture in your photo editor, experiment with sliding the exposure or brightness until you’re happy with the look of your image.
Sharpening
It can be frustrating when products with detailed design elements seem to lose their dimension in photographs. By sharpening images very slightly in a photo editor, you can accentuate smaller details and textures. Increasing the contrast provides a similar effect, creating stronger distinctions between light and dark spaces in an image. There are also Photoshop actions that can help.
Blemishes
Once you’ve adjusted the lighting you can get down to the nitty gritty. If you notice texture, dirt or things out of place that affects the photo experience, remove them! The blur or clone tools in more advanced editing programs like Photoshop can be helpful for erasing.
Photo Check Up
After editing your product photography images, it’s a good idea to test how they look on different size screens to ensure quality for viewing!
Why does this matter?
Quality photos help give your customers an accurate representation of a product. If your photo is blurry on a shoppers computer screen, it might sway them from purchasing—even if it looks good on their smartphone. Again check and think of function!
BONUS: Photoshop & Lightroom Action Presets
These have completely saved my bacon when it comes to keeping editing styles consistent and quick! Simply put, actions are a series of steps that have been recorded by their creator, almost like an Instagram filter for fancy people. This sequence of steps can then be reapplied at any time, which allows you to recreate the end result without having to go through each individual step every time.
To get to Photoshop actions, go to your top toolbar > Window > Actions. This will pull up a separate screen listing the actions available to you.
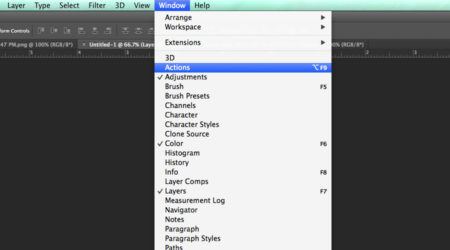
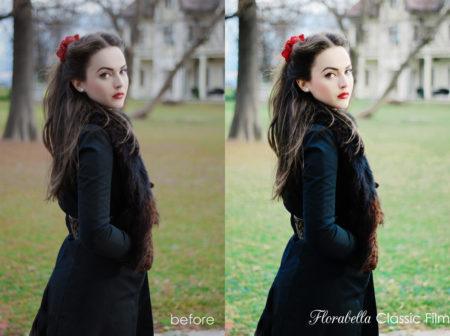
The nice thing is, there are tons of actions photographers have created and you can purchase actions for both Photoshop and Lightroom. Some of my favorite Photoshop preset actions are from Florabella Collection.

As you see, you can add these presets onto of your RAW shot photos (raw meaning as you shot in your camera without editing of any kind) and change the look completely to be more stylized, refined and beautiful.
She also has photoshop actions that allow you to use brushes to take away skin blemishes etc. All of the presets are fully customizable due to you being able to change the opacity, levels and other features. These take some time to learn but boy do they save you time and headaches!
OH SNAP! You Can Shoot Product Photography
So, how inspired are you feeling right now to take quality product photography? Yes, I talked your ear off but gave you enough tools to succeed and be absolutely fabulous!

Great product photography can mean a world of difference for a brand. Whether you’re a DIYer or hiring someone to photograph your products, your brand and ecommerce business can stand out with these photography tips and tricks!
If you want help in your photography branding, branding strategy or other visuals needs please reach out to me! I love helping small businesses succeed so don’t be shy!
What photography tricks and tips do you love? Comment below on some of your favorite stores, photography tips or inspirations!


