Google Merchant Center for Beginners: Getting Started with Google!
by Josh Hansen • June 30, 2018
Behind every good Google Shopping campaign is a great Google Merchant Center account. Sure, it can be easy to get caught up in the details of tweaking your Google Shopping settings, but when you get right down to it, if you aren’t using Google Merchant Center effectively, even the most optimized product listing ads (PLAs) will struggle.
Why? Well, your Google Merchant Center account is the hub that connects your ecommerce site to Google AdWords. Inventory, product categories, descriptions…everything Google Shopping needs to get your ads in front of the right people is pulled directly from your Google Merchant Center account.
In effect, managing your Google Merchant Center account is just as important as managing your keywords and text ads in AdWords. If you take the time to get it right, your ads will do just fine. If you get sloppy, you’ll end up wasting a lot of money.
To help you with all of this, we’re going to take an in-depth look at the Google Merchant Center: what it is, what it does and how to use it to create incredibly effective Google Shopping campaigns. Let’s get started!
What is Google Merchant Center?
As good as Google’s algorithms are, Google still can’t read minds. Google AdWords doesn’t know what you’re selling (product name, SKU, size, color, description, etc), if it’s in stock or how much you’re charging for a particular item. You have to “feed” that information to Google.
To give Google all of this information, you need a Google Merchant Center account.
Using your Merchant Center account, you can upload a shopping feed with information (availability, price, color, etc) about all the products you want to sell. This tells Google what’s in your product catalog and what information should be in your ads.
Creating a Merchant Center Account
To create a new Google Merchant Center account, you first need to decide what email to use. Typically, I recommend using the same Google email account you have connected to your AdWords account (although this is not required). That way, you only have to keep track of one email address for all your Google Shopping accounts.
Once you know what email you want to use, creating an account is as simple as clicking the big green “sign up” button and connecting your Google account (you can sign up for an account here).
Once your Merchant Center account is created, you will want to connect it to your AdWords account. Navigate to the dropdown menu in the top right corner of the page by clicking on the three dots.
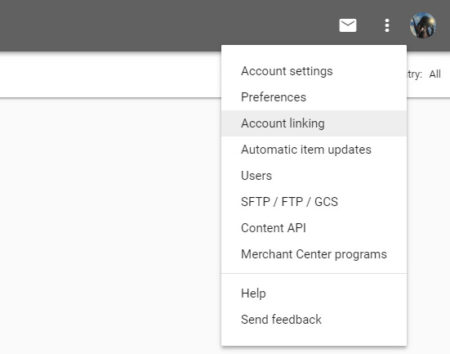
From the dropdown, select “Account Linking”. You will then be shown a suggestion to link the AdWords account that is already linked to your email.
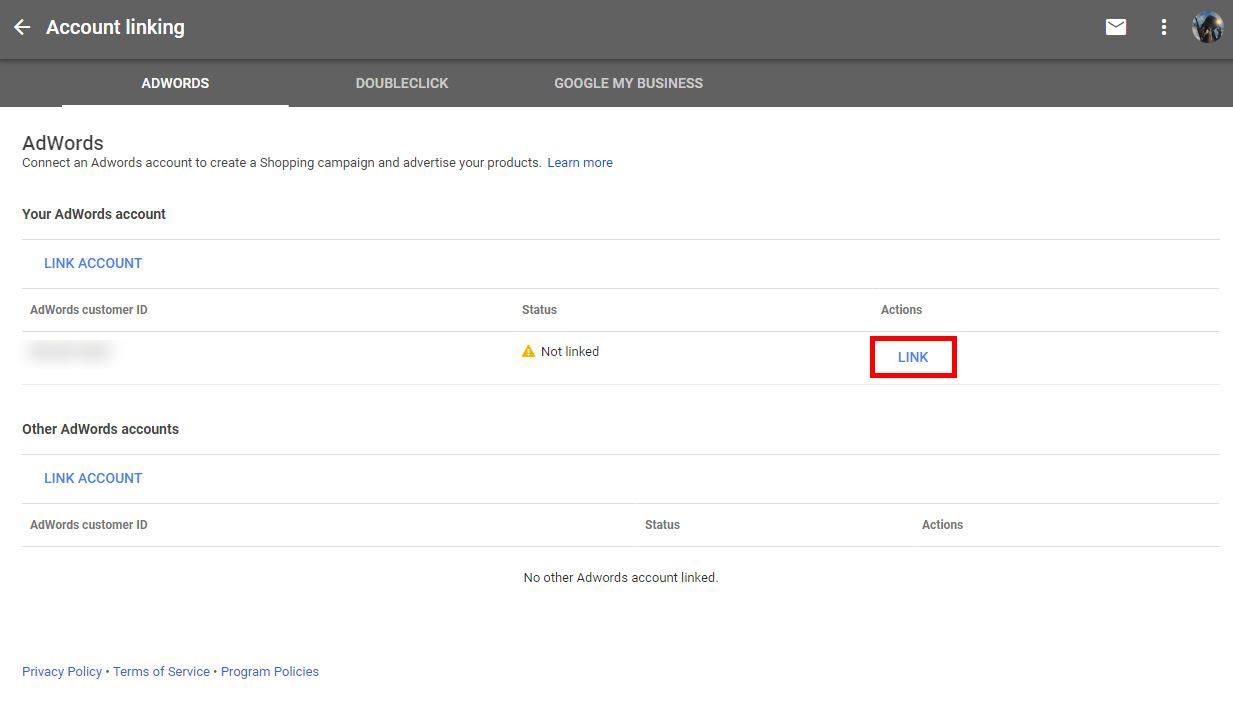
If you are using a separate email address for Google Merchant Center, you will simply need to click “Link Account” near the bottom of the page and enter your AdWords ID.
The next step will be verifying your website on Google Merchant Center. This is simply to verify that you are the owner of the website you are trying to advertise. This is done by navigating to the Business information tab on the left column and then selecting “Website”.
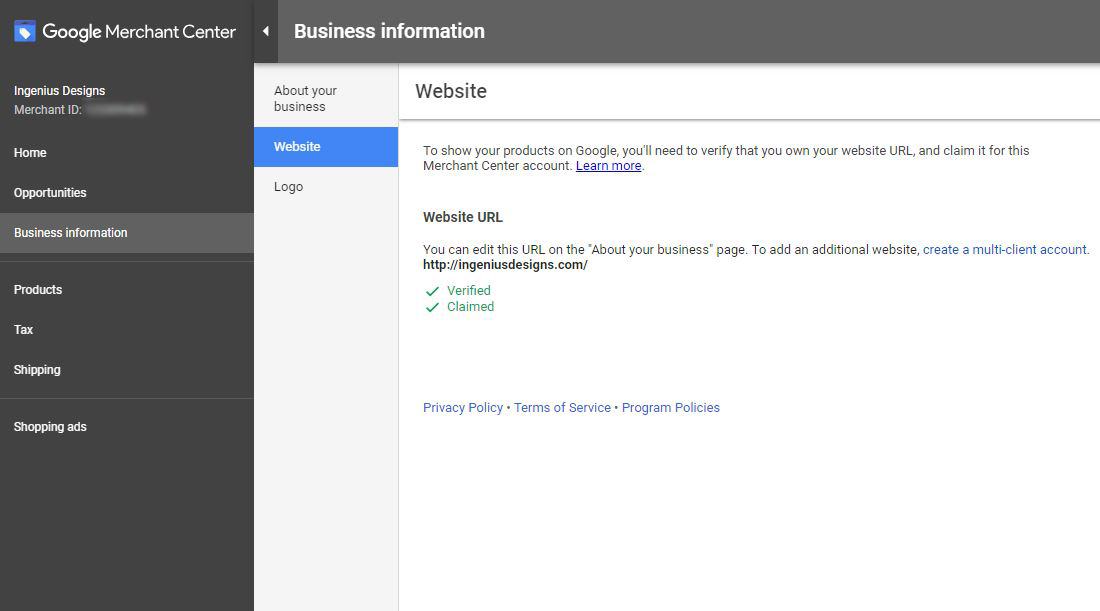
Here, you will be able to link your account through one of four methods:
- Downloading a snippet of HTML code and adding it to your websites theme file in the <head> tag.
- Verify through an HTML file you will upload to your site. (Google claims this is the most popular method)
- Verify through Google Analytics
- Verify through Google Tag Manager
Incidentally, if you’ve already verified your website through Google AdWords using this email account, you won’t have to worry about this step (see why I recommend using the same email address for both accounts?).
Shipping and Tax settings are the next things that you will want to set up within Merchant Center. But don’t worry, the process is pretty straight forward.
For the tax settings, click on “Tax” in the left-hand navigation menu:
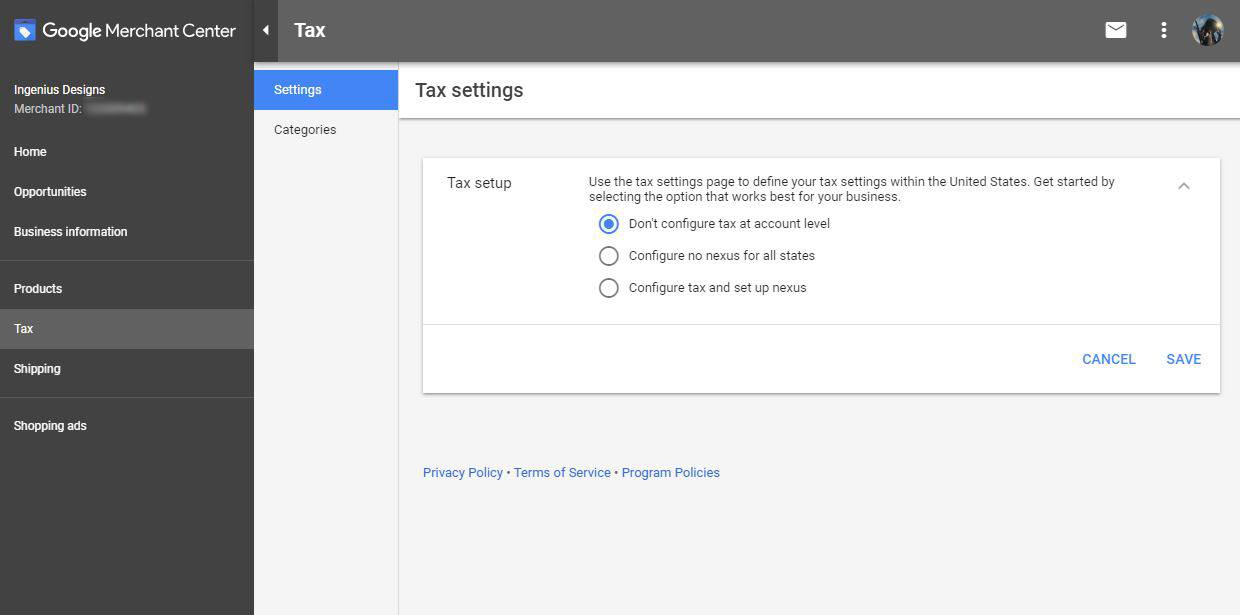
The good news is, you only need to set up rules for the states that you charge sales tax in (typically just the states you have a physical store in).
Shipping settings may require a little more work based on the complexity of your shipping rules. Google will not let you run any Shopping campaigns until you add this information, so click on “Shipping” in the left-hand navigation.
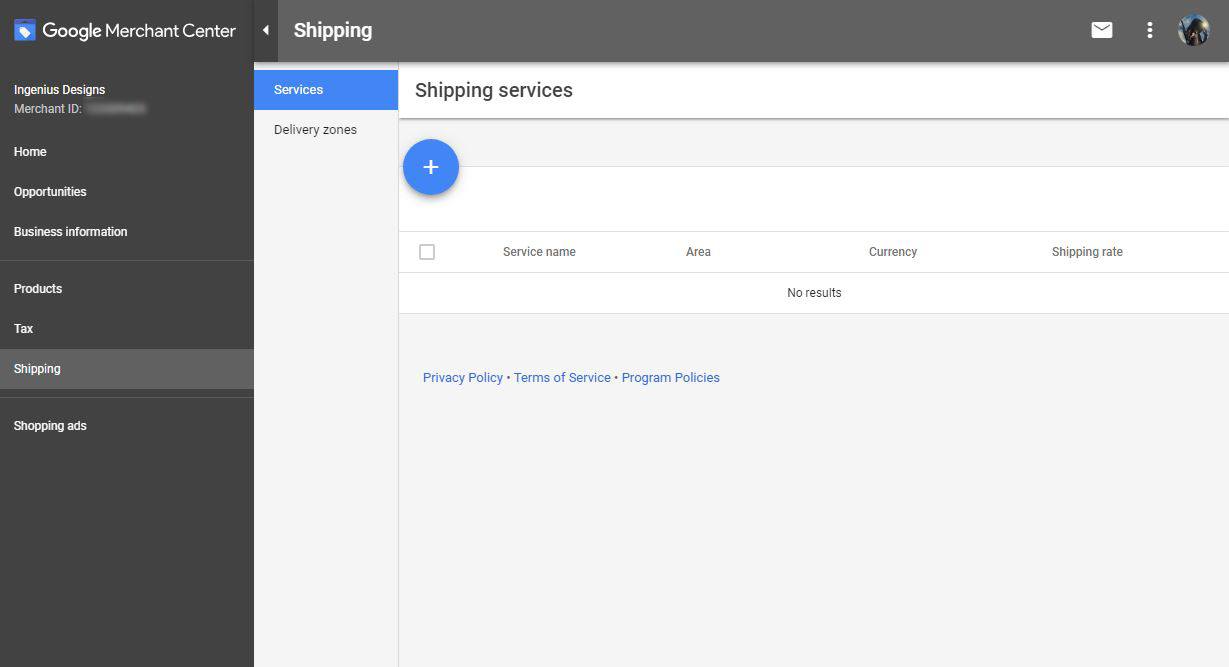
You will need the locations, weights, and prices of the different shipping options you offer.
By the way, if you offer free shipping, make sure you select Fixed Rate and enter $0.00 for the price. If you fail to do this, you will not see the “Free Shipping” promotional text in your Google Shopping ads.
Connect a Feed
Congratulations, you are now ready to connect your product feed to your Google Merchant Center! This can be done in a number of different ways, but to set up your product feed, you’ll need to click on “Products” in the left-hand navigation menu and then click on “Feeds”:
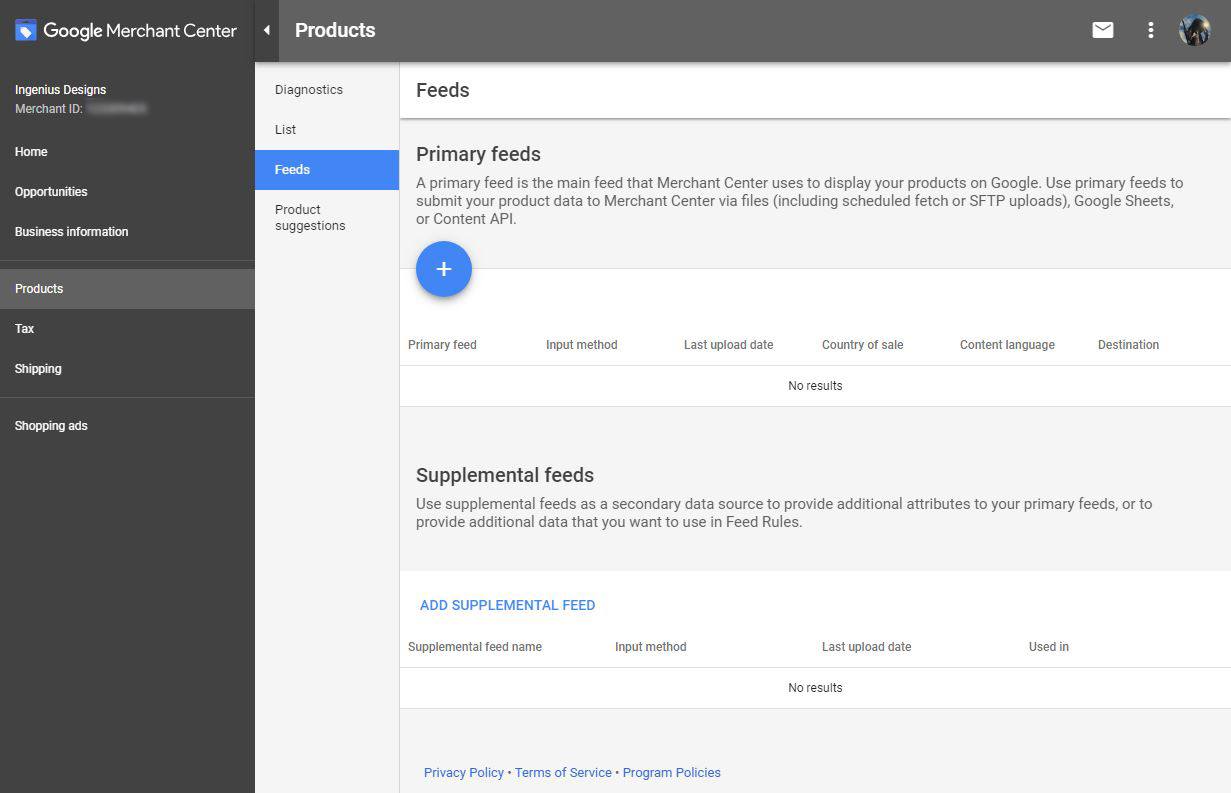
Here are some of the more common ways people connect their feed to their Merchant Center account:
- Upload a .TXT or .CSV file with all the right google product attributes
- Connect your feed via API – There are many apps or plugins you can use on your website that will connect your product feed through an API integration
- Use a feed on a URL to have it dynamically update
Once the feed has been connected using one of the above methods, you will then be able to see whether your product is pending, approved, or disapproved.
Dealing with Feed Problems
The initial approval process on a new account can take up to 72 hours. If it has been longer than that, contact Google support and tell them it has been longer than 72 hours and they can manually push it through same day.
To be honest, I have had experiences waiting weeks for a product feed to be approved, just to find out that if I had called in after 72 hours I could have had it approved that same day. Don’t make my mistake.
In the event that your product feed has products that are disapproved, don’t panic. Head over to the diagnostics tab within Merchant Center under Products. Here you can see any errors that Google has detected with your feed. You can even download a .csv of the products that were disapproved and why they were disapproved.
If all of your products were disapproved, you will want to click on the account section of that diagnostics page. If there are specific reasons why your account has been disapproved, you can find out why here by clicking on the Learn More link next to the error.
In my experience, this link tells you exactly what you need to know to fix most issues quickly. As soon as you have updated your product feed to comply with Merchant Center standards, make sure you go back into the settings of the product feed and click Fetch Now. This will update the feed with the new changes you have just made.
Advanced Merchant Center Features
All of this is well and good, but what if you need to do something special with your feed, like upload multiple feeds or create promotions? To be honest, these sorts of situations are exactly why Google created Merchant Center instead of simply having you upload your product feed directly to Google AdWords.
Multiple Product Feeds
If you have more than one feed that you need to combine in order to get all of the data you need, Merchant Center now has the capability to handle this within the platform itself. You can add attributes to an existing feed by uploading a secondary feed.
After connecting your primary and secondary feeds, you will then need to adjust your feed rules. Click on your primary feed and head to the Rules tab.
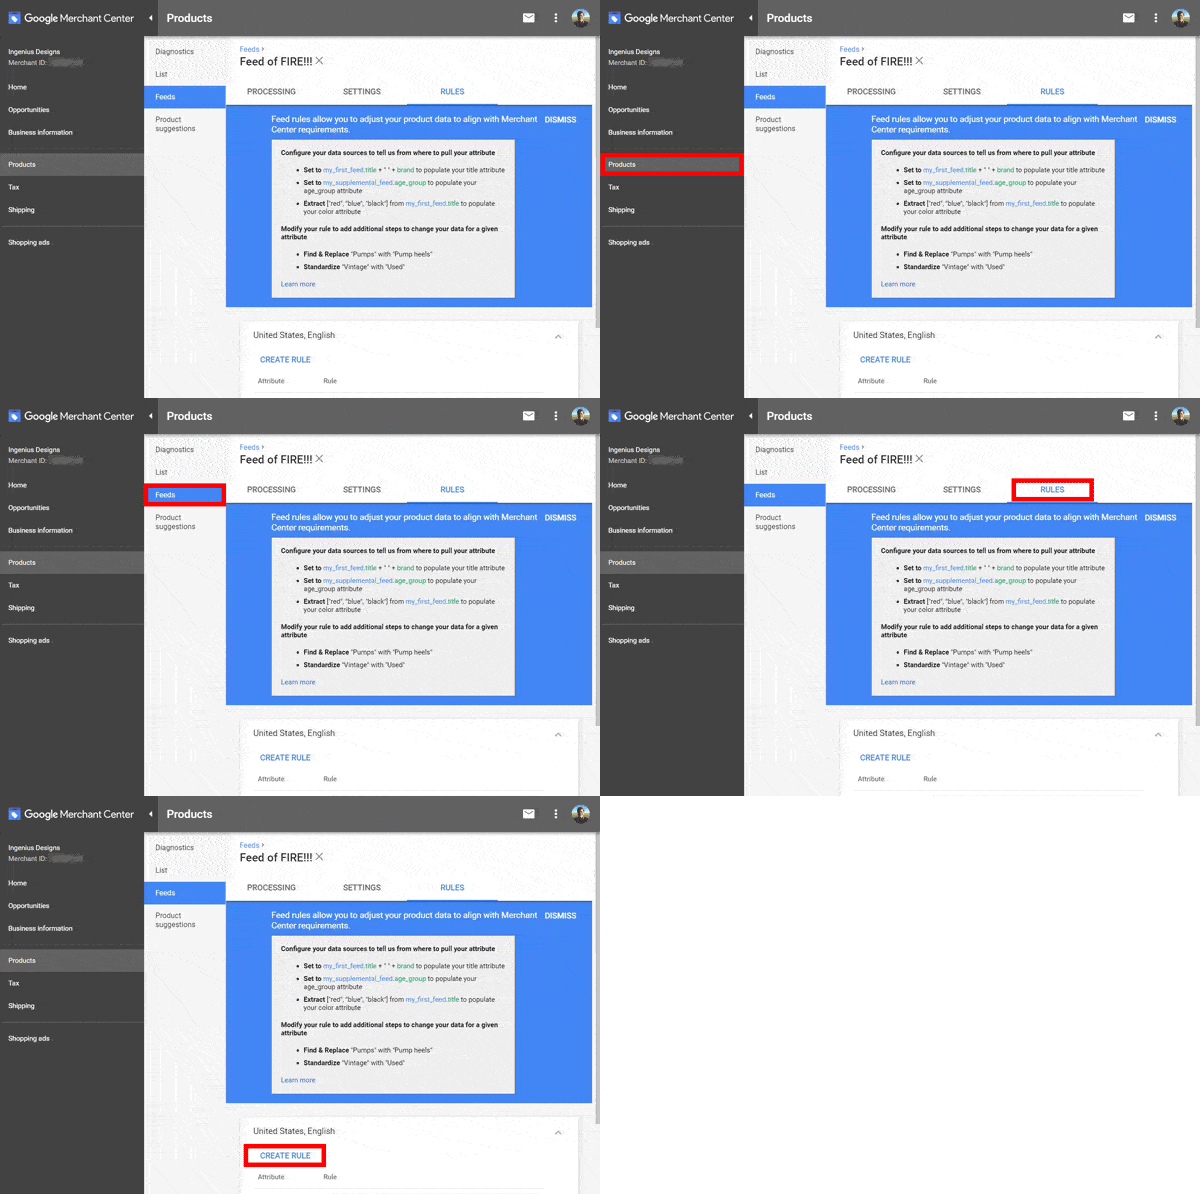
Here you can specify which attributes to pull from each feed. One common example I have used is setting all attributes to default to the Primary Feed, but if an attribute doesn’t exist in the primary feed, use the attribute in the secondary feed.
Promotions
One feature in Merchant Center that is a little newer is the Promotions section. Here you can set up promotions to appear on your Google Shopping Ads. This can be a huge benefit to price sensitive shoppers who are looking for a deal.
If you do not see the promotions tab on the left column in merchant center, that probably means that you still need to opt-into Promotions for Merchant Center. This can be done by going to this link and filling out some basic information.
There are basically two ways to set up a promotion in Merchant Center. The easiest way to set up a promotion is if it is a sitewide promotion that can be used for any product in the feed.
In this case, you will simply go to the promotions tab and select list from the drop-down menu. Click on the blue “+” and start filling out the required fields. These fields include:
- Promotion Id (This can be whatever you want)
- Title (This will be the promotional text that appears in your Google Shopping ads
- Redemption Code (optional but recommended)
- Select All Products
- Select the date range that the promotion will be active on the site
Not every promotion you run on your site will be able to be advertised on Google Shopping. There is a pretty long list requirements and prohibited items that you will need to abide by. This is the official list of program policies that Google provides:
- Promotions must add value
- Adhere to Shopping ads policies
- Adhere to Google Editorial Requirements for titles
- Follow redemption requirements
- Avoid overly restrictive promotions
- Make promoted products clear to the shopper
- Make confirmation of promotion receipt clear
- Include redemption code for shipping promotions
- Follow combined promotions policies
If you are running a promotion that will only be applied to a select number of products in your Google Merchant Center account, you will need to take one additional step. You will need to add an additional column in your product feed for promotion_id.
This will be the attribute you can use to separate products included in a promotion and products not included. Simply add the promotion_id only to the products that are part of that promotions. Using this technique, you could potentially have 15 different promotions running at the same time as long as you have a different promotion_id for each promotion.
Google Shopping Feed
Shopping feed optimization can seem tedious, but depending on the product, it can make a huge difference. We won’t go over every single field you can upload to your Google Merchant Center account, but let’s take a quick look at most of the basic fields in your product feed.
Google Product Category
A Google Shopping Campaign doesn’t use keywords to target your ads. It uses product categories. So, as you might imagine, entering the right category in the “google_product_category” is pretty important.

You pick your product category from the Google Product Taxonomy list.
Title
Your title is the first thing people will see when they perform a relevant search on Google:
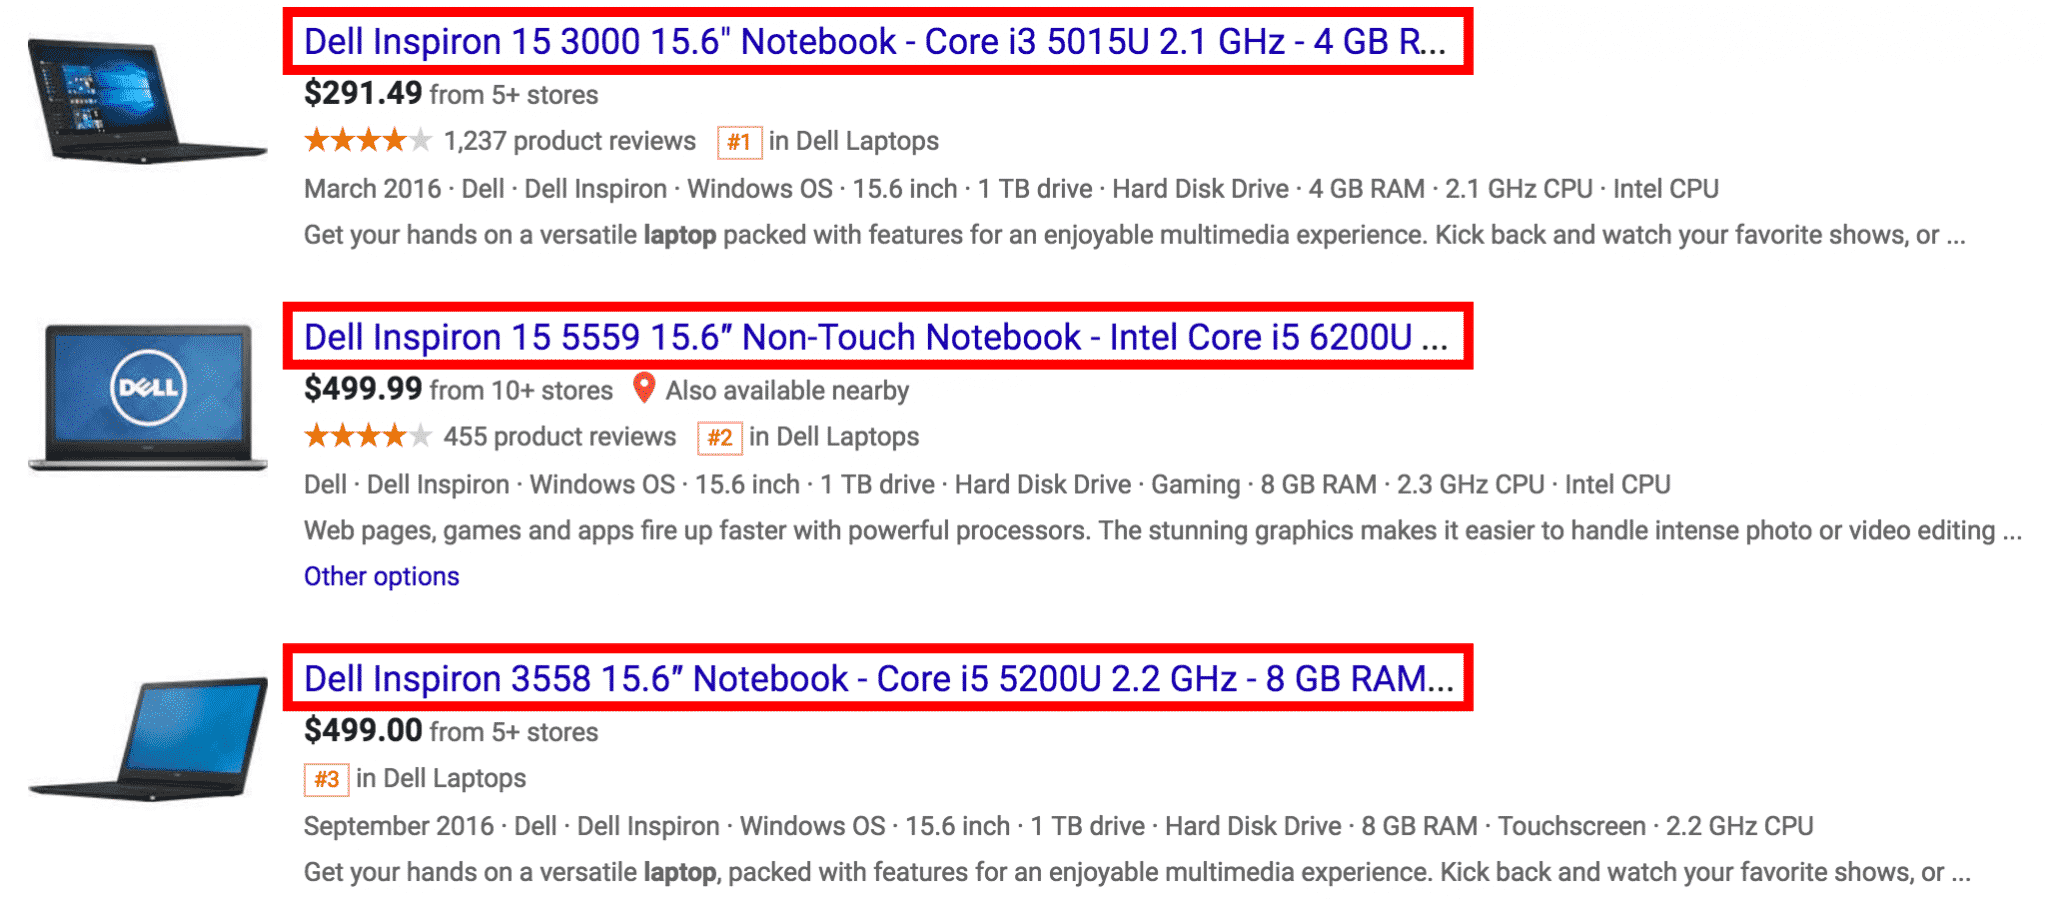
As you might imagine, your title has a big effect on the clickthrough rate of your ads, so it’s important to spend some time crafting a good title strategy for your feed.
Keep in mind that while Google allows up to 150 characters in your title, Google will only display about 70 characters, so be sure to put your most important keywords at the beginning!
In addition, Google frowns on putting overtly promotion text (“Limited Offer”, “Free Shipping”, etc) in your title, so focus your title content on products specifics like material, color or size.
Description
The description field contains the text your potential customers can read to get a better feel for exactly what your product is and does:
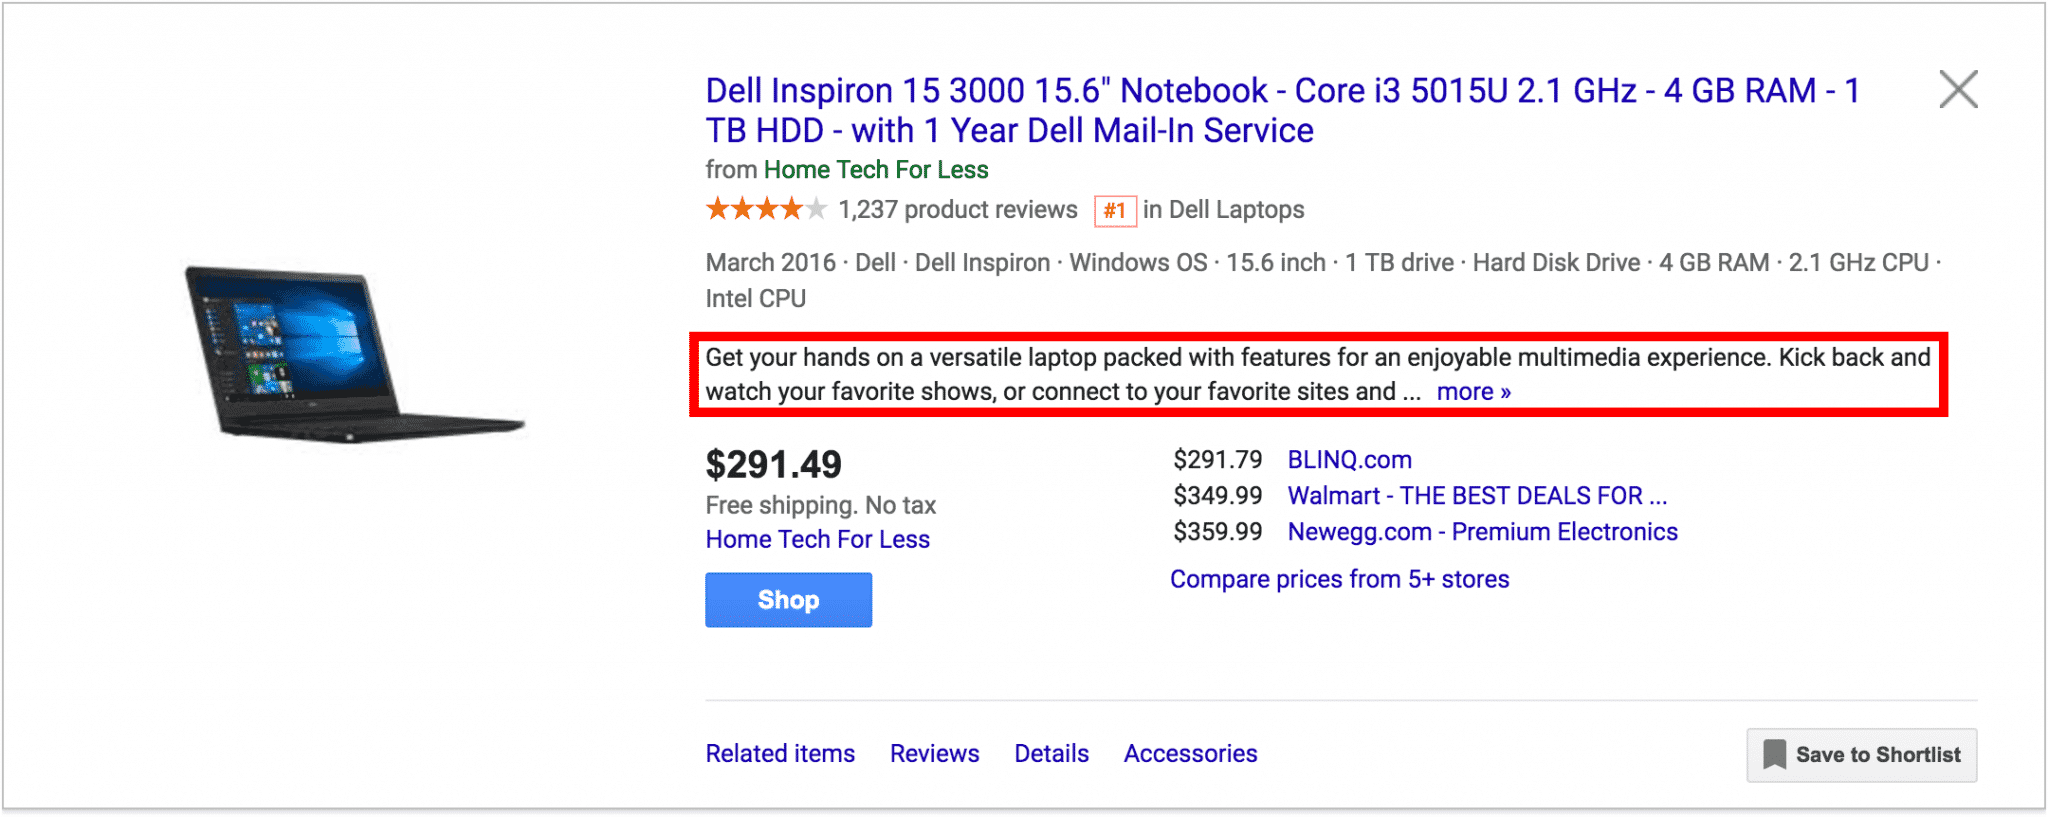
In the description field, you can enter up to 5,000 characters, but Google will only show a sentence or two. So, again, it’s important to make sure that you list the most important information first.
Here again, promotional content is a no-no, so keep it focused on the features and benefits of the product—not the benefits of buying from you.
Link
Guess what? If you’re going to run ads on Google, you need to have somewhere to point your clicks!
However, you can’t just point those clicks anywhere. Your link needs to point to your product page, not your homepage. Your link also has to have the “http://” part of your URL.
If you have a different product page for mobile users, put that link in the “mobile_link” field.
Image Link
You’ll also need to include a link to an image of your product in the “image_link” field. This link should point to a high quality, 800 x 800 px (or bigger) picture that is free of logos and extra text:
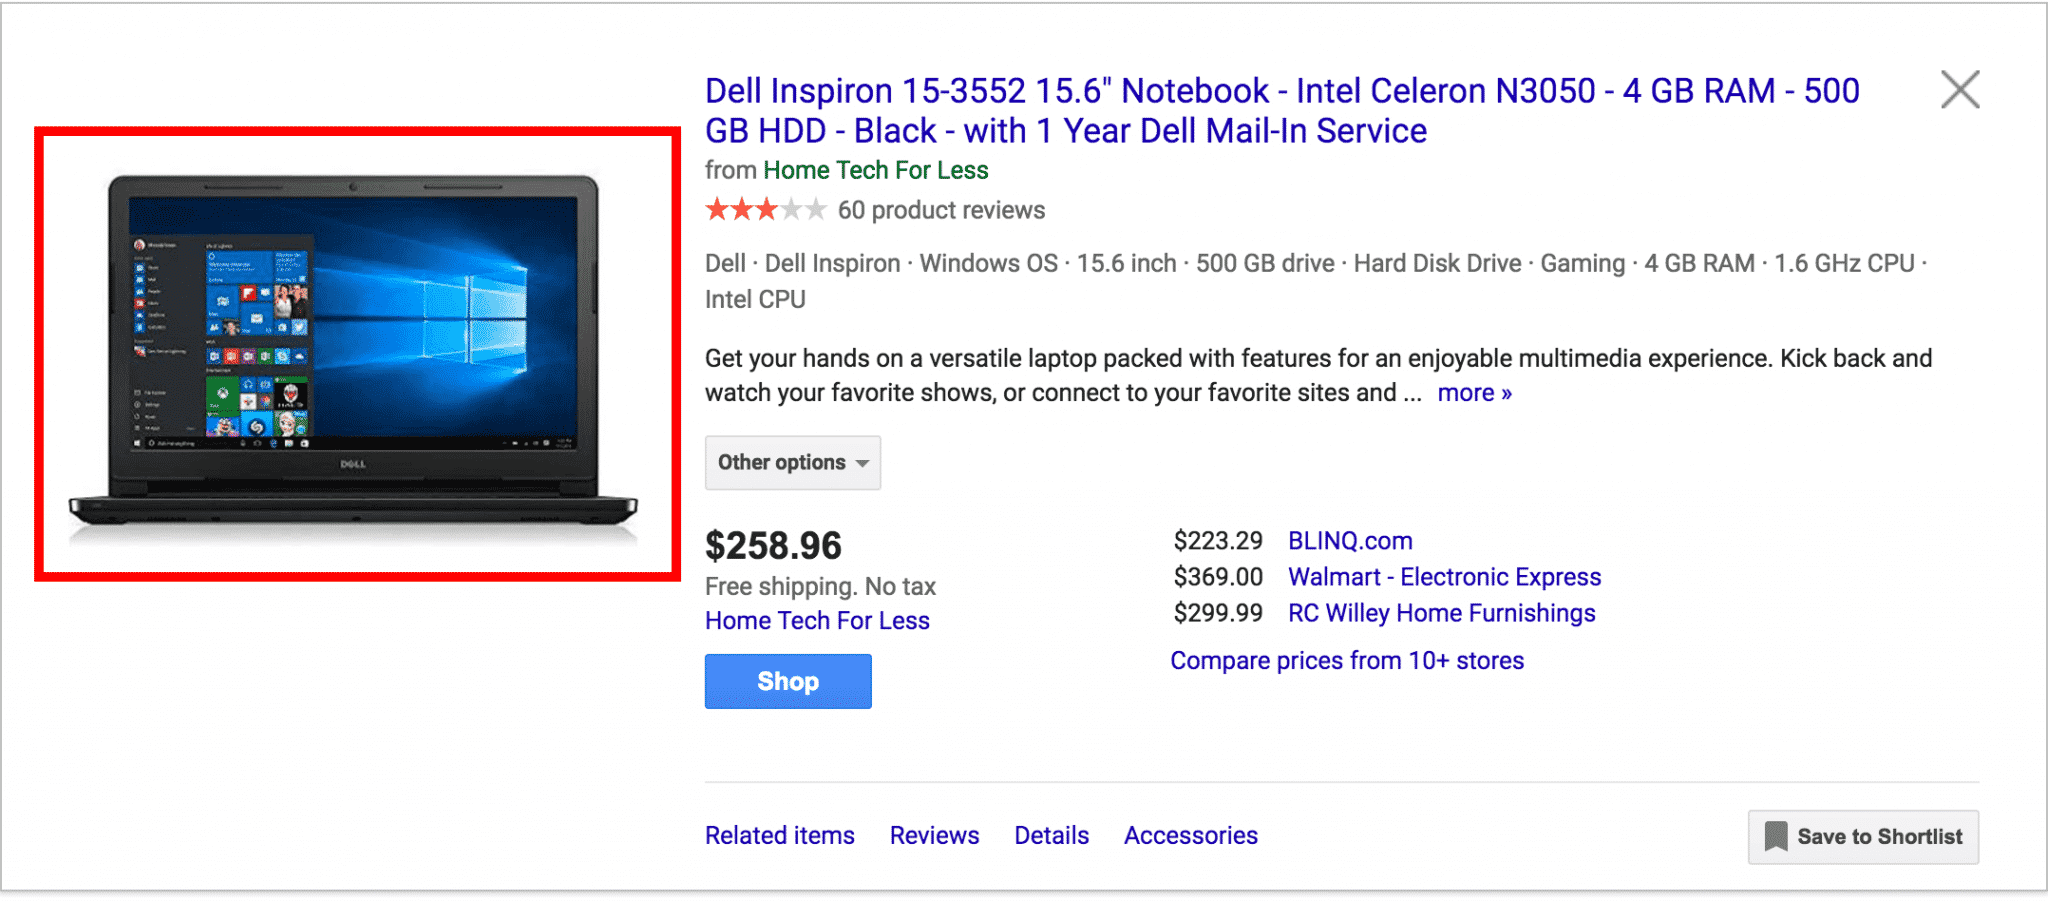
If you really want your images to succeed, though, your images need to be eye-catching. It’s not enough just to have a nice picture, you want it to draw the attention of your potential customers.
For example, check out these tennis rackets. Which one stands out to you?
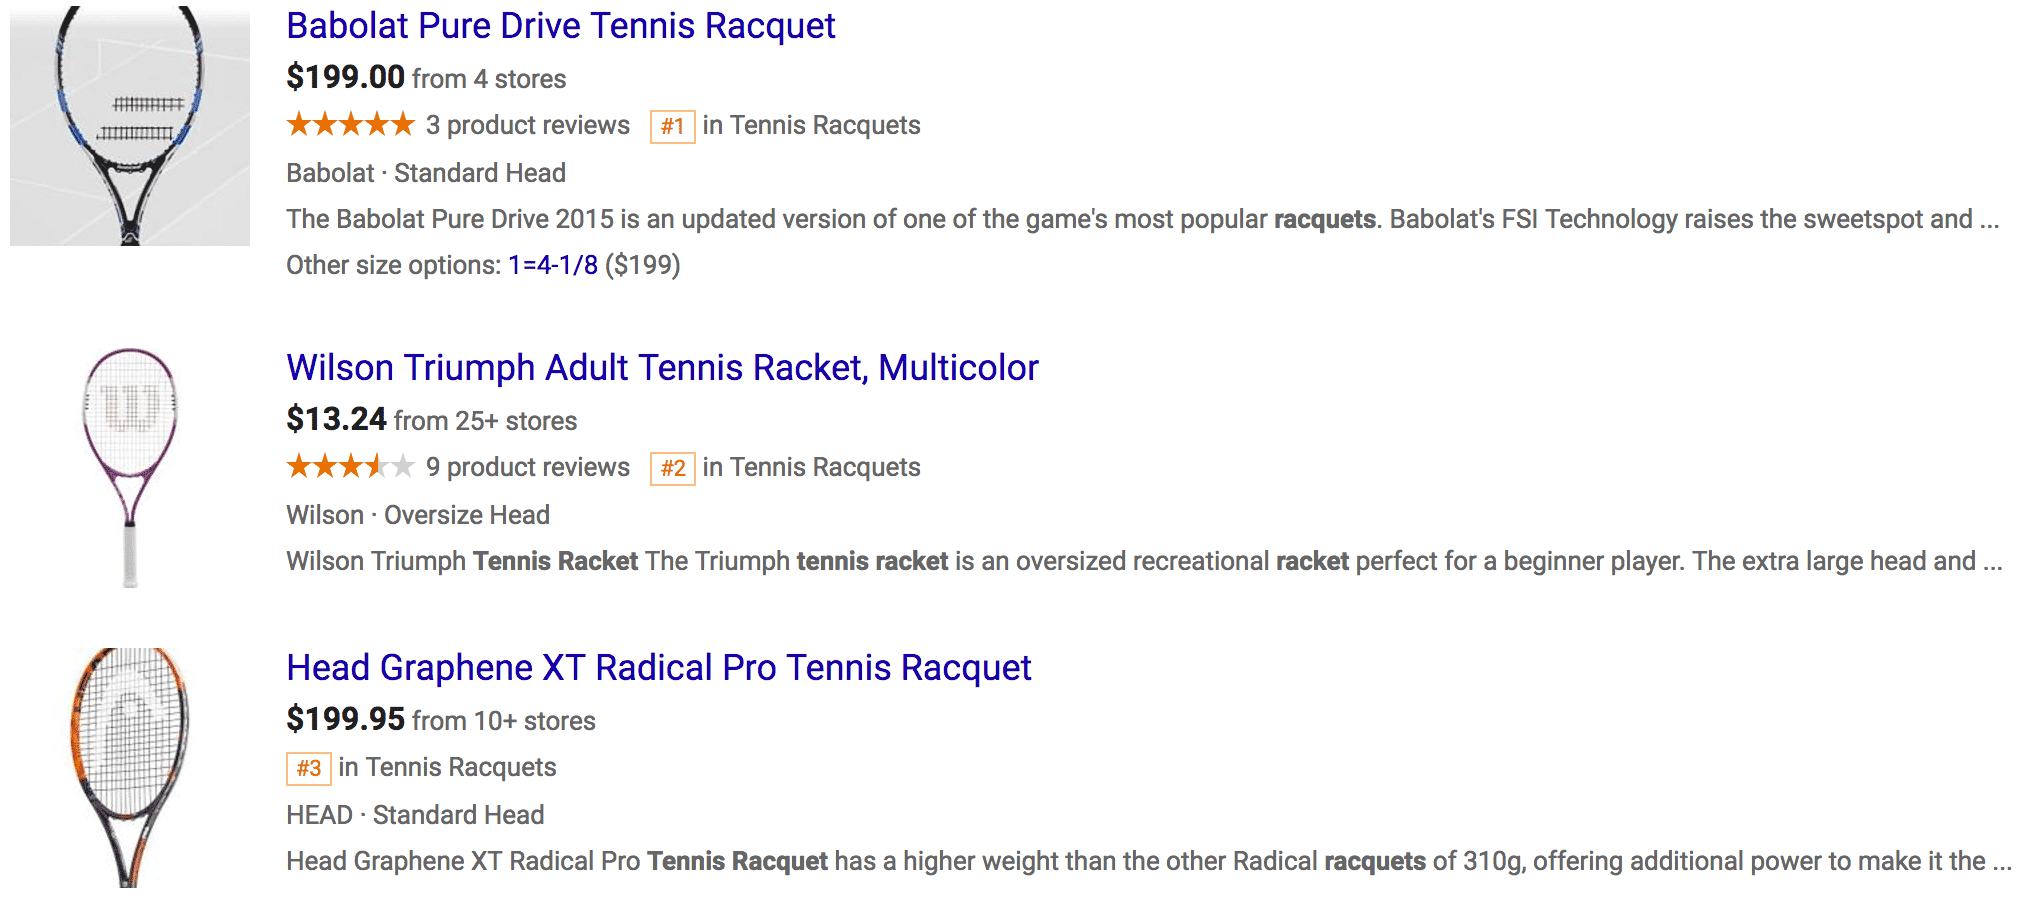
The effect is fairly subtle, but the first ad’s gray background sets it apart from the other ads. And, since different draws attention, that’s the ad you notice.
Condition
The condition field only has 3 options (new, used and refurbished), but it’s required, so make sure you complete it.
Availability
The availability field is also required and easy to complete. You can pick from in stock, out of stock and preorder. However, this field is particularly important to keep regularly updated. Otherwise, you could end up with a lot of disappointed customers!
Price
Ah, price. This is the field you really care about. All you have to do here is give your selling price and currency (for example, 547.43 USD). Just make sure that your currency matches the country you are advertising in.
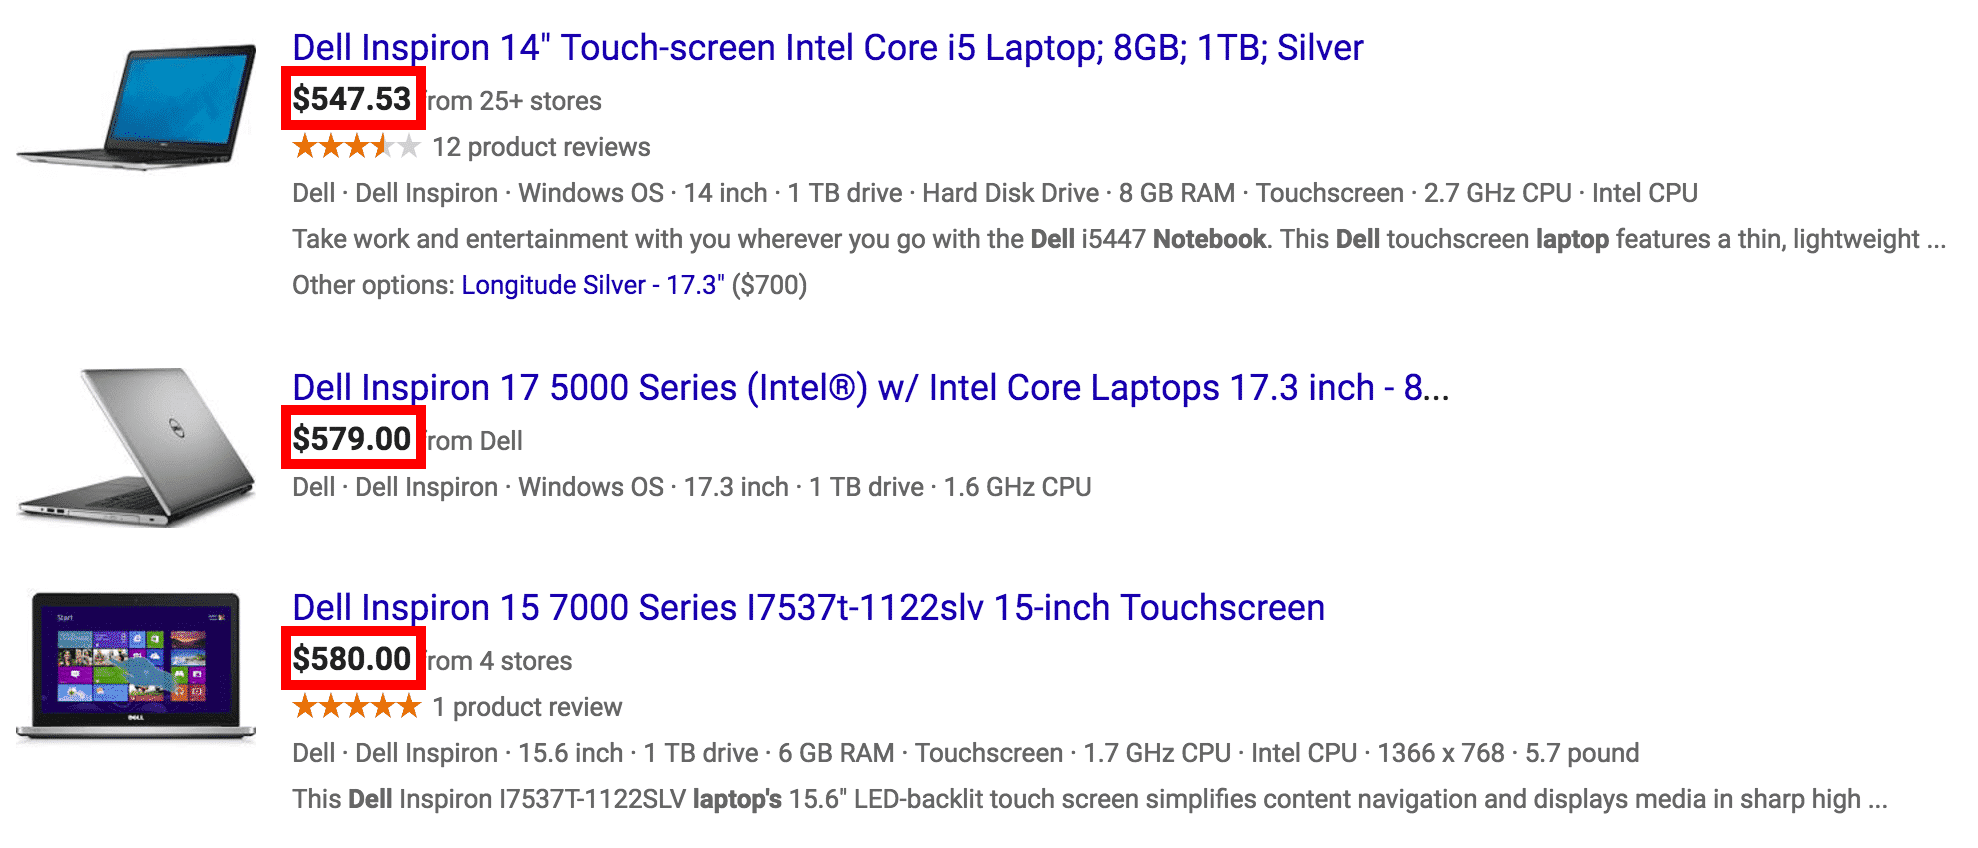
One thing to keep in mind with your price (as well as condition and availability) is that the information in your shopping feed needs to match the information on your product page. Google will penalize your ads or even prevent them from showing if you don’t.
So, if your price changes on your page, make sure you’ve updated your shopping feed!
Global Trade Item Numbers (GTINs)
Google uses global trade item numbers (GTINs) to group identical products in on the shopping results page.
GTINs are manufacturer issued. Here are the GTINs you’re most likely to see:
- UPC—this is the primary GTIN in North America
- EAN/UCC—the major GTIN used outside of North America
- JAN—the Japanese GTIN
- ISBN—a GTIN for books
Some products will have more than one GTIN (eg, both a UPC and an EAN). In this situation, just pick one GTIN to use in this field.
If your product doesn’t have a GTIN, you’ll need to use your manufacturer part number (MPN).
Manufacturer Part Number (MPN)
MPNs are created by the manufacturer of a part. They tend to be very specific to a particular part, but they serve the same basic purpose as a GTIN.
If you’re not sure what your GTIN or MPN is, try checking with your suppliers. If that fails you, you can try upcitemdb or barcodelookup.
Identifier Exists
Of course, if you’re selling custom or antique goods, you may not have either an MPN or a GTIN. In this case, set “identifier_exists” to “false”. That way, Google won’t look for a GTIN or MPN in your feed.
Brand
The brand field lets Google know who made the company. In general, this should not be your company name (unless you happen to be the manufacturer of your own product).
For example, if Amazon decided to run shopping ads on Google again, Amazon might list Scholastic Corporation as the brand for the latest Harry Potter novel, but its own business name (Amazon) as the brand for the Kindle Fire.
Color, Gender, Age Group, Size
If you are selling shoes or clothing, the color, gender, age group and size fields are all required. Of course, since most customers who are in the market to buy clothes or shoes want this information, these fields would be a good idea to complete if they weren’t required fields.
ID
The ID field is really mostly for your own reference. It’s a unique number you create that allows you to connect your Google data to your store data, so use whatever sort of system (SKU, internal reference number, etc) makes sense for your business.
Optimizing Your Product Feed
Google looks at a number of different product attributes when deciding which product to show for which search terms. Of all the attributes you could optimize, there are three that can have the biggest impact. These are three most important attributes in order of importance:
- Title
- Description
- Google Product Category
To help you make the mot of your product feed, let’s take a closer look at each of these attributes.
Title
For the title, you will want to have a short intuitive string of words that front-load the most important keywords. Your titles are how you market your products to a potential buyer, so it should come as no surprise that optimizing your titles can increase clicks by up to 9.6x.
When it comes to writing effective titles, you don’t want to keyword stuff, but you do want to make sure you have the main keywords you are targeting somewhere in the title.
Here are a few examples of good Product Titles.
Good: Size 8 Red Nike Shoes Air Max 95 Best Sale Deal
Better: Red Air Max Size 8 – Nike Basketball Running Fitness Shoe
Best: Nike Air Max 95 Men’s Shoe in Red – Size 8
In general, when people are searching for products online, they’re looking for something specific. It may not be a specific brand or model, but they usually have a particular look, feel or color in mind. If they see that information in your title, they’ll be a lot more likely to click and make a purchase.
To figure out what your potential customer are truly looking for, you need to see which search terms are triggering your Google Shopping ads.
You can do this by clicking on “Keywords” and then clicking “Search Terms”. If you create a filter for “Conversions > 1”, you will be able to see every search term people entered that led them to buy your products.

The resulting list of search terms will tell you what words people use to find and buy your products. This list gives you a lot of insight into the types of words you should be using in your titles.
If people use certain phrases or vocabulary to describe your products, your titles should reflect that so that when people read your titles, they feel like they’ve found exactly what they’re looking for.
Description
Similarly, your description tells both Google and your customers what your product is, what it does and whether or not it matches their search. There’s a lot of debate out there about what constitutes a “good” product title and description.
The key to success with product descriptions in the feed is front loading the most important keywords. Google weights the keywords in the beginning of the description more heavily. If you are able to creatively add all the keywords you want to show up for in the first sentence of the description, you will get a higher relevance score and be more likely to show up.
At the same time, it’s important to remember that Google isn’t your customer. In addition to making Google’s bots happy, your description also needs to cater to your customers.
So, if you’re selling an expensive product to an audience that cares all about the specific details and features of that product, your description should cover all of those features in detail. On the other hand, if you’re selling a cheap, run-of-the-mill item, you might want to keep your description short and sweet to avoid overwhelming potential customers.
Google Product Category
As I mentioned above, the Google Product Category you choose affects which searches your product is eligible to show up in.
Google product categories have been around for years now and they continue to be very important in making sure your products are showing up for the right search queries. There are hundreds of Google product categories to choose from. You will want to choose the most relevant subcategory you can find. Go as deep as possible into the subcategories (3-5 levels is ideal).
You can find an exhaustive list of these Google product categories here.
The broader your category, the more potential searches your product could be eligible for, so you might wonder about picking a very broad category for your product to maximize your impressions—but don’t do it! The broader your category, the more irrelevant clicks and impressions you’ll get.
Irrelevant clicks don’t turn into sales, so picking a broad category usually means you’ll end up wasting a lot of money.
On the other hand, the more specific your category is, the more relevant your traffic will be. After all, if you’re selling cycling jerseys, will the “Activewear” or “Bicycle Jerseys” category be more likely to drive relevant clicks?
“Bicycle Jerseys” is a subcategory of “Activewear”, so picking the “Bicycle Jerseys” category might result in fewer impressions and clicks, but those clicks will be a lot more likely to turn into purchases.
Polishing Your Google Merchant Center
As you work to optimize your Google Merchant Center and product feed, make sure you keep an eye on the diagnostics tab. Looking at the diagnostics tab will quickly show you if you are missing required attributes and it will also tell you if there are errors with the existing attributes.
One of the most common errors that I see is a missing GTIN (global trade item number). You can use an MPN (manufacturer part number) in place of a GTIN if you do not have a GTIN, but if you don’t have an MPN, you might feel like you’re up a creek.
Fortunately, if your product has a SKU number, you can simply map that number to the MPN attribute and you won’t have any issues at all. If you have no such number, you can add an attribute for custom product and insert the value “True”. This will help you avoid this error altogether and give you an alternate way to get your feed up and running.
If you are looking for more advanced capabilities for feed optimization, I would suggest looking at some of the third party feed management options that exist. Many are very affordable and if you are dealing with a large number of products, they usually pay for themselves with the improvements their optimizations make to shopping campaign performance.
A couple of third party feed management companies I like using are Feedonomics and Go Data Feed.
Feedonomics is much more hands off where you will basically hand everything over to them. Go Data Feed puts a lot of the power in your hands by providing you with access to their dashboard that lets you customize the optimizations you would like to make in an intuitive way. If you are thinking about it, you can usually get a free audit from these companies and then you can assess if it is worth the investment.
Conclusion
A great Google Merchant Center account is the key to a successful Google Shopping campaign. Next to all the bells and whistles you can play with in Google AdWords, your Google Merchant Center account might not seem very exciting, but trust me, if you don’t take the time to keep your Merchant Center working properly, none of those bells and whistles will matter.
Fortunately, setting up and managing your Google Merchant Center account isn’t all that difficult. If you take the time to follow the directions in this article, set it up right the first time and keep your product feed updated, you shouldn’t have much to worry about.
By the way, if you’d like help with your Google Merchant Center account or your Google Shopping campaigns, let me know here or in the comments. I’d love to help!
Any tips for Google Merchant Center optimization you’d add to this article? Any questions you’d like me to answer? Leave your thoughts in the comments.

