
How to Setup Transaction-Specific eCommerce Conversion Tracking
by Andrew Warren


Conversion tracking is important for eCommerce businesses. No shocker there, I think most great eCommerce business managers would agree that accurate revenue tracking and attribution are a critical part of eCommerce success.
That being said, it never ceases to amaze me just how many eCommerce businesses aren’t accurately tracking their revenue in AdWords. After working with a lot of eCommerce companies with thousands-to-hundreds of thousands of SKUs, I know setting up quality revenue tracking in AdWords can be a pain; but, there are ways to do it effectively.
To date, there hasn’t been a lot out there about how to set up AdWords tracking in the various shopping platforms, so I’ve had to figure most of my clients’ tracking out on my own. Having gone through the headache of figuring it all out, though, I hope I can spare some of you the trouble with this easy-to-use guide.
In a nutshell, this post takes information that I’ve gathered on my own and combines it with information provided by 3 of the major eCommerce platforms to give you an easy guide to tracking revenue in AdWords.
I’ve tried to be fairly comprehensive; but, if you don’t see your platform on here, it doesn’t mean that I haven’t worked with it—I probably just forgot. If that’s the case, please let me know in the comments and I’ll be happy to help.
Get Your Tracking Code
Before we get into the nitty gritty of tracking, you first need to set thing up right in AdWords:
To get started, you’ll need to make sure you selected “The value of this conversion action may vary” during the conversion setup process. If you haven’t already done this or you want to see if you’ve already done it, follow these steps:
- Sign in to your AdWords account.
- Click the Tools tab, and select Conversions from the drop-down menu.
- Click the name of the conversion action you want to edit.
- Click the Edit conversion settings
- Click Value. Select “The value of this conversion action may vary.” Provide a backup value to use when one isn’t provided. Click Done.
- Click Save.
- Select one of the two options under “Install your tag.”
- Save instructions and tag: Select this option if you’ll be installing the conversion tracking tag on your website yourself.
- Email instructions and tag: Select this option if someone else, such as your webmaster, will be installing the tag on your website.
- Click Done”
It should look something like this:
<!-- Google Code Conversion w/Values Page -->
<script type="text/javascript">
/* <![CDATA[ */
var google_conversion_id = 1234567890;
var google_conversion_language = "en";
var google_conversion_format = "1";
var google_conversion_color = "ffffff";
var google_conversion_label = "Wk66CJYKwABCg6zc6wM";
var google_conversion_value = 1;
/* ]]> */
</script>
<script type="text/javascript" src="//www.googleadservices.com/pagead/conversion.js">
</script>
<noscript>
<div style="display:inline;">
<img height="1" width="1" style="border-style:none;" alt="" src="//www.googleadservices.com/pagead/conversion/1234567890/?value=1&label=&guid=ON&script=0"/>
</div>
</noscript>Once you’ve got your code, you’re ready to start setting up tracking! Look through the rest of this post and find your shopping platform to proceed.
Magento
Magento is one of the most widely used e-commerce platforms because it’s highly customizable, free, and open-source.
The fact that it’s open-source makes it ideal because many third-party developers have created useful extensions that make customizing it super easy. One of those extensions is called LUKA Google AdWords Conversion Tracking.
The LUKA extension makes conversion tracking with values a breeze for Magento. I’ve used it several times and it’s both simple and effective.
How to Set It Up
- Download and install the extension in your Magento backend. If you don’t know how to do that you can read instructions here.
- Login to your Magento backend
- Go to: System > Configuration > Google API
- Enter in your Conversion Label and ID (you can get these from the conversion code that you created in AdWords)
- Save the configuration and that’s it.
You’ll want to test it of course, but that should do the trick.
Shopify
Shopify is another very common platform and also has a fairly simple and straight forward solution. It involves a little more effort than Magento, but you’ll be able to do it now problem. Shopify has laid out very clear instructions on their site or you can just follow the steps below.
How to Insert the Tracking Code

- From your Shopify admin, click Settings, then click Checkout (or press G S C):
- Scroll down to the Order Processing In the Order Processing section, locate the Additional Content & Scripts editable text box.
- In the Additional Content & Scripts editable text box, paste the code snippet you received from Google.
- Click Save.
Manipulating the Snippet to Provide Real Data
In the code snippet you just pasted, replace: var google_conversion_value = 1;
With this code: if ({{ subtotal_price }}) { var google_conversion_value = {{ subtotal_price | money_without_currency }}; }
If you prefer to include taxes and shipping in the conversion amount, use this instead of the code snippet above: if ({{ total_price }}) { var google_conversion_value = {{ total_price | money_without_currency }}; }
We need to take care of the noscript tag as well, since customers may disable JavaScript in their browser when checking out.
Replace the following in the pixel tracking URL: value=1
With: value={{ subtotal_price | money_without_currency }}
Or this: value={{ total_price | money_without_currency }}
That’s it for Shopify. Pretty easy, right?
BigCommerce
Another great platform and another simple solution provided by BigCommerce. First, you’ll need the conversion code we generated at the beginning.
Adding the Code to Your Store
- In your Bigcommerce control panel, click Settings › Advanced Settings › Affiliate Conversion Tracking. In some versions of the control panel, this is located under Settings › Advanced Settings › Affiliate Conversion Tracking.
- Paste your code in theConversion Tracking Code field. Note, if you already have another tracking code in this field, you can add this one below it.
- Replace the “0.00” after var google_conversion_value = and ?value= to %%ORDER_AMOUNT%% as shown below.
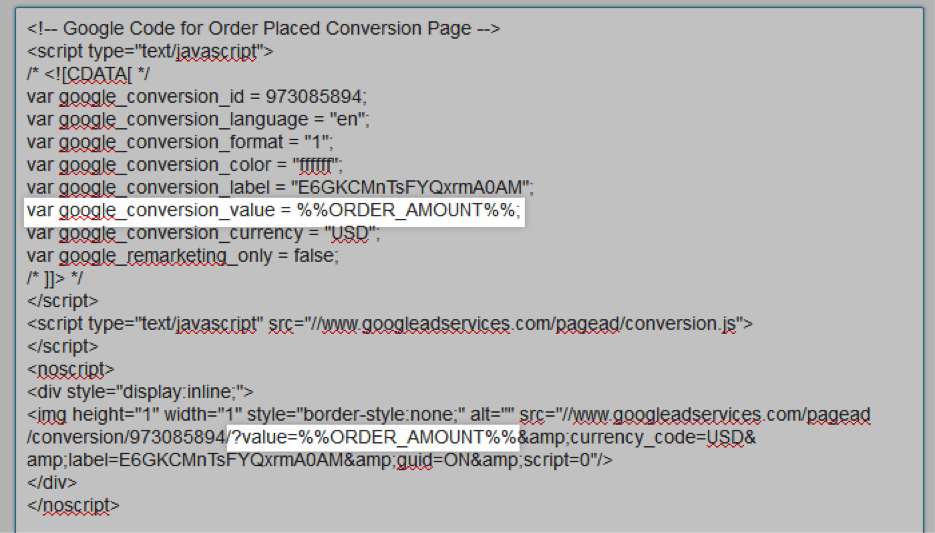
- Save your changes.
Again, always remember to check this once it’s complete to make sure it’s working properly.
Conclusion
That’s it for this week. We covered most of the simple solutions today. Next time we’ll cover one more simple one, WooCommerce for WordPress, before we move on to more advanced solutions for Volusion, 3DCart, and Pinnacle Cart.
Also, stay tuned because I’ll be writing a post on setting up Dynamic Remarketing for all these platforms in the next few weeks.
Let me know if you have any questions in the comments below and I’ll be happy to help with any integrations you’re having trouble with.


