You Need Google Tag Manager | What & How to Set Up
by Joseph Jones • April 4, 2023
Welcome! We’re going to take a minute to talk about data quality. Yeah, data quality!
As marketers, we tend to jump deep into our creative minds but we also tend to forget about tracking analytics accurately so we can prove that our work is well… working.
In marketing, there’s been a huge push for years for more data. The more, the better, to the point where it felt like quantity was the end game for so many businesses.
More data certainly can be better… but only so long as the quality and accuracy of the data are top-notch, too.
That goes for advertising campaigns just as much as all other elements of your business.
The Google Tag Manager can help with this, whether you want to run action-based retargeting campaigns the second you can, or you want to understand which campaigns are driving the most conversions.
In this post, we’re going to go over everything you need to know here, including answering all-important questions like “what is the Google Tag Manager used for?” and “how to set up the Google Tag Manager?”
What is a Google Tag?
Before we start talking about the Tag Manager, let’s take a minute to go over what the tags themselves are.
Google tags are snippets of code that can be placed on different third-party platforms (including your site) to facilitate data sharing. You can use the newest version of the Google tag to send data from your website (like items added to a cart, or purchases made) to multiple different Google product accounts, like Google Analytics or Google Ads.
There are plenty of third-party tag configurations, allowing you to sync data from Google and third-party platforms like Crazy Egg and LinkedIn Insight. You can also create custom tags, which can be image, HTML, or function tags.
What is the Google Tag Manager?
The Google Tag Manager (GTM) helps you manage, track, and install your Google tags. It allows you to create new tags, see which tags have been created, and assess the publication status of any changes made. It’s a free tag management system available natively through Google.
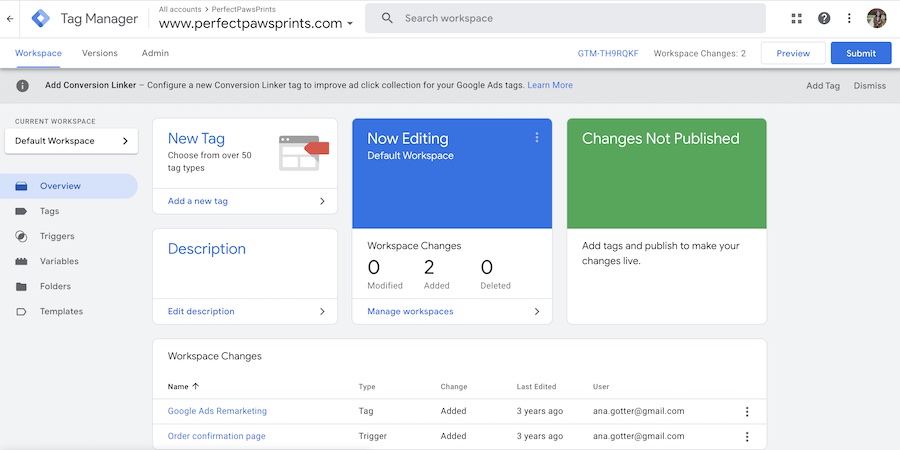
You can see how these features work in the video from Google below:
Why Use the Google Tag Manager?
The Google Tag Manager makes it easier than ever to set up Google’s tracking tags on your site and to integrate third-party data with Google’s database through additional tags.
We do want to note that this isn’t exactly the easiest setup process that you’ll have in the Google suite of tools; there’s some understanding of coding required, and you’ll need some technical and strategic information to set up individual tags.
That being said, once the account is set up, ongoing management is easy.
You can use these tags to automatically share relevant information with Google, which can then be used to automatically:
- Track a user’s actions on your site after clicking on Google Ads.
- Accurately report on conversion data that happens after users click on your ad.
- Collect data for remarketing campaigns from your own site and from third-party platforms that you’re already using to track and store user behavioral data.
- Improved optimization through Google thanks to accurate data shared for conversion reporting.
And if you’re wondering why you should use the tag manager instead of alternatives, the answer is simple: GTM is a trusted, efficient, all-in-one source that streamlines data tracking and reporting.
By using the Google Tag Manager, you’re also able to have always-up-to-date information available for Google. This means remarketing campaigns that are able to reach users nearly immediately after they visit your site or add an item to a cart, and even conversion reporting data that is more accurate.
How to Set Up the Google Tag Manager
Setting up the GTM is remarkably easy, and it’s something that many businesses and advertisers are able to do themselves.
To get started, you’ll head to the Google Tag Manager page. You can sign in and then get started creating an account.
Creating a Google Tag Manager Account
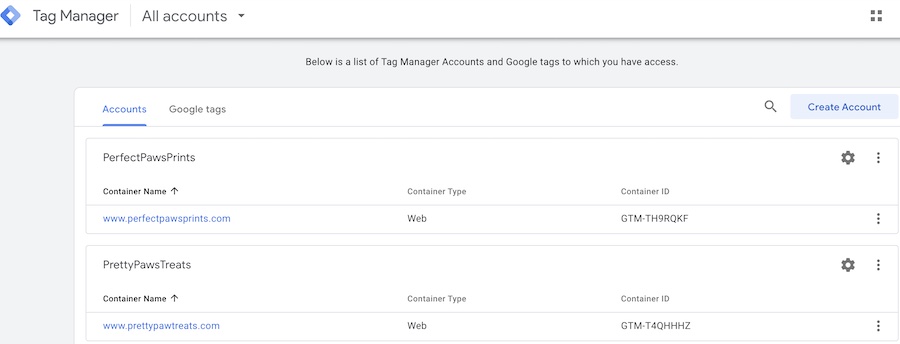
When you first log in to GTM, you’ll be able to see any existing accounts and tags that you have access to. This is linked to your Google account.
You can create a new account by clicking the blue “Create Account” button towards the top right corner of the dashboard.
You’ll then be asked to create a name for the Tag Manager account and to set the country. You’ll then choose the site connected to the account and the specific platform in question. You can choose from web, iOS apps, Android apps, Accelerated Mobile Pages (AMPs), or Server.
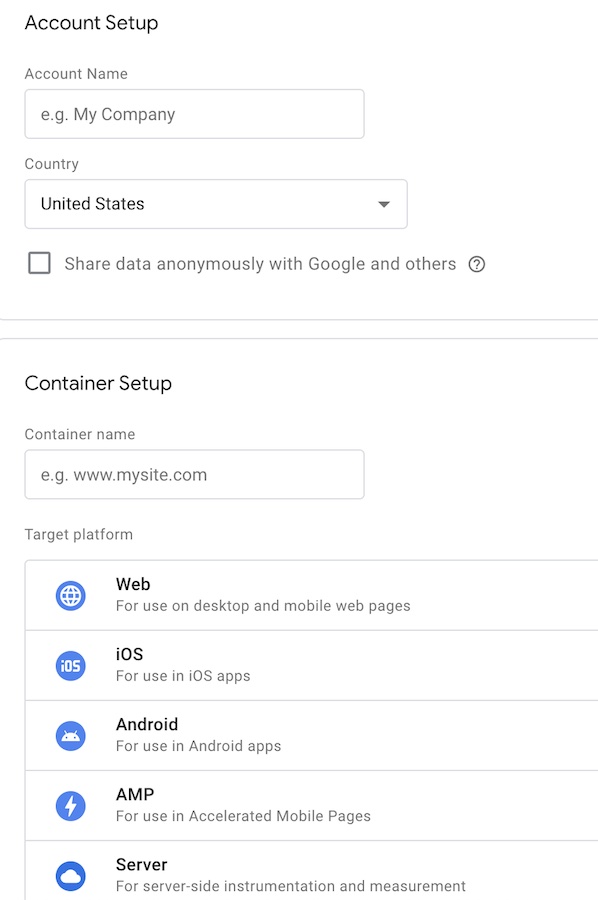
Once you’ve made your selections, save and you’re ready to get started on adding tags!
Creating Google Tags
After you set up your account, you need to create tags that can sync the information you need to and from Google Ads.
Click on “New Tag” in the top left corner of the dashboard. There will be over 50 different tag types to choose from.

When you click, this screen will pop up:
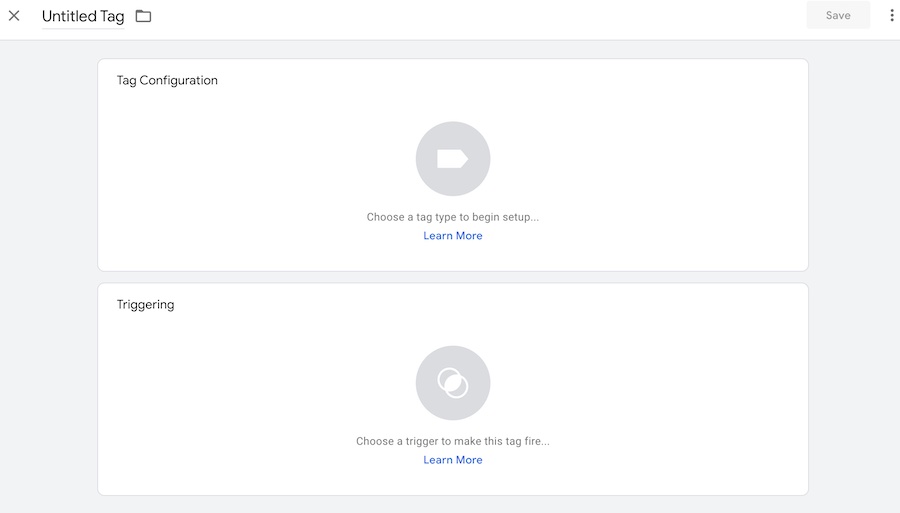
Start by naming the tag; we recommend opting for something descriptive for easier management later on. Then you’ll choose the tag configuration, which details the type of tag you’ll set up. Click on the Tag Configuration section, which will open this drop-down menu where you can select the type of tag you want to create:
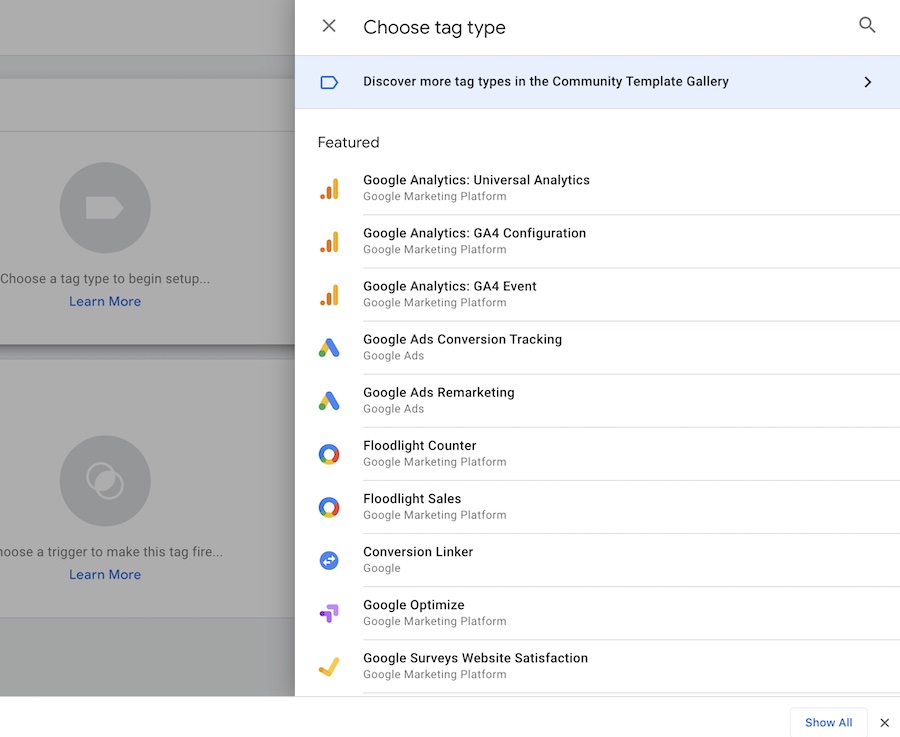
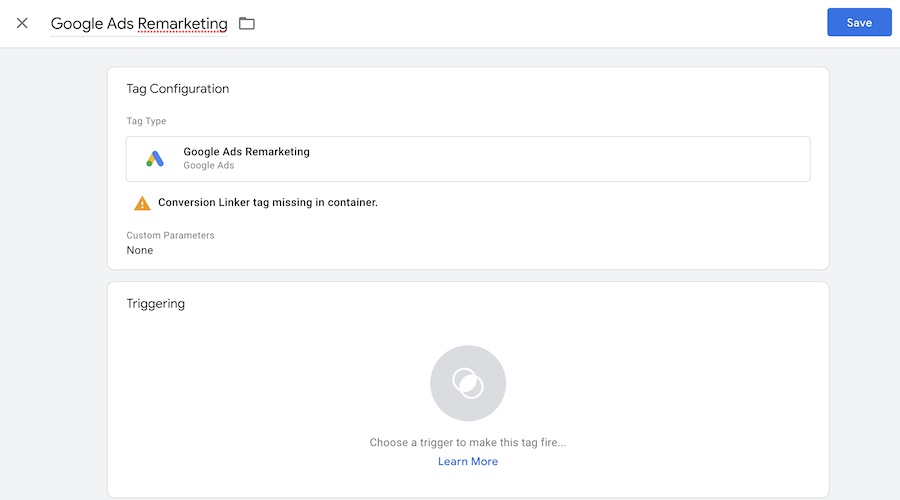
For this example, we’ll create a Google Ads remarketing tag. Because we’ve made this choice, we’ve received a notification: “Conversion Linker tag missing in container.”
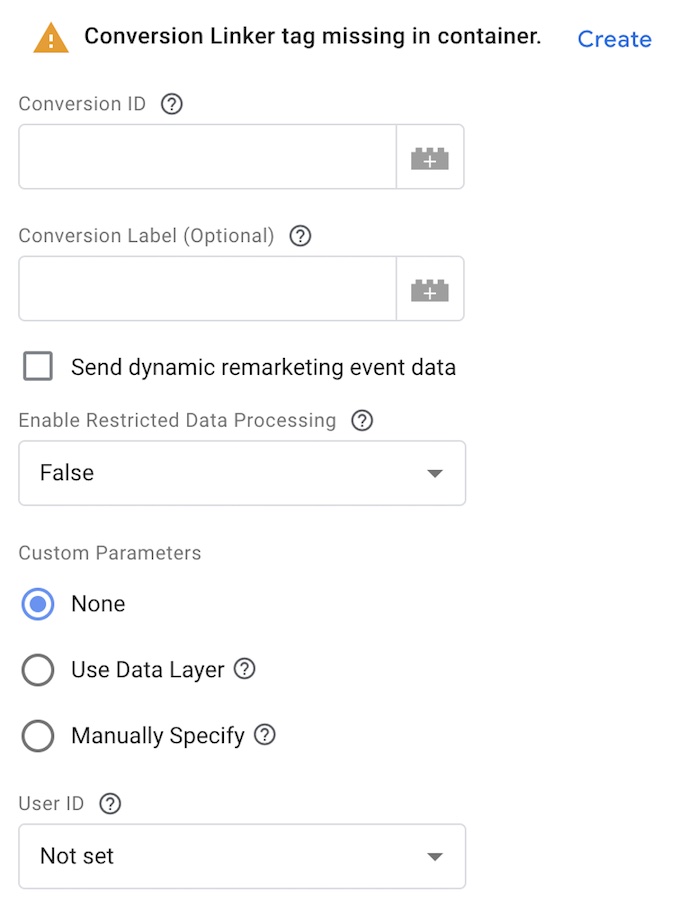
When you click the notification, it will pull up a form where you can fill in any needed information. In this case, you’d need to enter the Conversion ID and make other necessary selections around restricted data processing, custom parameters, and user ID.
Once you do this, you’ll choose a trigger to complete the tag creation process. For the ‘remarketing’ tag, we have the option to choose from different triggers like page views on all pages, an order confirmation page view, and initialization for all pages.

Installing the Google Tag Manager on Your Site
In order to utilize tags fully, you need to install the Google Tag Manager on your website.
To do this, head to the “Admin” tab (you start on the “Workplaces” tab, for reference), and then find “Install Google Tag Manager.”
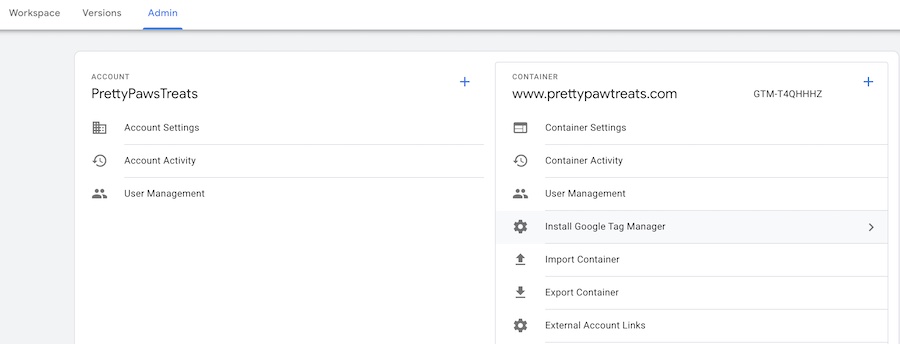
This will bring you to a pop-up that gives you your GTM codes, which will be copied and pasted into different parts of your website.
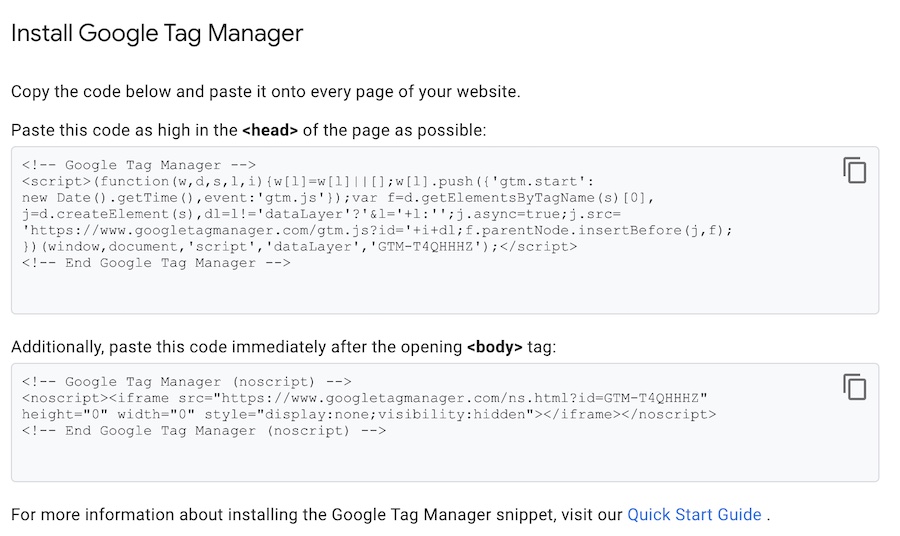
You’ll copy the first section of code and paste it as high in the <head> of the page as possible on every page of your site. The bottom section of the code should be pasted immediately after the opening <body> tag – again, on a sitewide scale.
If you’re uncomfortable with coding, your advertising or SEO agency should be able to help with this. You can also look into integrations that make this simpler, like the Insert Header and Footer plugin for WordPress or the Google Tag Manager app for Shopify.
Troubleshooting Your Google Tag Manager
Are you experiencing issues with your GTM? According to Google, these are the most common problems causing issues with the GTM:
- Unpublished changes, which may include containers that haven’t been published. Keep in mind that you should wait several minutes after publishing to test a new container, and only do so after reloading the page.
- Issues with triggers, including your triggers being too specific and causing them to not fire, or having conditions that aren’t present for an expected trigger behavior.
- Unexpected app or website changes, particularly when it comes to code changes. This is particularly common with web page triggers that rely on HTML IDs and class attributes, but configuring your container to use a data layer can help.
- Improperly installed Tag Manager. Proper GTM installation will capture as many user page views as possible, whereas improperly installed GTM installation may cause users with short page view windows to be missed, with the tag not firing in time. If you’re unsure about installation, consider working with an agency to make sure that your account is set up for success.
If you think there may be problems with a specific container, you can use Google’s free Tag Assistant Legacy extension to verify that the tags were installed correctly. See how it works here:
Final Thoughts
Google’s Tag Manager has become the most efficient way to manage and set up a large number of tags that can offer invaluable data for your Google Ads campaigns. When you want to improve conversion reporting data, remarketing potential, and optimization capabilities, GTM is going to be a useful weapon in your arsenal.
Because GTM can be a little tricky to start with, we offer setup as part of the Google Ad services we offer our clients. We’ll get your Google Tag Manager installed correctly with the the right tags in place to get Google the information it needs to help your campaigns excel.
Need help setting up your Google Ad accounts and managing your campaigns? Get in touch to learn more about our PPC services here.


