How to Set Up Call Tracking for Your Dental PPC Campaigns
by Aden Andrus • January 6, 2017
If you’re like most dentists, most of your online leads don’t fill out a form…they call you!
Sadly, the average dental campaign doesn’t do a great job of tracking calls. At best, they might record some of the calls that come into their office, but they aren’t really sure how they got those calls.
Now, this is different from tracking calls made from an ad extension. Tracking call extensions is easy.
But what about all of the people who see your ad, click through to your site and then call? Wouldn’t you like to know if they are converting?
More importantly, wouldn’t you like to know which keyword they used and which ad they clicked?
After all, if you don’t know where your leads (ie, calls) are coming from, how can you optimize for more quality phone calls if you don’t know where your current calls are coming from?
Setting Up Quality Call Tracking for Your Dental Practice
Fortunately, it doesn’t have to be that way. This article will teach you how to combine CallTrackingMetrics, AdWords and Google Analytics in a way that will help you optimize your paid search performance.
Basically, there are 7 simple steps to this process:
Step 1: Get Your Numbers Set Up
First, you’ll need to log into your CallTrackingMetrics account and buy some tracking numbers.
![]()
Once you’ve got your numbers, you need to set your receiving number. This is the number your calls will be sent to (most likely your main office number).
You’ll want your new tracking number to appear on your site or landing page whenever someone clicks on your ad. CallTrackingMetrics and AdWords can automatically swap your new number in for a number on your site.
Odds are, you’ll want your new number to swap in for the normal office number on your website or landing page. To set that up, enter the main number on your page into the “Web Target Number” space.
Now, click Numbers > Tracking code:
![]()
CallTrackingMetrics will provide you with a code that will allow it to substitute your tracking number for your default site number. Copy that code and paste it into the <head> Tag of every page.
Step 2: Connect Google Analytics and CallTrackingMetrics
Now head over to the Google Integration page in CallTrackingMetrics (make sure you’re logged into Google Analytics in another tab).
![]()
Open the page, click “link my account” and authorize CallTrackingMetrics to link up with your Google Analytics account. Once your account is authorized, select your account profile in the dropdown menu and click “Use Profile.”
![]()
You should be good to go!
Step 3: Make Sure Your Google Analytics and AdWords Accounts are Connected
As you might imagine, if you want to track calls effectively in AdWords, you need to have your Google Analytics and AdWords accounts connected.
To make sure you’ve got this set up, open the Admin section in your Google Analytics account. There’s an “AdWords Linking” option under the “Property Column.”
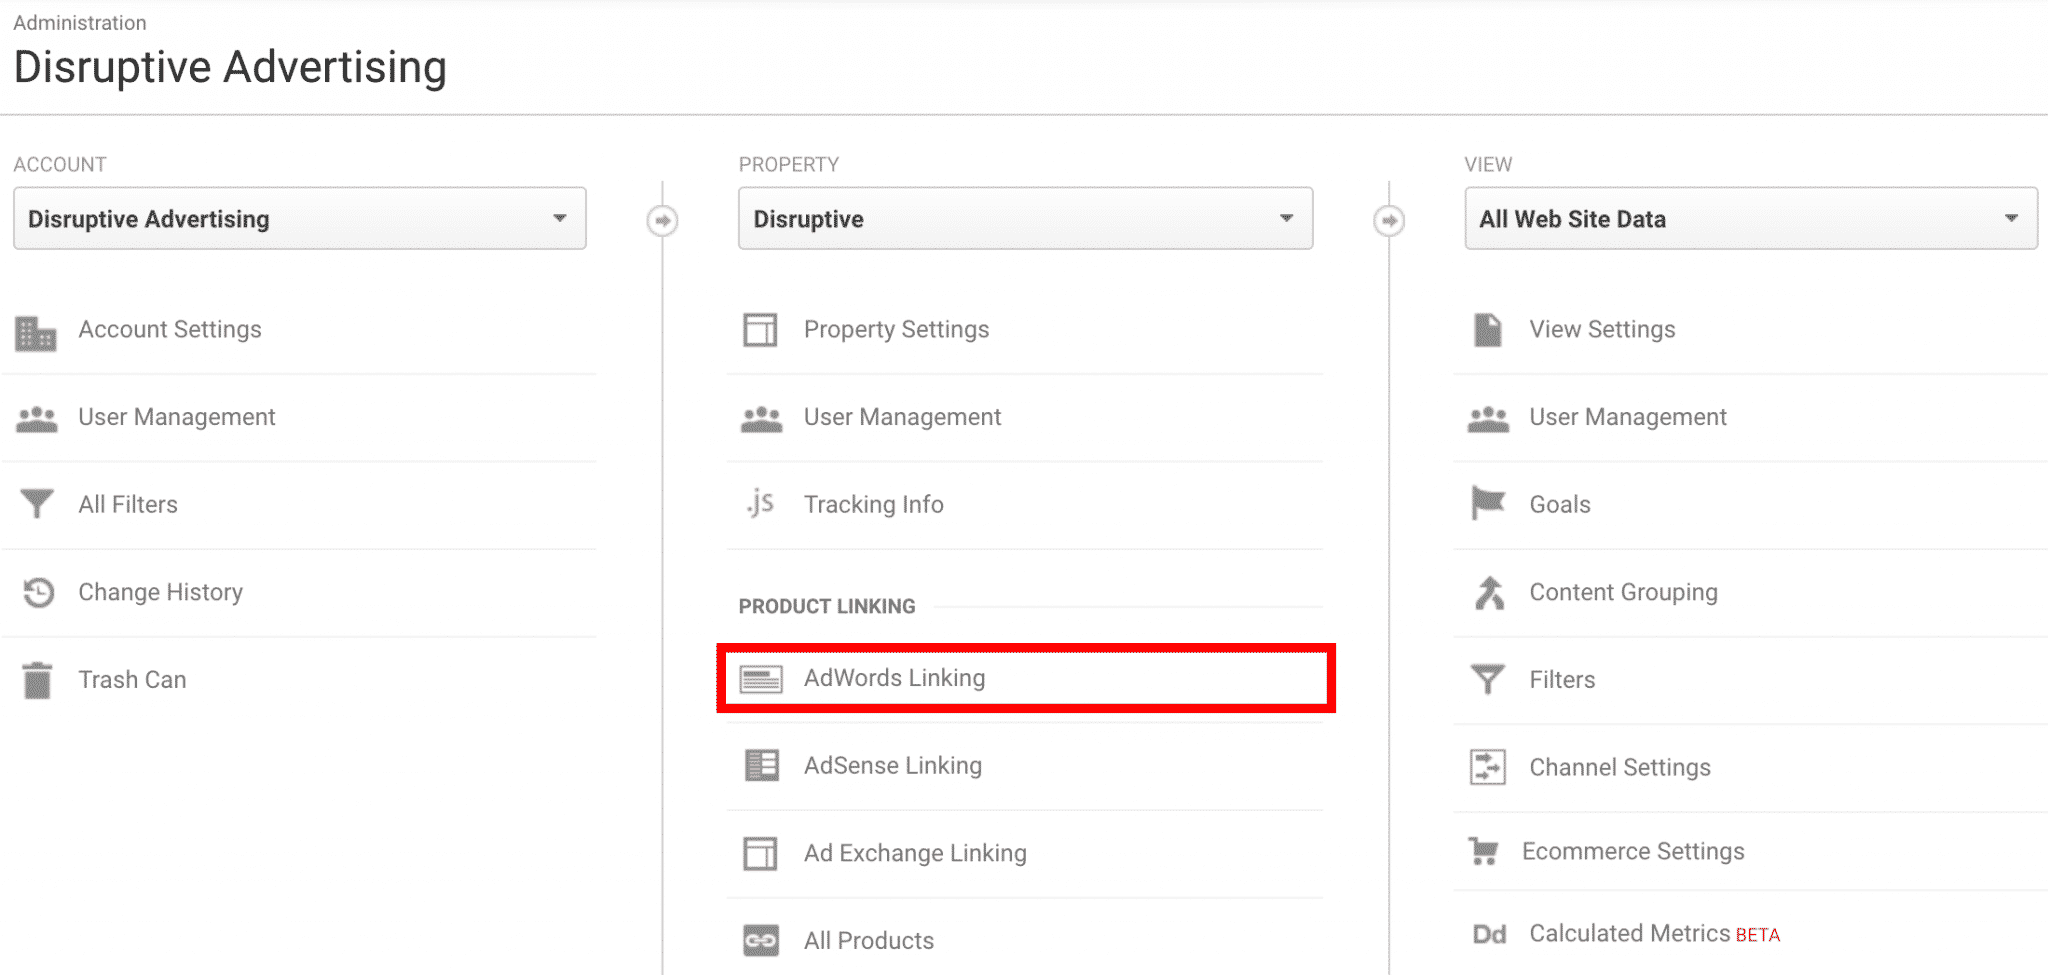
If you click on “AdWords Linking,” you’ll be able to see if you Analytics account is linked to an AdWords account.
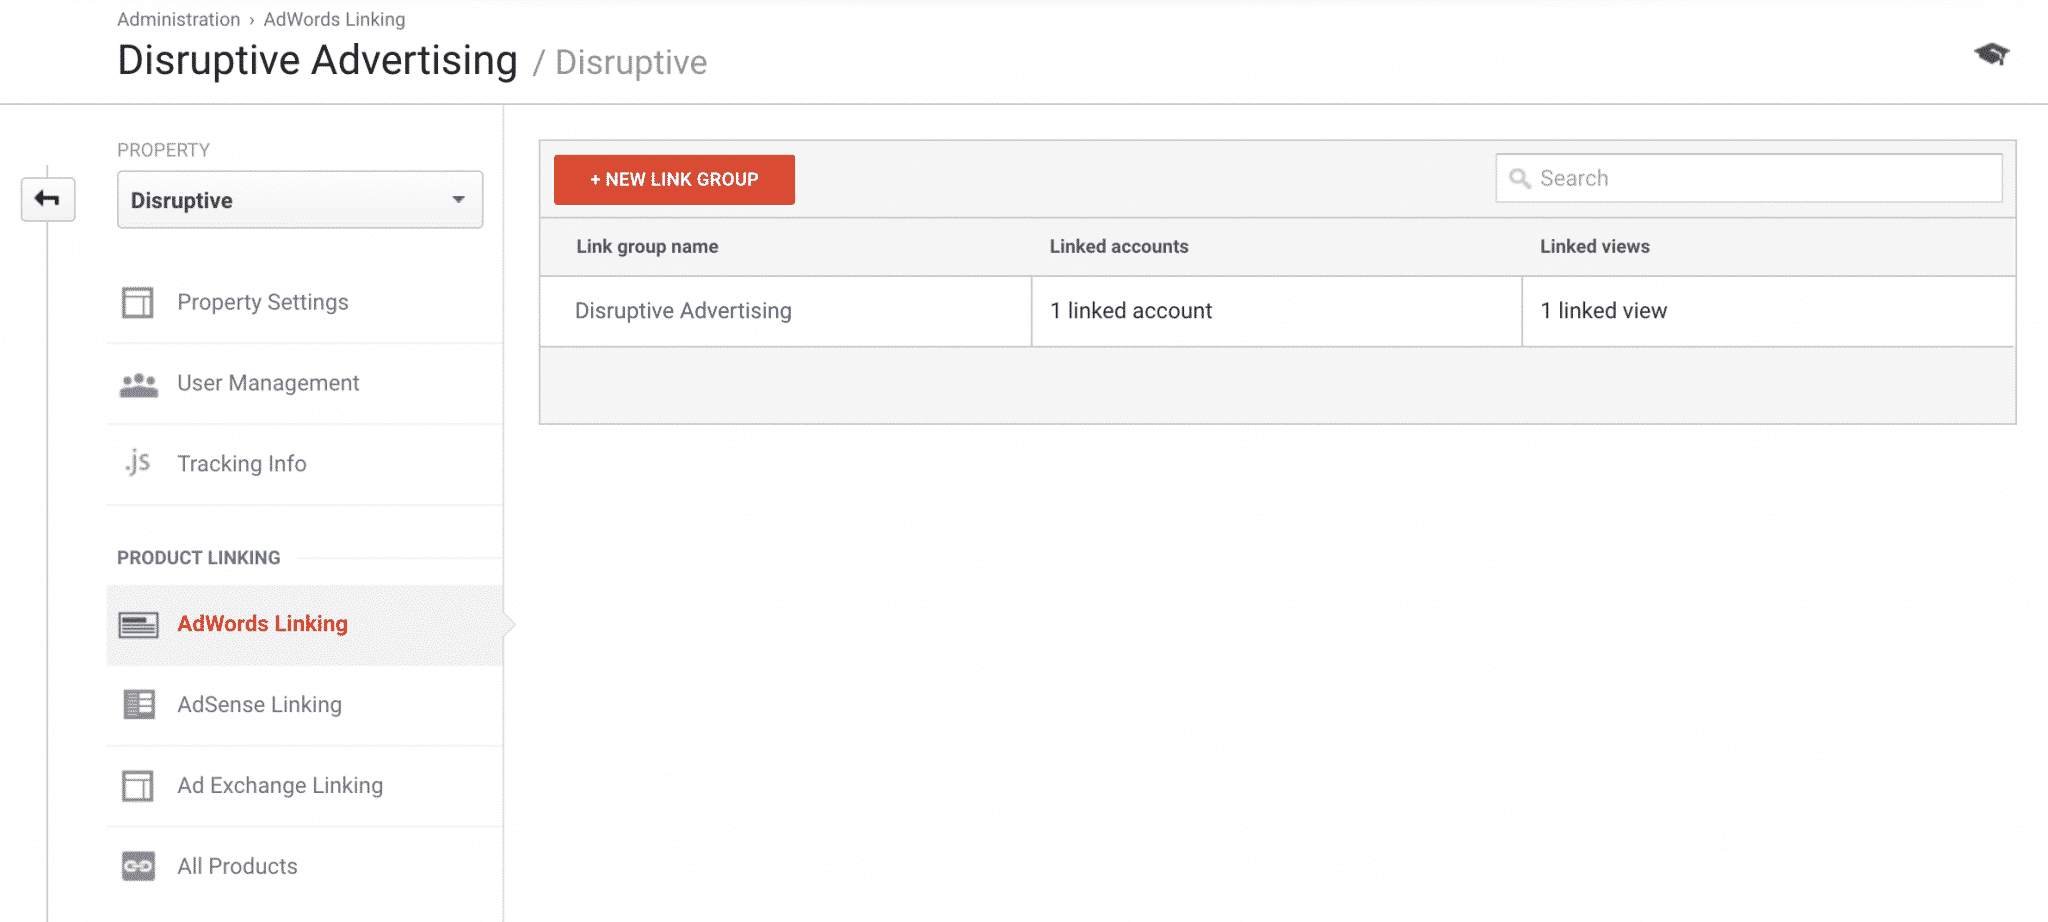
If your accounts aren’t linked, this video will walk you through linking them up.
Once you’ve verified that your accounts are linked, it’s time to set up some goals!
Step 4: Create Call Event Goals in Google Analytics
Unfortunately, simply linking all your accounts isn’t enough. If you want to be able to track calls effectively, you need to set up call event goals that will tell Google Analytics and AdWords what you want to track and measure.
Since CallTrackingMetrics is communicating with Analytics, which is then communicating with AdWords, you’ll need to set things up in Google Analytics. That way, whenever you get a relevant call, it will trigger an event in Analytics and then send that event data to AdWords.
Open the Admin Panel and click “Goals.”
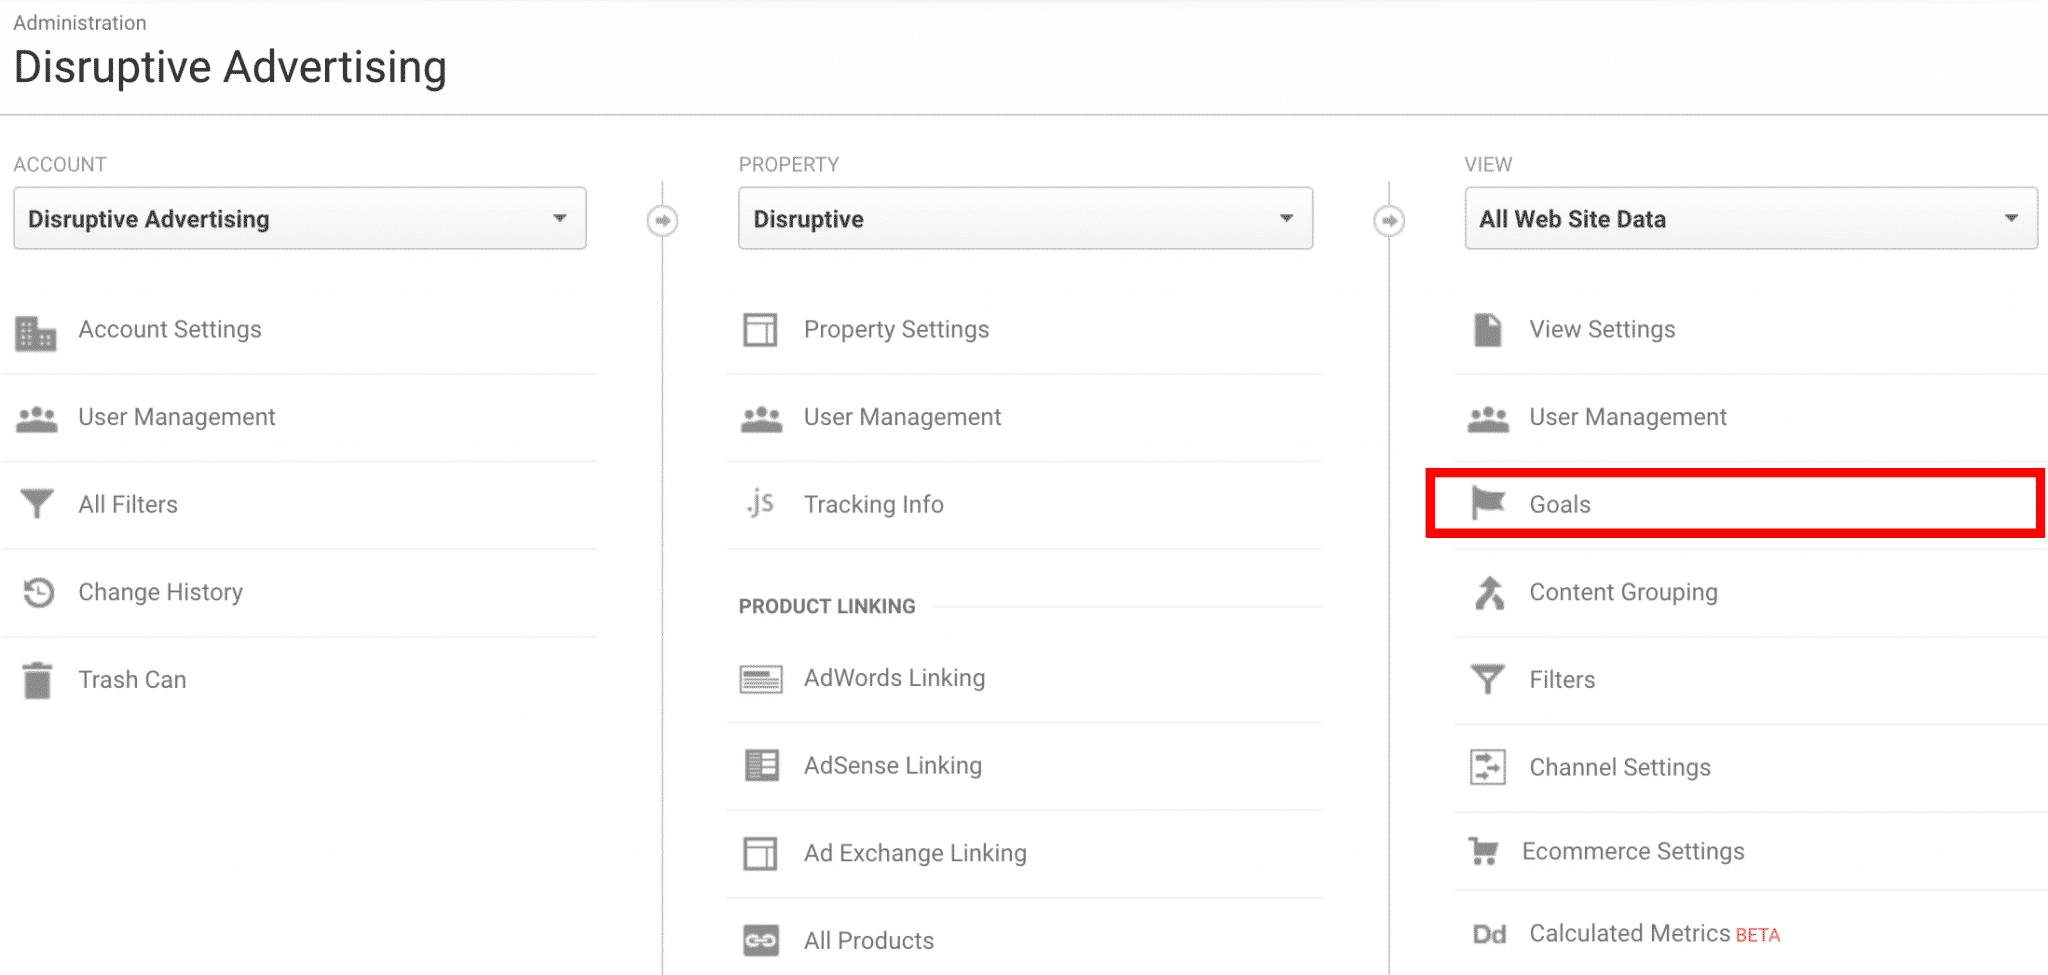
Next, click “+ New Goal.” Give your goal a name that makes sense, like “Calls” or “Google Paid Search Calls”.
From there, you have 4 fields you can complete:
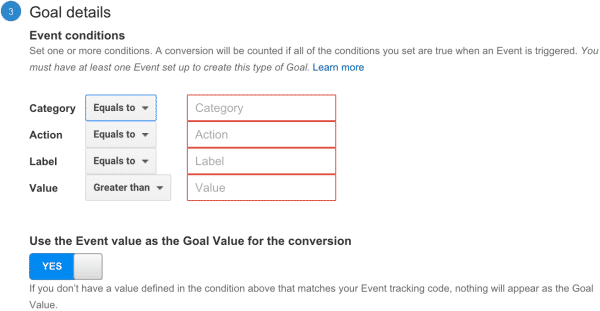
The only mandatory field is Category. This needs to be set to “Category Equals to Calls”. That way, the goal will pull data when someone makes a call.
The other 3 fields are up to you, but here’s a quick breakdown to help you decide how you want to approach these fields:
1. Action
Odds are, you probably want to track calls from all sources with this goal, so I’d generally recommend leaving this field blank.
2. Label
This field allows you to separate out first time and repeat callers. Again, most of the time I’d suggest leaving this field blank. That way, if someone calls your practice a few times (which usually means they are much more interested in becoming a patient), you are tracking all of their calls.
On the other hand, if you only want to track first time callers, change “Equals to” to “Regular Expression” and add “first-call” as your criteria.
3. Value
When it comes to calls, “Value” is actually a bit misleading. It refers to talk time (in seconds)—not a dollar amount.
Unlike the previous 2 fields, “Value” can actually be a useful way to filter your data. Someone who calls your practice by accident and immediately hangs up doesn’t represent a potential lead.
If you want to avoid tracking those calls as “conversions”, you can set the value as “30” or “60.” That way, Google will only register a call as a conversion if it lasts for more than 30 or 60 seconds, respectively.
If this isn’t an issue for you, just leave the field blank.
Use the event as the goal value for the conversion
When you turn on this feature, Google Analytics imports a value every time your goal criteria are met. If you don’t specify a value, Google will use the length of the call (in seconds) as the default value. This can be helpful if you’re trying to determine the relative value of your calls.
For example, if you have a long average call time, that means you are probably getting a lot of calls from very interested potential patients.
Of course, you’ll want to take into account the average amount of time that people end up on hold when you look at this number, but in general, if your goal value (call duration) is going up, your lead quality is probably going up, too.
Step 5: Import Goals as Conversions in AdWords
Now that you’ve set up your goal(s), we just need to set up your Analytics goal values to import into AdWords as conversions. Keep in mind that you’ll need to wait 2-5 after your goals are up and running before you can start importing them.
First, open AdWords and follow this path: Tools Panel > Conversion> Conversions actions > Google Analytics:
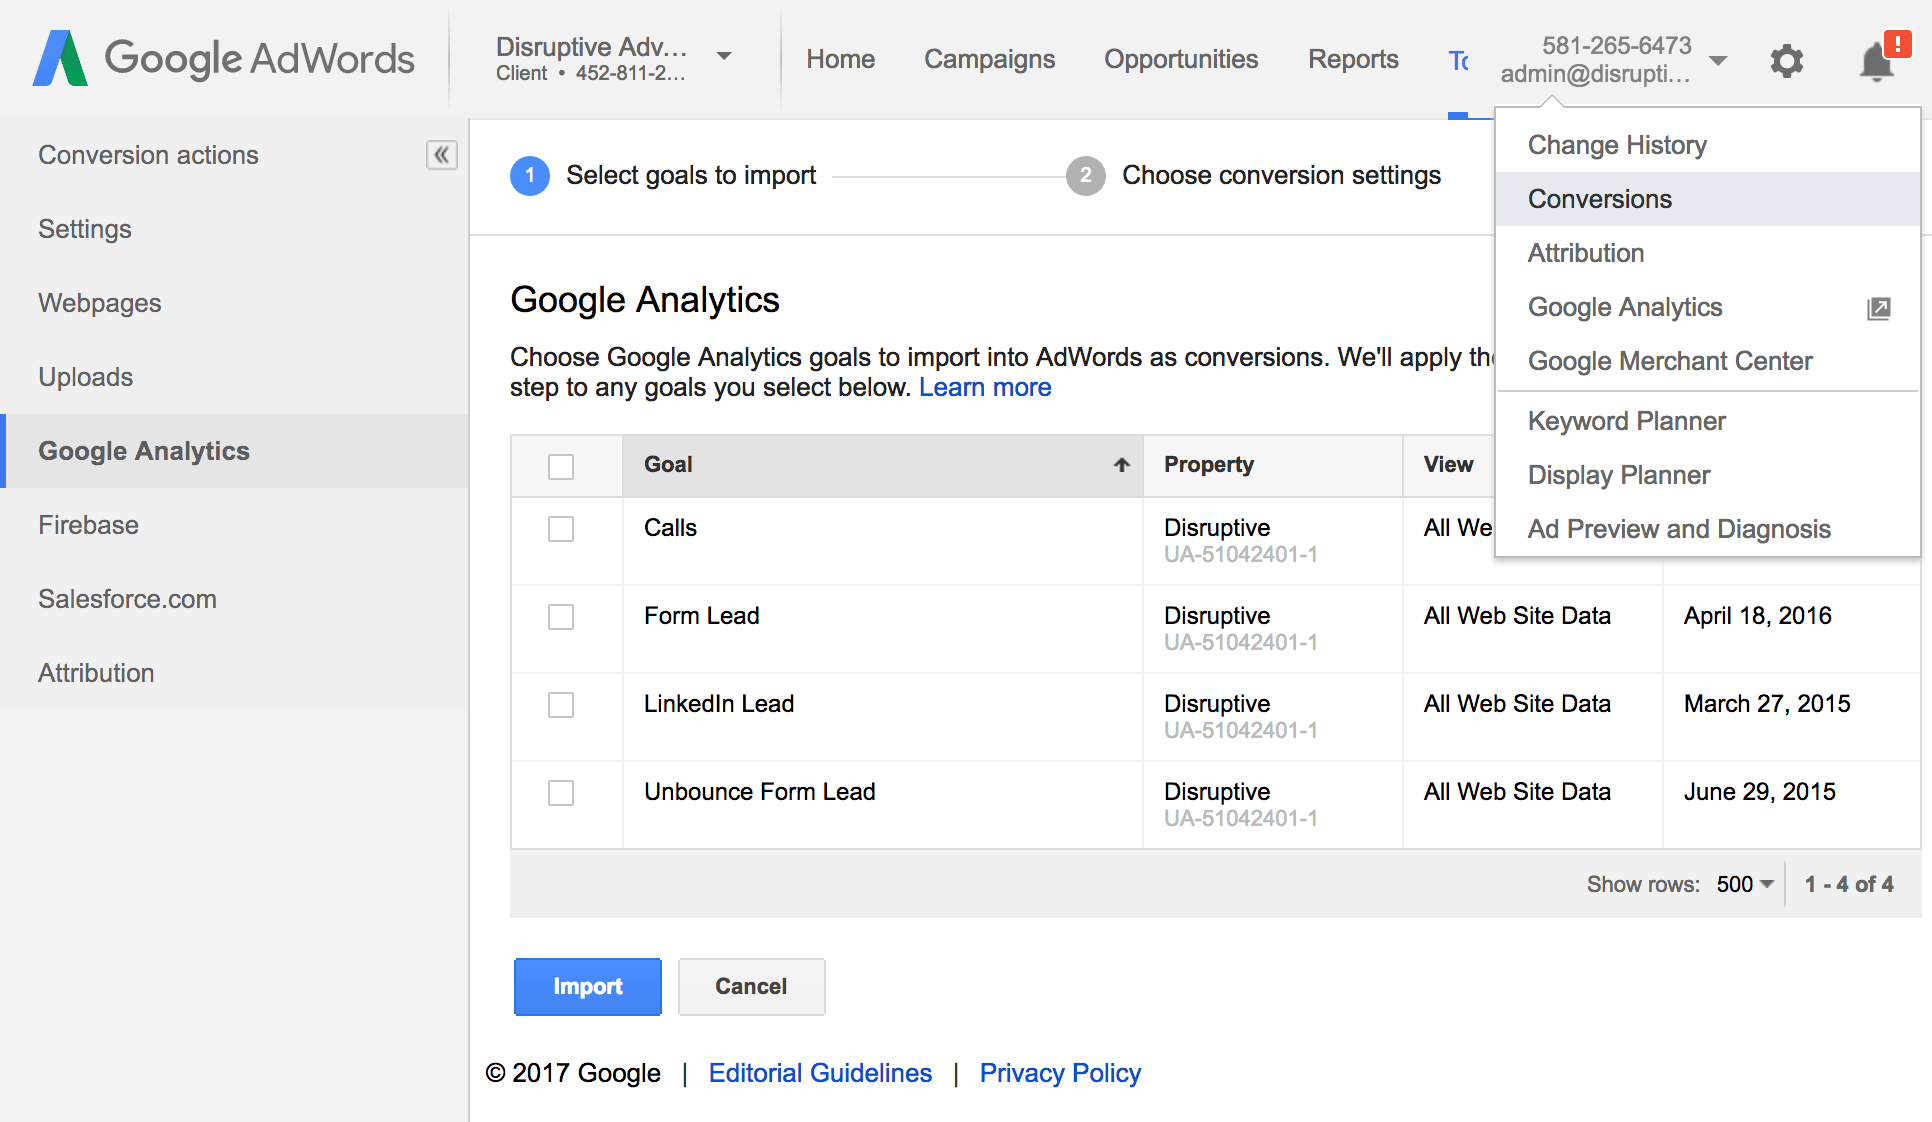
From there, all you have to do is select the goals you want to import as conversions and hit “Import.” If you haven’t set up conversions in AdWords before, here’s a quick tutorial video:
Finally, you’ll want to make sure that you have auto-tagging turned on.
To check this, click on the gear icon in your AdWords account, then click Account settings > Preferences and make sure that auto-tagging is enabled:
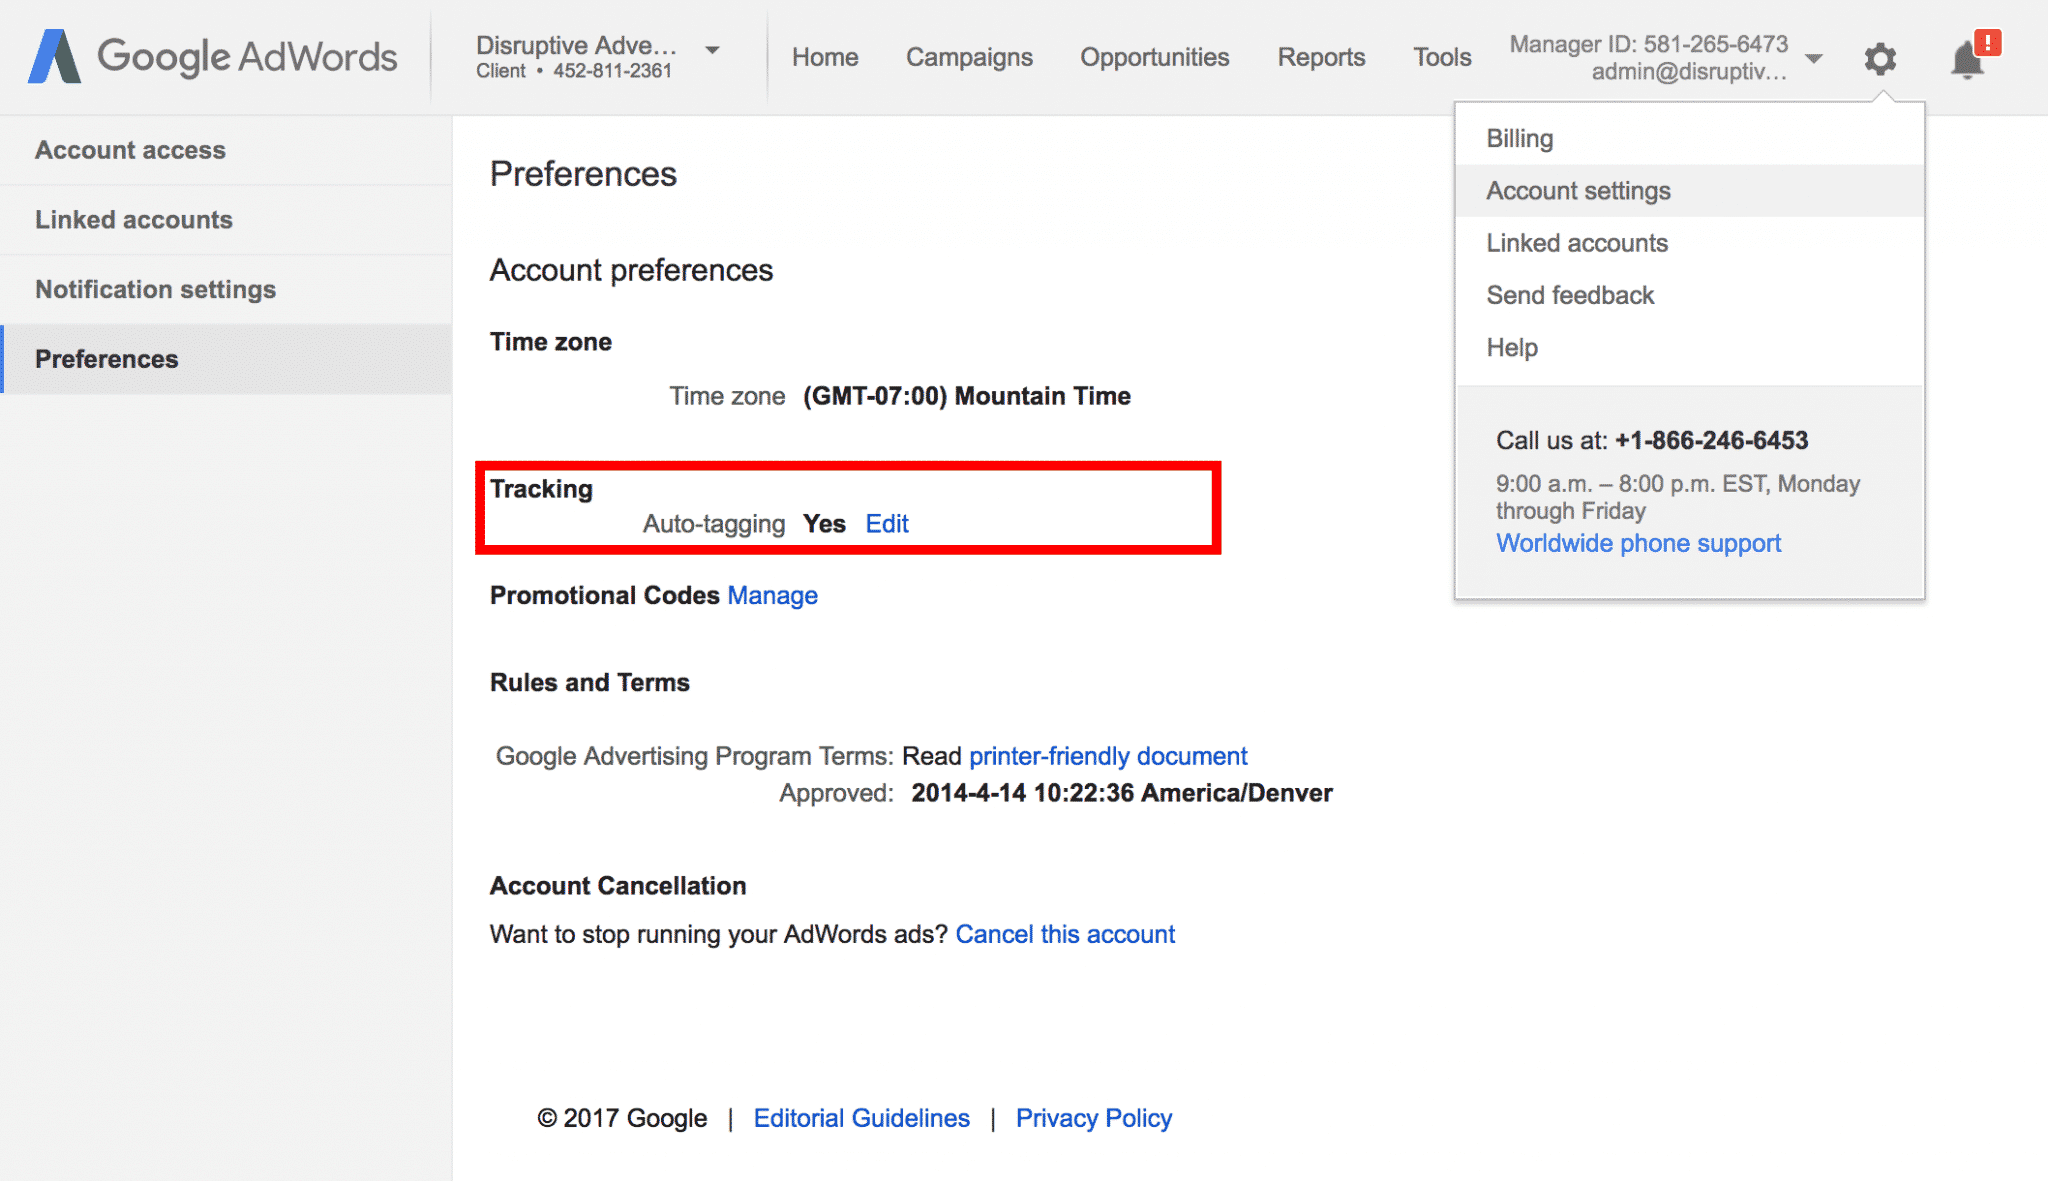
Once you’ve got all of this set up, you’ll be able to track calls all the way back to the keyword level. As a result, you’ll be able to optimize your keywords and maximize the effectiveness of your paid search campaigns.
Conclusion
Keyword-level call tracking and campaign optimization is 1 part of our 3-fold strategy for our dental clients. Using this approach, we are able to provide dozens of additional low-cost leads from our clients’ existing budgets.
So, while implementing keyword-level call tracking for dental ppc campaigns takes some extra effort, the results are certainly worth it.
By the way, if you’d like some extra help adding call tracking to your PPC campaigns or getting more leads for your dental practice, let me know here or in the comments! We’d love to help!


