Facebook Attribution Tool: Getting Started and Getting Results
by Cydney Hatch • March 23, 2019
Do you ever wonder how well you are “actually” doing when it comes to your Facebook ads and content?
Well, you are not alone.
As many marketer’s struggle to figure out how they measure and optimize their ads, let alone frantically try to connect with their target audience, Facebook created a tool that provides businesses with the best way to measure ad performance and understand how their marketing investment drives value both on and off Facebook.
Enter the Facebook Attribution tool.
If you are looking for a marketing tool that is designed to give marketers a holistic view of the customer journey, both on and off Facebook, this is the article to help you get started! In this article, you’ll learn how to use Facebook’s Attribution tool to better understand your customer’s journey across devices and channels and how you can use data to optimize your campaigns.
Let’s take a look!
What is the Facebook Attribution Tool?
To be straight and to the point, Facebook’s Attribution tool helps you as a business understand what is causing conversions, from where the traffic came from, what device they were on and if the content was organic or paid.
Facebook Attribution tool is designed to help you understand the impact of your content across multiple publishers, channels, and devices. For example, using the new data-driven attribution model, you can see how your ads on Facebook, Instagram, Audience Network and Messenger are contributing to your business strategy ROI.
On top of performance insights, Facebook Attribution allows you to see the full picture of your customer’s journey of cross-device measurement and make the right marketing decisions based on user behavior.
So, what is so special about this tool? In the next section, we’ll talk about what sets Facebook Attribution apart and why you should care.
Why Should You Care About the Facebook Attribution Tool?
So, you might be thinking that you already have Google Analytics and in-platform insights that can do the job, and you are right. Those are great tools to use for your marketing but Facebook’s Attribution model uses machine learning to account for incremental conversions driven by ads across its platforms.
“Using new data-driven attribution model, you can see how your ads on Facebook, Instagram, Audience Network and Messenger are contributing to incremental business results compared to if you were not running ads,” writes Facebook on its business blog.
So, outside of the obvious benefits Facebook will “sell” you on, you may consider using Facebook Attribution to:
-
Maximize your return on investment by re-allocating your budgets to campaigns that are most effective at driving conversions.
-
Increase your focus on the marketing tactics that work for your business.
-
Optimize placement, creative and audiences that are performing best.
If you are interested in starting this tool, you are in luck, below check out how you can set up this powerhouse of an analytics tool free of charge today!
How to Setup the Facebook Attribution Tool for Your Business
Although Facebook does a great job at making sign-ups and setups a breeze, below is a quick tutorial on how you set up and test your Facebook Attribution tool.
If you’ve already set up your Facebook pixel or Facebook SDK for app events, and you’ve already been using UTM parameters with your ads, no additional setup is required to use Facebook Attribution. Facebook Attribution also offers support for offline conversion events, which you can upload yourself or send to Facebook by using the Offline Conversions API.
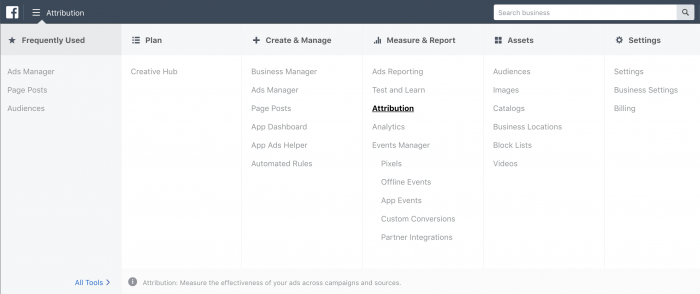
To set up the tool, you should see it within your Business Manager’s top menu. If you want a short cut, you can also, go here.
After you click “Get Started,” Facebook will first ask you how your business is organized (single business; multiple brands, verticals, or regions; or agency). Below are some of the major sections you need to set up correctly:
Selecting Your Conversions
Facebook Attribution uses the standard events and custom conversions you’ve already set up with your Facebook pixel, Facebook SDK for your app or Offline Conversions.
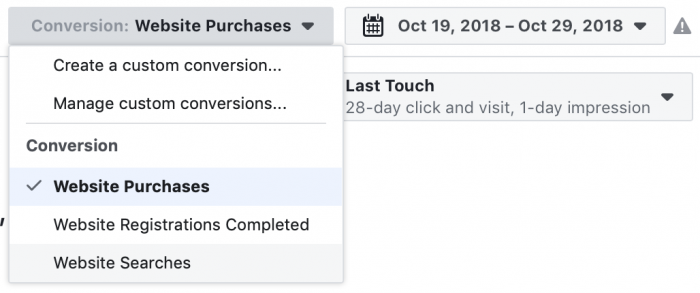
To select a conversion, click on the dropdown menu of conversion events in the top right. Then, select the conversion event you’d like to measure. If you’d like to use a custom conversion, select Create a custom conversion. You’ll be prompted to create a custom conversion in Events Manager.
Select Your Tracking Period
To best track your metrics you must select your reporting period.
To select your tracking period:
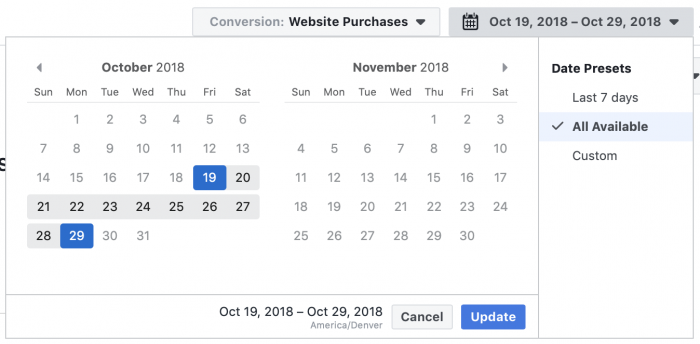
- Click on the dropdown menu of reporting periods in the top right.
- Select the reporting period you’d like to look at, either by selecting a date range on the calendar or by selecting a date preset.
- Click Update.
Your attribution reporting will include conversions that happened within this period of time (or date range), up to the last 90 days.
Select Your Attribution Model and Window
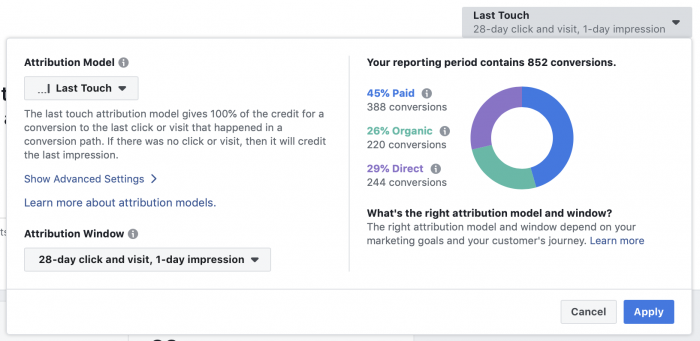
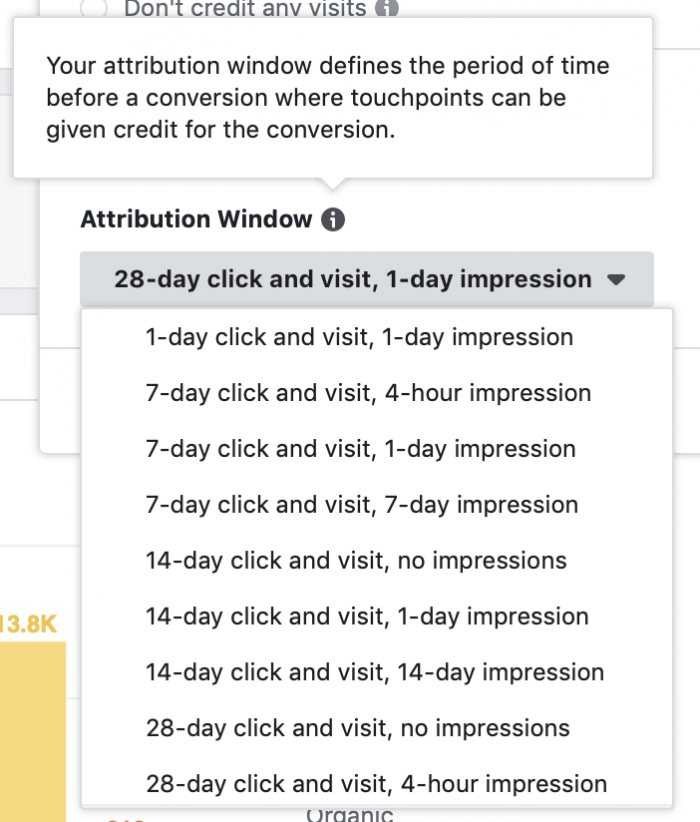
Attribution models determine how credit is given to touchpoints for a conversion. Attribution windows specify which touchpoints you want the attribution model to consider. The attribution window you select will be used to determine how long before a conversion the attribution model should look for touchpoints to give credit.
Different attribution models distribute different amounts of credit for conversions across your ads. Attribution models can be based on a rule or set of rules, or a statistical model. Rule-based models let you select the rule that will determine how conversions should be attributed to different touchpoints. Statistical models, like Facebook’s data-driven attribution model, look at historical data to determine credit and varies depending on your business.
By default, Facebook Attribution selects a last touch model with a 1-day impression and 28-day click window. For example, if you were to select purchase as your conversion, and apply this default attribution model and attribution window, your reporting will reflect purchases that can be attributed by Facebook to the last ad click that happened within 28 days prior to purchase or the last ad impression that occurred within 1 day of purchase, whichever happened last.
To select your attribution model and attribution window:
- Click on the dropdown menu displaying the default last touch model with a 1-day impression and 28-day click window.
- Under Attribution Model, select the attribution model you’d like to use.
- Under Attribution Window, select the attribution window you’d like to use.
- Select Apply.
Checking Your Setup
Under Settings, you can check your diagnostics and review your data sources, referring domains and third-party advertising platforms to make sure Facebook Attribution has been set up correctly:
-
Review Diagnostics: Check the status of data collection from both Facebook campaigns and off-Facebook sources. You can also troubleshoot any errors related to your pixels.
-
Review Data Sources: See which pixels and apps are associated with your business, as well as which events and custom conversions they’re receiving. You can also exclude data from any data sources you may not want to include in your attribution reporting. If you notice any issues with your data sources, go to Events Manager to investigate further.
-
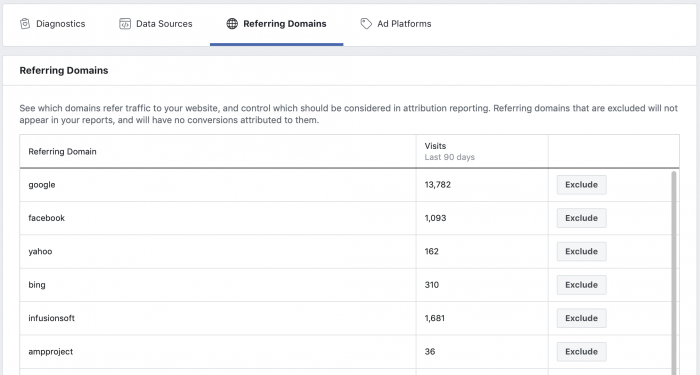
Review Referring Domains: Exclude data from any referring domains that you may not want to include in your attribution reporting. Learn more about reviewing your data sources and referring domains.
-
Add Ad Platforms: If you advertise across multiple publishers, you can add any third-party advertising platforms to Facebook Attribution. Adding platforms allows you to apply click and impression tags provided by Facebook to your off-Facebook media so that you can get a more complete picture of your conversion path. You’ll also have the option to upload campaign and cost mapping. Learn more about adding platforms.
Facebook Attribution: A Tour of the Tool
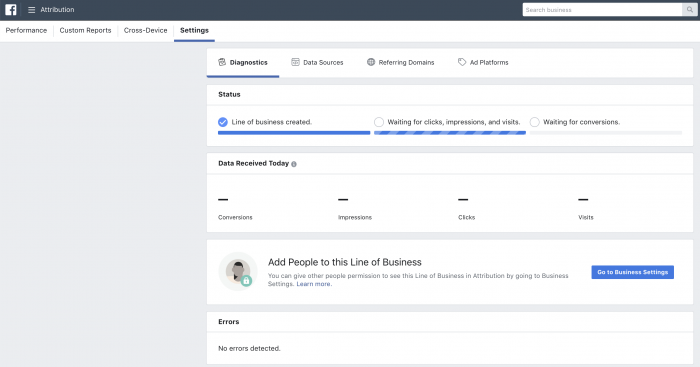
When you first see your tool interface you should see something empty like the photo below, but DO NOT PANIC!
Your numbers are not tumbling in as you will not get info for activity that occurs prior to configuring Facebook Attribution. Diagnostics won’t show you much of anything at first while the tool is building data from your data sources: It needs traffic and conversions.
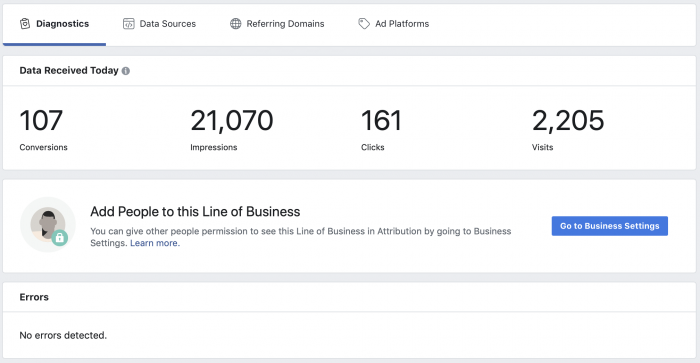
Eventually, though, it will look something like this:
You’ll see a reporting of conversions, impressions, clicks, visits, and errors (if there are any). So, while you wait, let’s take a look at the things you should know and understand about the interface before the data starts rolling in.
Reporting on Facebook Attribution is broken down into three sections:
-
Performance: Compare the impact of your ads across paid, organic and direct touchpoints. For campaigns on Facebook, Instagram, Messenger and Audience Network, you can use the data-driven attribution model, which is a statistical model developed by Facebook that gives a percentage of credit to each touchpoint based on the incremental impact they had on driving business goals.
-
Custom Reports: Create custom reports using custom breakdowns based on your campaign names.
-
Cross-Device: See how people engage with your business and paid media across devices.
All three of these sections helps you understand your campaign data in new and detailed ways. To add, let’s take a look at some of the other features of Facebook Attribution you should know:
Drop-down Menu: Conversion Types
At the top right of your results, you’ll notice three drop-downs that will allow you to filter and alter data based on your interests and needs.
First, you can choose the type of conversion or event that will receive focus in the data on that page.
What appears here will depend upon what events you use with your pixel.
Drop Down Menu: Tracked Time Calendar
You can also change the time period, as you would for your Ads Manager.
Select specific days or go with “Last 7 Days” or “All Available.”
Drop-down Controls: Attribution Model/Window
You can change the attribution model or window.
The default attribution model is “Last Touch,” which gives 100% of the credit for a conversion to the last click or visit that happened in a conversion path.
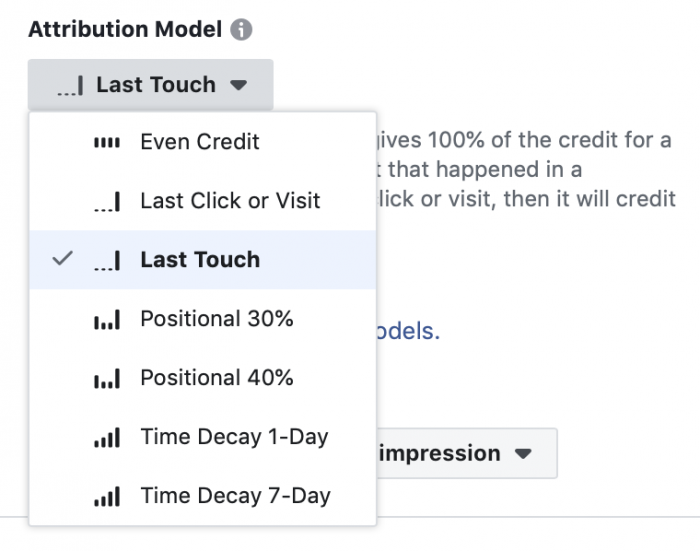
But, you can also select from several other options like seen below:
Here are your options and how they’re defined…
- Even Credit: gives an equal percentage of the credit for a conversion to each touchpoint on a conversion path.
- Last Click or Visit: gives 100% credit to the last click or visit that happened in a conversion path.
- Last Touch: gives 100% of the credit for a conversion to the last click or visit that happened in a conversion path. If there was no click or visit, then it will credit the last impression.
- Positional 30%: gives a specific percentage of the credit for a conversion to the first and last touchpoints in a conversion path, with the remaining credit distributed evenly across all other touchpoints.
- Positional 40%: gives a specific percentage of the credit for a conversion to the first and last touchpoints in a conversion path, with the remaining credit distributed evenly across all other touchpoints.
- Time Decay 1-Day: gives an increasing percentage of the credit for a conversion to touchpoints as they get closer in time to the conversion.
- Time Decay 7-Day: gives an increasing percentage of the credit for a conversion to touchpoints as they get closer in time to the conversion.
We can’t go much deeper on this topic here, but feel free to check out this tutorial on attribution models.
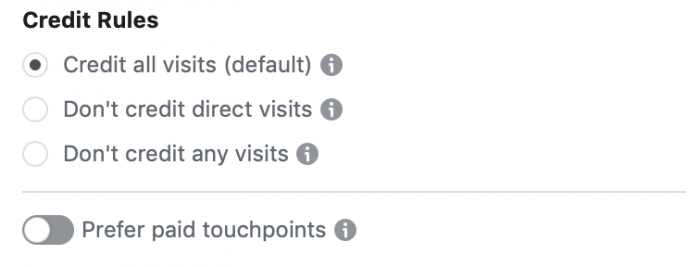
There are also some advanced settings…
And you can alter how Facebook defines a conversion based on the attribution window (default being within 28 days of a click or 1 day of a view).
Attribution windows tend to be an eye-opener for new advertisers. You may assume that Facebook counts conversions based on someone clicking an ad and immediately converting on your website. But the reality is that Facebook measures people who click ads and come back on another day—or don’t click, but view, and convert later that day.
Facebook Attribution Cross-Device: Quick Tour
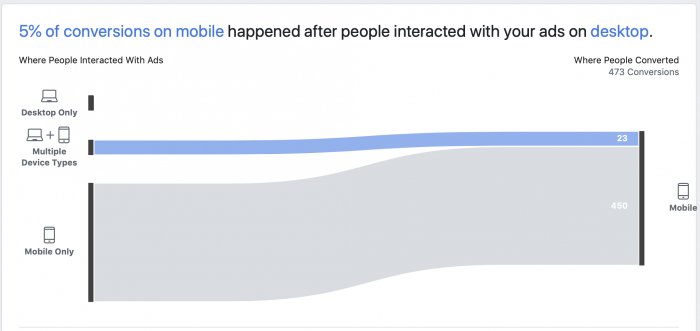
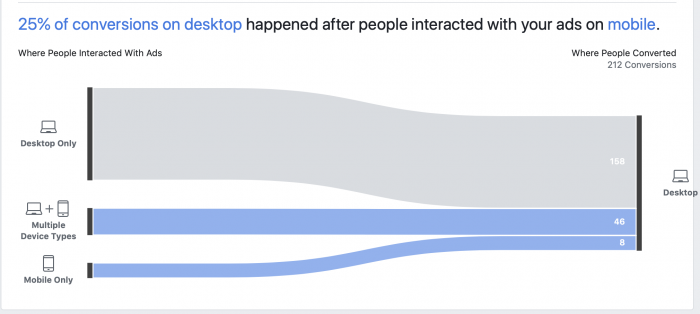
Finally, Cross-Device provides some top-level information regarding how interaction via multiple devices related to conversions. Here are examples…
How many conversion paths included both desktop and mobile?
How many conversions on mobile resulted after users interacted with your ads on desktop?
And what percentage of your conversions on desktop happened after users interacted with your ads on mobile?
That’s it. It’s interesting information, no doubt. But there’s no slicing and dicing of data the way there is in the other sections. At least, for now.
Facebook Attribution Tool: Your New Data Friend
This tool is quite impressive and I am sure that after you login and set things up, you might kick yourself for not getting it sooner.
The findings and data you get from the tool can improve your ad campaigns and wider marketing efforts based on the effectiveness of different channels and the sources within them. Just note that you will need to retrospectively take action on the findings from the attribution dashboard because you can’t adjust your campaigns from within the tool just yet.
But, we are just getting started!
If you want some help understanding the tool better, as I know this article probably brought up some questions, we would be happy to help you! Data is the name of the game when it comes to truly optimizing your Facebook ad campaigns so if you need help creating a plan, we are here.
Good luck data digging and improving your campaigns! We and Facebook are here for you!
Have you set up the Facebook Attribution Tool yet? What types of information are you finding? Share your tips and tricks below!


