6 AdWords Display Network Tips You Need To Try
by Megan Fields • January 7, 2015
Take advantage of visuals with these AdWords display network tips
The Google Display Network allows you to place your ads on various sites across the internet such as blogs, news sites, or any other targeted placements that allow advertising so that you can reach more potential customers.
If done the right way, the Google Display Network can help boost your business in a very significant way. It allows you to advertise to the people who are most likely to be interested in your product or service, by placing your ads on pages that are relevant to what you’re selling.
Below are six tips I’ve found to be very useful when looking to achieve success on the AdWords display network.
#1 – Use Demographic Targeting
The Display Network allows you to target by interests, gender, age, parental status, topics, etc. This can help lead to higher conversions as you refine your settings and make them directly relevant to the target market you’re going after.
For example, let’s say that you’re a legit massage clinic. You know that most people who get massages are single females between the ages of 18-24. By knowing the gender, age and parental status of the people who are most likely to be interested in your products and services, you will want to use demographic targeting to reach this very narrow audience. To do this, go into “Display Network”, “Demographics”, then “+Targeting”.
I would highly recommend that you use different Demographic Targeting settings in different ad groups to see how each ad group performs.
#2 – Have A Strong Call To Action
The call to action (CTA) on your website or landing page should be the same call to action that you use in your image ads. Make sure that those who see your image ad know what you want them to do. There should be a strong call to action that urges those who see your ad to do exactly what your goal for them converting on your landing page is.
For example, if your goal is to have someone sign up to get a free guide your company has produced, then the image ad should read “Get My Free Guide!” This way, customers are more likely to click on your ads with the intention to actually convert once they’re on your landing page.
#3 – Stay On Top Of Your Placements
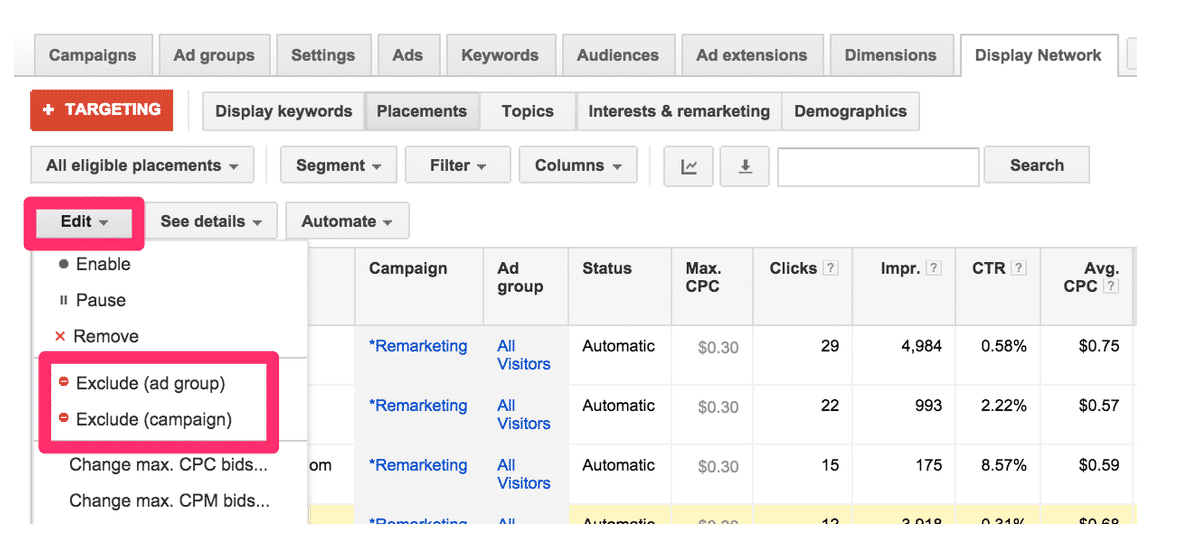
To ensure that your ads are only going to be on relevant placements, make sure to go into your AdWords account on a regular basis and look at which placements (URLs) your ads are showing up for. Here, you can exclude placements that are irrelevant. You can also use Placement Targeting to choose the exact websites that you want your ads to show up on.
To take a look at your automatic placements and see which sites your ads are showing on, go to “Dimensions” tab, and then “Automatic placements” from the dropdown menu.
Here, you will find all of the sites that your ads are showing up on and which ad groups they are showing for.
If you find any irrelevant placements, you can exclude them at either the ad group or campaign level. To do that, you can select which placements you want to exclude, then go to “Edit”, and then exclude at whichever level you want.
#4 – Test All Image Sizes
When it comes to the best AdWords display network tips, this one is a no brainer. To make sure that your ads are showing as often as possible, you are going to want to make sure that you are creating ads in every size that Google allows you to.
Once running, you can then see which image sizes perform the best, and make good data driven decisions as to which image ad sizes to continue showing. These are the different pixel size variations that you are able to create image ads for:
- Vertical rectangle: 240 x 400
- Mobile leaderboard: 320 x 50
- Banner: 468 x 60
- Leaderboard: 728 x 90
- Square: 250 x 250
- Small square: 200 x 200
- Large rectangle: 336 x 280
- Inline rectangle: 300 x 250
- Skyscraper: 120 x 600
- Wide skyscraper: 160 x 600
- Half-page: 300 x 600
- Large leaderboard: 970 x 90
- Large mobile banner: 320 x 100
- Billboard: 970 x 250
- Portrait: 300 x 1050
It is important to also keep in mind that your Image Ads must be 150 kb or smaller, and the file types allowed are .JPEGs, .PNGs, .GIFs, and .JPGs.
#5 – Make Your Ads Match The Company’s Website or Landing Page
Your image ads should match the brand and feel of your company’s website or landing page. You may want to use an image from your website or landing page and make sure that your colors are the same on both your ads and your site.
Sometimes it’s a good idea to use your image ads to test new colorways and layouts and if the click through rate is high, use this data to change your landing page to match the new ad. Otherwise, you can spend a ton of time creating ad and landing page combinations that don’t turn into anything.
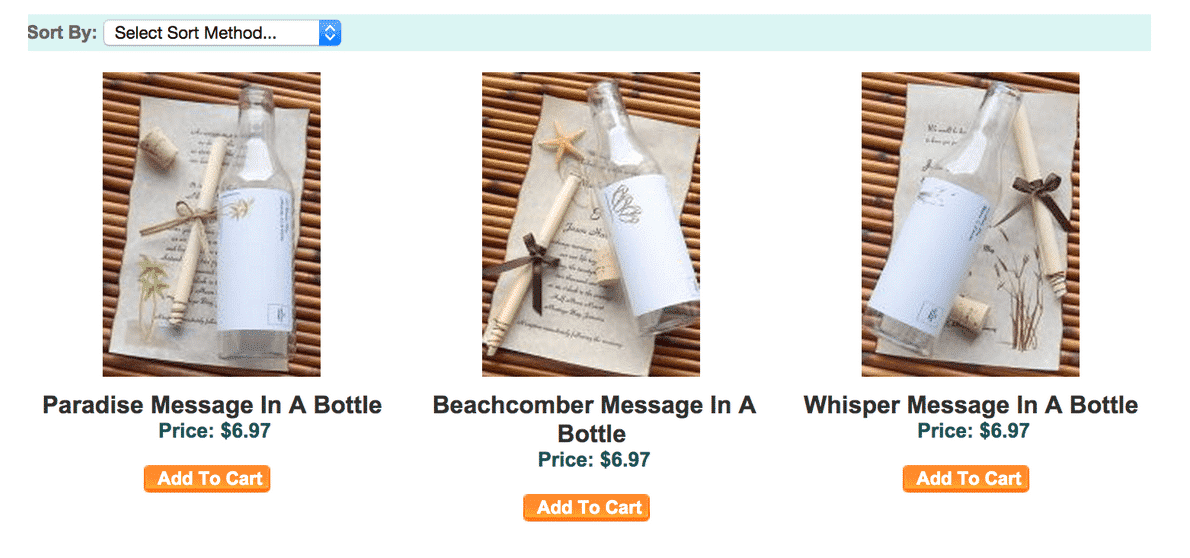
For example, let’s take a look at Message In A Bottle’s website that highlights their wedding invitations. Here is a screenshot from their page:
Here is an example of a relevant image ad for this client:
As you can see, this ad goes hand in hand with the feel of the website or landing page.
The brown and teal colors used in this image ad are the same colors found on the website. The image itself was directly pulled from the website, and so was the logo. The message is directly targeting “wedding invitations” specifically and the call to action is trying to bring the customer to order one of the wedding invitations, which is what the website intends for you to do.
It is important to make sure that your colors, messaging, and call to action on your image ads are directly correlated to the colors, messaging, and call to action on your website.
#6 – Set Up A Remarketing Campaign
Remarketing campaigns are one of the easiest ways to bring you a good return on investment. It allows you to reach the customers who have already been to your site but didn’t convert, and continues to advertise to them through the Display Network by showing relevant ads on websites, mobile apps, and on Google Search.
If you haven’t already started using the AdWords display network tips in your campaigns, now is the time to do so!


