How To Use Shopify: A Beginners Shopify Tutorial
by Cydney Hatch • June 14, 2018
If you are familiar with ecommerce software and you’re selling something online, you must have come across Shopify. It’s an all-in-one ecommerce software for various types of businesses.
If you wish to set up a Shopify account for selling online products, you will need to learn how to use Shopify. This cloud-based platform with extremely low startup costs and an easy-to-comprehend interface lets you sell, ship, and promote your business products. Moreover, you can efficiently run your online store for low prices, such as $9/month.
However, setting up an online store with Shopify may feel like a daunting task. But don’t worry! Shopify simplifies the setup process of an online store. So if you have never set up an ecommerce store, you just need a detailed Shopify tutorial to get on track.
If you wish to learn how to use Shopify, this article serves as the perfect Shopify tutorial to help answer all your questions about this online service.

What is Shopify?
Before you learn how to use Shopify in our Shopify tutorial, you must learn what this ecommerce service provides.
Ecommerce Management
Shopify is an ecommerce online service for setting up online stores for businesses. You can use this platform to sell your products as it manages everything from payments, marketing, checkouts, and shipping procedures.
You don’t have to worry about your online store at all when you’re using Shopify. It’s an excellent solution for all types of ecommerce businesses because it serves as a single interface that allows you to organize your store in every aspect.
Ecommerce Website Builder
However, since Shopify offers so many services related to online business, it is easy to get confused. If you’re new to online business platforms with less information about web development, Shopify’s detailed website builder will be of help. It has customizable templates that help you represent your business. You can also use these customizable templates to promote your online business.
14-Day Free Trial and Helpful Support
Before you invest in this ecommerce software, you must try it out. This is why Shopify offers a 14-day free trial with an easy setup process. In addition to this, Shopify has various helpful articles and chat rooms that will assist you in knowing everything about this platform. Thus, an extensive Shopify plan helps you overcome the challenges of your ecommerce business.

How Much Does Shopify Cost?
Shopify offers a variety of services for online stores. Similar platforms often charge you a lot for offering various services. You must be wondering: How much does Shopify cost and do you have to pay for every service?

Shopify is an extremely affordable ecommerce platform. It has flexible pricing plans that allow every type of business to take maximum advantage of its single interface, applications, and various features that it offers. Shopify has four main pricing tiers that are based on functionality, ecommerce features, and tools that you use to grow your online store:
- Shopify Lite: For $9 per month
- Basic Shopify: For $29 per month
- Shopify: For $79 per month
- Advanced Shopify: For $299 per month
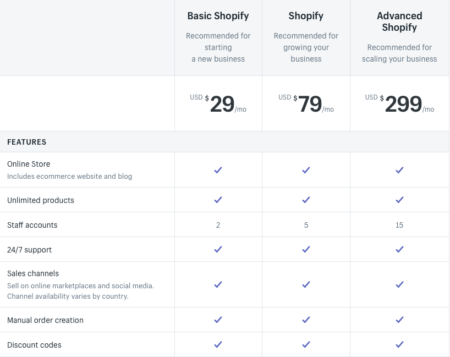
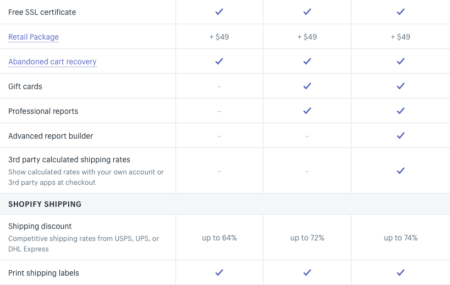
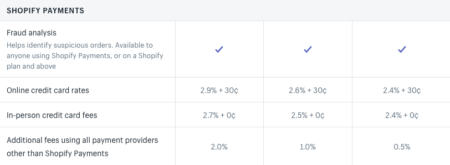
Besides the four pricing plans, Shopify also offers Shopify Plus, called an enterprise-grade solution. It is for large businesses.
In addition, the four Shopify plans above don’t have a setup fee and come with 24/7 online support. Shop owners can upload unlimited products due to the unlimited file storage. You also don’t have to pay bandwidth fees or any type of transaction fees when you use Shopify Payments. These factors make Shopify extremely affordable. Moreover, you can add a website template or app from the Shopify store, which has a large collection of free and paid templates.
You can upgrade, cancel, or downgrade your Shopify plan from month to month or whenever you wish.
Shopify Tutorial: How To Use Shopify
Now that you have learned about this ecommerce service and its cost, you should learn how to use Shopify. You can read this detailed Shopify tutorial to create an account and an online store for your business.
Create an Account on Shopify
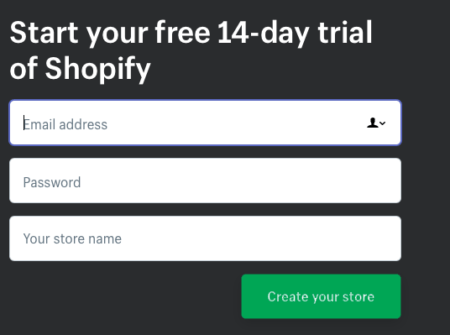
You need to visit the Shopify website, which offers a sign-up form that lets you create your Shopify account.
Next, you have to enter some required details. Click on the “create your store now” option to get started. Enter the email address for your business and create a strong password for the account. You also have to come up with a Shopify store name. Besides this, you have to provide additional information such as your name, country, address, and contact number.
Then, the website will ask you what you’re selling online. It is a dropdown question, so you can choose your answer accordingly. The website will also ask about the product you want to sell. You can mention the products or go with the option that states that you’re unsure. Once you complete this, click “I’m done.”
Set Up an Online Store
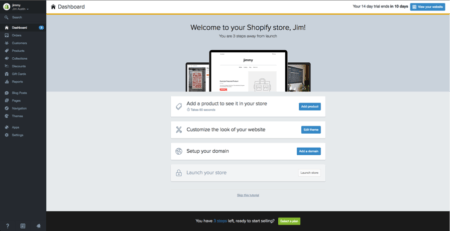
The most important part of the Shopify tutorial is setting up your online shop. Once you have provided the initial information for signing up, you will be directed to your store’s admin screen on the existing website.
This screen is your ecommerce business command center. This is where you start to customize your store. For example, you can add products and set up payment methods such as accepting credit cards or cash on delivery. This is also where you also provide information about payment gateways and shipping rates.
Choose Your Shopify Storefront Theme
You’re not going to make a strong impact on your customers if your business does not have a branded storefront up and running. This is where Shopify brings in customized templates to enhance your storefront’s ecommerce web design. Shopify even has its theme store.
Free vs. Premium Storefront Themes
All Shopify themes are customizable. The theme templates come with self-help articles, a design team, and Shopify chat which ensures that you thoroughly understand every step of setting up your online store. You can also get premium themes but you’ll have to pay for them.
Premium themes have more modifications. However, modifying the themes requires some expertise. But since Shopify is an all-in-one solution, there are Shopify Experts that can help you customize the themes. All you have to do is find a theme that matches your business.
But how do you find the perfect theme? Our Shopify tutorial will help you pick a theme for your business brand.
How To Select a Theme for Your Business Brand
Selecting a theme for your Shopify account is easy. Visit Shopify’s Theme Store and you’ll find about 180 themes. Some of them are free and some are premium. Pick the one that suits your business.
You can filter the themes by price, popularity, industry, and features. After finding the theme that you like best, click the theme’s sample image. Once you click on it, you will get all the information about the theme. Follow the instructions below afterward:
- Click “view demo” to preview the theme
- Read customer reviews to understand the theme better
- Once you find a suitable theme for your business, click on the green button
- Shopify will ask for confirmation before installing the theme, so confirm to install
- Click on “publish as my shop’s theme” while installing
- Add your business logos, product photography, videos, fonts, product descriptions, videos, and more customizable content
Here are some common features you can add to your online store:
- Logos
- Product collection
- Colour schemes
- Fonts

Add the Products to Your Online Store
After you’re done setting up your site, you can add products to your online store.
First, you have to navigate a bar at the far left — when you can click on “products.” From there, you’ll see an “add a product” button at the top right corner of the page. You can use this screen to add as many details as you need.
You should write detailed, helpful, and descriptive information about every product. Good product descriptions can convince your customers to add the products to their shopping cart. You can also look for product keywords and use them cleverly in product descriptions.
Next, you have to upload the product pictures. When you are done uploading the pictures, you may also rearrange them. So you do not have to initially worry about the correct order when you’re uploading them. Remember always to post high-quality pictures. Good product photography can attract customers. In addition, professional photography ensures that the sizing and styling are just right.
Once you fill out everything, you can click on the “save product” option at the bottom right corner.
Set Up a Payment Method
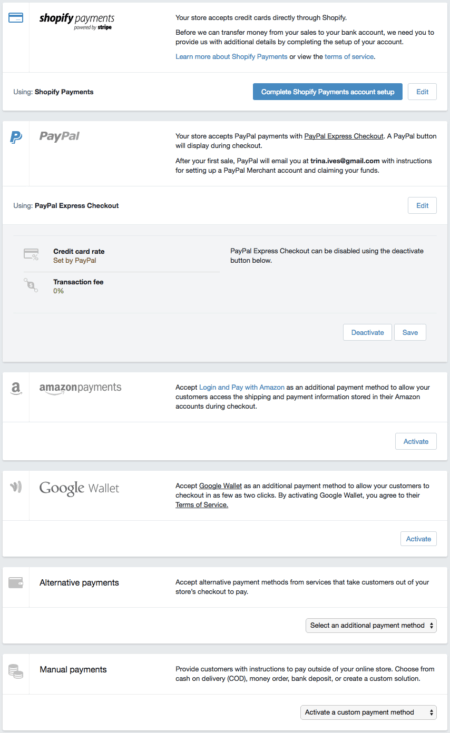
Now that you have made your Shopify account with product pictures and prices, you may think that you’ve reached the last step of your Shopify tutorial. But you still need to set up the payment method. Payment gateways allow customers to purchase from a Shopify storefront.
Customers should be able to add the products to the cart then click on the buy button. They must then be directed to the payment page. You can choose a payment gateway for this step. There are various payment methods with different features, rules, and regulations. They all offer different prices.
Here are some things you should consider before finalizing a payment processor.
- Credit card: Payment gateways accept various cards, so you should know the card your payment getaway can accept. Most payment gateways accept Mastercard and Visa. Some payment gateways also accept American Express and PayPal.
- Offsite Checkout: Payments from other servers are allowed for Shopify themes. But customers are redirected to the other server, which may be inconvenient.
- Transaction fees: Shopify keeps a flat fee when you make payments. This small percentage of payments is charged for using their service. You do not have to pay a transaction fee for using Shopify Payments. However, if you choose external payment methods, it costs you 0.5% to 2% for Shopify, Advanced Shopify, and Basic Shopify plans.
Click on the “complete Shopify Payments account setup” option in the settings to complete setting up the payment method of your online store.
Make Your Store Live
When you are done setting up an account with a point of sale, payment methods, and products, it is time to make your Shopify store live. But before you make it live, there are some important considerations that store owners, like you, should know.
Taxes
Taxes are an important consideration.
First, access the products page of your store’s admin panel. Click on the given product’s name and scroll to the “inventory & variants” option. Next, you have to click on an edit link option next to “product variant.” It will open the dialog window. Mark “charge taxes” and “requires shipping” options for your products.
If you want to ship the products to the customers, you also have to enter the weight of products in the given field.
Shipping
Your shipping options should meet your customers’ needs. It is easy to lose your customers with amazing alternatives for such services, such as Amazon Prime. If you do not provide them with practical in-demand shipping methods, you might lose sales. Ecommerce platforms such as Shopify only charge the customers according to the shipping rules you set up on your admin page.
Make sure that you correctly set up payment methods and shipping plans. You can check out these settings via the shipping page.
Final Words
Now that you have learned how to use Shopify through our detailed Shopify tutorial, here’s a tip to enhance your store’s functionality: While Shopify has many premium apps and some free apps that will help you increase revenue, you can also create a store on your Facebook page to integrate and eventually increase your sales.
If you want more help with the setup process, sales process, or customization process, Shopify Experts are always there to help you! We hope our Shopify tutorial helps you set up your desired business account.
